It's safe to say that Andy has made his way through life so far by pushing himself and deliberately pitting...
Read More3:8 :: Big wall climbing, real-life survival and accidental comedy with Andy Kirkpatrick
Sunday, 14 May 2023


Bestseller
Coastal Foraging
The Coastal Foraging Walk from Original Outdoors is an introduction to edible plants, seaweeds, shellfish and other wild foods on the beaches of North Wales.
Bestseller
Foraging and Wild Food
The Foraging and Wild Foods Course from Original Outdoors is an introduction to edible plants, fungi and other wild foods in the fields and woodlands of North Wales. It is, by far, our most popular course.
New for 2023
Modern Bushcraft
Bushcraft and Wilderness Skills courses for the modern age. Courses that focus on the equipment, skills and mindset for practising bushcraft in the 21st century.

Bespoke
Private Training
All of our standard public courses are available to book as private events for individuals or groups. We have availability all year round and can recommend timings and locations to suit your needs.

3:7 :: Gear advice, time-travelling explorers and book recommendations
Richard Prideaux answers questions from our patrons, discord members and audience with a backdrop of crackling campfire, interfering dogs and...
Read More
3:6 :: UK military survival training with Chris Smart
Chris Smart is ex-military and now runs 112 Survival, a survival training company based out of a wood in Shropshire,...
Read More
3:5 :: Assumption of Function
This episode is delving into the importance of not making assumptions. You've bought a brand new stove for an outing...
Read More- Published in All Blog Posts, Emergency and Safety, Modern Outdoor Survival, Personal, Podcasts, Skills
No Comments
3:7 :: Gear advice, time-travelling explorers and book recommendations
Thursday, 04 May 2023


Bestseller
Coastal Foraging
The Coastal Foraging Walk from Original Outdoors is an introduction to edible plants, seaweeds, shellfish and other wild foods on the beaches of North Wales.
Bestseller
Foraging and Wild Food
The Foraging and Wild Foods Course from Original Outdoors is an introduction to edible plants, fungi and other wild foods in the fields and woodlands of North Wales. It is, by far, our most popular course.
New for 2023
Modern Bushcraft
Bushcraft and Wilderness Skills courses for the modern age. Courses that focus on the equipment, skills and mindset for practising bushcraft in the 21st century.
Bespoke
Private Training
All of our standard public courses are available to book as private events for individuals or groups. We have availability all year round and can recommend timings and locations to suit your needs.

3:8 :: Big wall climbing, real-life survival and accidental comedy with Andy Kirkpatrick
It's safe to say that Andy has made his way through life so far by pushing himself and deliberately pitting...
Read More
3:7 :: Gear advice, time-travelling explorers and book recommendations
Richard Prideaux answers questions from our patrons, discord members and audience with a backdrop of crackling campfire, interfering dogs and...
Read More
3:6 :: UK military survival training with Chris Smart
Chris Smart is ex-military and now runs 112 Survival, a survival training company based out of a wood in Shropshire,...
Read More
3:5 :: Assumption of Function
This episode is delving into the importance of not making assumptions. You've bought a brand new stove for an outing...
Read More- Published in All Blog Posts, Emergency and Safety, Modern Outdoor Survival, Personal, Podcasts, Skills
3:6 :: UK military survival training with Chris Smart
Friday, 14 April 2023


Bestseller
Coastal Foraging
The Coastal Foraging Walk from Original Outdoors is an introduction to edible plants, seaweeds, shellfish and other wild foods on the beaches of North Wales.
Bestseller
Foraging and Wild Food
The Foraging and Wild Foods Course from Original Outdoors is an introduction to edible plants, fungi and other wild foods in the fields and woodlands of North Wales. It is, by far, our most popular course.
New for 2023
Modern Bushcraft
Bushcraft and Wilderness Skills courses for the modern age. Courses that focus on the equipment, skills and mindset for practising bushcraft in the 21st century.
Bespoke
Private Training
All of our standard public courses are available to book as private events for individuals or groups. We have availability all year round and can recommend timings and locations to suit your needs.
3:8 :: Big wall climbing, real-life survival and accidental comedy with Andy Kirkpatrick
It's safe to say that Andy has made his way through life so far by pushing himself and deliberately pitting...
Read More
3:7 :: Gear advice, time-travelling explorers and book recommendations
Richard Prideaux answers questions from our patrons, discord members and audience with a backdrop of crackling campfire, interfering dogs and...
Read More
3:6 :: UK military survival training with Chris Smart
Chris Smart is ex-military and now runs 112 Survival, a survival training company based out of a wood in Shropshire,...
Read More
3:5 :: Assumption of Function
This episode is delving into the importance of not making assumptions. You've bought a brand new stove for an outing...
Read More- Published in All Blog Posts, Emergency and Safety, Modern Outdoor Survival, Personal, Podcasts, Skills
Survival Tips for Travellers
Tuesday, 30 October 2018

[vc_row][vc_column][vc_column_text]
Survival Tips For Travellers
Quick tips that SHOULD work for anybody travelling to anywhere
Earlier this week I was asked by a writer for an upcoming Lonely Planet book called Travel Goals. The request was for some simple tips on ‘wilderness survival’ and…, well I’ll let you read for yourself:[/vc_column_text][vc_column_text]
I am getting in touch as I am currently looking to include an ‘expert voice’ in a feature I am writing for a new Lonely Planet book called Travel Goals.
The feature is on survival in the wilderness, including around five/six expert tips. I’m afraid, though, that there is a fairly tight turnaround and I would need your input by tomorrow, if possible – so sorry for the short notice!
These are the points I’d love to cover and have your opinion on:
– What would be your top tips for surviving in the wilderness? Please feel free to go into step-by step detail on everything from foraging (and what to watch out for) to lighting a fire without matches, building a shelter, using medicinal plants, using a map and compass, mountain navigation, river crossings, etc. Our aim is to present you as the expert here and hopefully give you (and Wales!) some great exposure.
I look forward to hearing from you.
[/vc_column_text][vc_column_text]As you have probably guessed – what Lonely Planet wanted was somebody to write some unique content for them (for free) and then for them to make money from selling that content as one of the ‘expert voices’ in the book. Apparently they “never pay interviewees (they benefit in terms of exposure)“. Well, quite. Exposure can be a dangerous thing – too much of it and it can kill you. That’s why our survival courses always include some training in awareness and prevention of hypothermia.
However, it prompted me to write this post – are there any generic survival tips I can give for people travelling the globe? Something quick and easy to read and as applicable to someone travelling to Mongolia as it would be to Mali? Tips that would work in Belgium or Belize?
It turns out I can. So here are some of those top travelling survival tips – given away to you for free – but I like you, so it’s OK.[/vc_column_text][/vc_column][/vc_row][vc_row][vc_column][vc_separator][/vc_column][/vc_row][vc_row][vc_column width=”1/4″][vc_single_image image=”7761″ img_size=”medium” alignment=”center”][/vc_column][vc_column width=”3/4″][vc_column_text]
Knowledge weighs nothing
It’s easy to get distracted by shiny equipment and expensive outdoor toys, but the really important survival skills rely on good decision making and improvisation. Basic first aid training is easy to access and the lifesaving basics of being able to clear an airway, stop a major bleed and perform CPR requires only a few hours of training and either very basic or improvised equipment. When I teach people about survival in different environments there is always a lot more time spent on learning how to make good decisions and plan well rather than relying on gear and equipment.
[/vc_column_text][/vc_column][/vc_row][vc_row][vc_column][vc_separator][/vc_column][/vc_row][vc_row][vc_column width=”1/4″][vc_single_image image=”9425″ img_size=”medium” alignment=”center”][/vc_column][vc_column width=”3/4″][vc_column_text]
Pay attention to maps
Unless you’re going out do something like climb a mountain or travel along a certain route it’s unlikely that you will be carrying a detailed map of the area with you. Smartphones and online map sources are great but rely on access to the internet, or at the very least a functioning device with a charged battery. You can at least retain a good idea of what is around you by paying attention to any tourist or information maps you pass – probably found at ‘hub’ sites like fuel stops, railway and bus stations and some tourist sites. You don’t have to memorise each one, but it’s worth checking where important places are relative to your current position – which direction is the nearest town where you are likely to find medical care? Is that waterfall more than, or less than, halfway along the next section of trail? Does this road head more to the north, or more to the east? It may seem trivial at the time but being able to quickly orientate yourself in the direction of the nearest help will remove a lot of confusion and uncertainty from an emergency situation.[/vc_column_text][/vc_column][/vc_row][vc_row][vc_column][vc_separator][/vc_column][/vc_row][vc_row][vc_column width=”1/4″][vc_single_image image=”7157″ img_size=”medium” alignment=”center”][/vc_column][vc_column width=”3/4″][vc_column_text]
Carry the fire with you
If you are travelling to somewhere where there is an outside chance that if you are stranded you may need to light a fire to save your life then carry some form of firelighting with you. This could just be a box of matches, but it would be better to carry something that’s easy to use, is reliable and doesn’t weigh very much. It’s also worth taking something to help get that fire going – dry firewood can always be gathered without cutting tools, but finding dry tinder can be very hard in some environments. When I travel to places like that I take several cigarette lighters (the type with a spark wheel) and scatter them throughout my kit along with some strips of bicycle innertube. They’re cheap, light and small and you can put one in your first aid kit, one in your rucksack lid and one in something you ALWAYS have with you – like the bag you carry your camera in perhaps?[/vc_column_text][/vc_column][/vc_row][vc_row][vc_column][vc_separator][/vc_column][/vc_row][vc_row][vc_column width=”1/4″][vc_single_image image=”9043″ img_size=”medium” alignment=”center”][/vc_column][vc_column width=”3/4″][vc_column_text]
File a ‘flight plan’
When travelling in remote places away from other humans and access to reliable communications the best chance of someone getting help to you when you need is from somebody reporting you missing or overdue. If you are planning on returning to a hostel or other accommodation after completing a hike or other excursion see if there is a facility for you to leave notes of your intended route, your details and when you expect to be home. That way if you don’t return then there is at least SOMEBODY who will send help to the right area. You MUST make sure that you check in with that person when you get back from your trip – plenty of SAR missions have been sent out in search of somebody who had just forgotten to tell their accommodation that they were back safely![/vc_column_text][/vc_column][/vc_row][vc_row][vc_column][vc_separator][/vc_column][/vc_row][vc_row][vc_column width=”1/4″][vc_single_image image=”8976″ img_size=”medium” alignment=”center”][/vc_column][vc_column width=”3/4″][vc_column_text]
You don’t have to go far to get into trouble
When most people start to think about ‘survival situations’ they tend to picture themselves as a castaway on some strangely uninhabited island or shivering atop a remote mountain. The reality is more likely to come from doing something fairly ‘safe’, like hiking along a trail not too far from a busy tourist area or exploring an area away from where you left your kit. A broken ankle or just misplaced footwear can incapacitate you very quickly in a place where you thought was ‘just a short walk’. Don’t assume the survival situation will be a big, dramatic moment – it’s going to arrive dressed up as something fairly boring and ordinary. Consider the ‘penalty of failure’ for what you’re about to do – although considering and working within that risk are an important part of any adventure.[/vc_column_text][/vc_column][/vc_row][vc_row][vc_column][vc_separator][/vc_column][/vc_row][vc_row][vc_column][vc_column_text]
Make Good Decisions at the Right Times
Survival training is fun. It often involves knives and fire and learning weird and fun skills in the woods or halfway up a mountain. But that’s not the lesson that we hope our course participants take away with them – what we want is for them to take away one VERY important lesson:
MAKE
GOOD
DECISIONS
Good decisions before you go out. Good decisions whilst you are there. Good decisions when you are back at home and planning the next trip. That’s all it is really – and the single best survival tip I can give any traveller is to learn how to make good decisions. That might mean learning about the potential environmental risks of the country you are travelling to – or how to do some basic first aid so you can make good decisions about whcih way round D,R,A,B, and C go.
I can outline every potential survival situation here, but you can take a good look at where you’re going to, what you’re planning to do when you get there and then decide if you are equipped to make those decisions yet.
[/vc_column_text][/vc_column][/vc_row][vc_row][vc_column][vc_column_text]
Some of our public survival courses
[/vc_column_text][product_category per_page=”12″ columns=”4″ orderby=”rand” order=”ASC” category=”survival-courses”][/vc_column][/vc_row]
- Published in All Blog Posts, Articles, Bushcraft General, Emergency and Safety, EST Framework, Mountain General, Personal, Skills, Survival
Sharpening Bushcraft Knives and Axes – a 2018 update
Friday, 10 August 2018

[vc_row][vc_column][vc_column_text]
A guide to sharpening axes and knives for bushcraft and the outdoors
The equipment and techniques we use to sharpen our equipment at home and at camp
[/vc_column_text][/vc_column][/vc_row][vc_row][vc_column width=”2/3″][vc_column_text]This isn’t the first article on the blog about the equipment we use for sharpening knives and axes. The last one was quite short and was mostly just a list of the equipment – but I have been meaning to write out a more in-depth guide. We cover knife and axe sharpening at different levels on our bushcraft and campcraft courses, and it’s one of those subjects where the course participants ‘lean in’ to the topic – most of those who attend the course have tried to sharpen their own equipment and had, shall we say, a variety of results? Sometimes at the end of that lecture or presentation I have been handed a knife or axe that could be a lot sharper than it currently is and have been asked for advice on how to improve it, and if we have time I will show that person how to regain the shape and edge they want. As one of the instructor team said during our most recent Woodcrafter course – “what the hell did you do that guy’s axe? Last time I saw it you could have used it as a spoon and now it’s shaving the hairs off a nettle!“
I need to state a few things from the outset – first, I’m not a ‘knife guy’. I don’t collect knives, and I don’t buy knives to put in a display case. That is not to denigrate or to criticise those who do – it’s just that I have enough hobbies and collections to fill my time (and home) and knives, axes and similar items have been, quite literally, the tools of my trade. I use my cutting tools weekly, both on courses and for tasks at home – my morning exercise today was snedding, crosscutting and splitting several dozen kgs of firewood for the logburner in the office, using a chainsaw, forest axe and maul that have all been sharpened or fettled by myself recently. I use knives and axes, and teach others how to use them within an ‘outdoors’ context – but I know many other people who care much more about the subject than I do and will have strong opinions on everything that follows.
I also need to acknowledge that there are many different ways to achieve the same thing when it comes to tool sharpening, and a quick Google search would bring up dozens of techniques and variations – each written by somebody who swears that their way is the ‘true’ method.
This is, as with many things on the internet, complete cobblers.
When it comes to teaching a complex skill like sharpening any good instructor should acknowledge that there are often multiple ways of achieving the same thing. Generally speaking, if someone says that “THIS is the only way to do this…” then it’s likely that:
- They don’t know another way of doing it, because they have a limited range of experience
- They have an external pressure on them teaching ‘that way’ of doing things – i.e. they need to keep to a strict syllabus or lesson plan, often seen in military training
- They are selling you ‘that way’ of doing things, usually to go along with the equipment they are selling
In short – there are several techniques and methods that can achieve the same thing. Some are certainly easier for novice users, or work more efficiently with certain blade shapes – but if you find one method works best for you and your tools, you can repeat that process time and again and recognise when you have achieved what you wanted then that’s absolutely fine.[/vc_column_text][/vc_column][vc_column width=”1/3″][vc_single_image image=”9255″ img_size=”medium” add_caption=”yes” alignment=”center”][vc_single_image image=”9261″ img_size=”medium” add_caption=”yes” alignment=”center”][vc_single_image image=”9260″ img_size=”medium” add_caption=”yes” alignment=”center”][vc_single_image image=”9262″ img_size=”medium” add_caption=”yes” alignment=”center”][/vc_column][/vc_row][vc_row][vc_column][vc_column_text]
Stage 1 – Shaping the Blade
In most cases you will only need to perform this stage if the knife or axe is VERY blunt, needs to be reshaped or has a dent/ding in the edge of the blade that needs to be removed (well, the material either side needs to be removed to match it). It is often performed with a file, either one dedicated for use with outdoor cutting tools or a general machinist/metalworking file.
This is the most aggressive stage in the sharpening process and care needs to be taken. All sharpening processes involve removing material from the blade, but when you are using a file or very coarse stone you can quickly grind away more material than you wanted to. Each stroke needs to be deliberate and assessed and done to a plan.
Remember also to only use hand tools unless you have access to dedicated grinding and honing machines for this stage – power tools like grinders will unevenly heat the blade, changing the chemistry of the steel and ruining the ‘temper’ of the steel. Cutting tools like knives or axes are made from steel or alloys that have been carefully heated and shaped to maintain a balance between hardness and shapeability – something that can be sharpened to a fine edge but is resilient enough to not chip or dent the moment it is used to cut something.
Knives
It’s rare that you will need to reshape or repair a knife blade with a file but it can be useful if you need to change a knife ‘grind’ from a convex to a bevel shape – it’s still unlikely that a general user will reprofile a knife in this way. I have repaired knife blades with a file though, removing material from across the length of the blade until it has dropped to the same level of the ding. It can also be useful for reinstating a point on the knife, and area that can be tricky to sharpen and easily dulled by repeated ‘stabbing’ of material or game/fish preparation.
A file can also be useful for ensuring the ‘spine’ of a knife has a 90° edge, vital for use with a ferro rod.
Axes
This is where you are more likely to use a file, as the force used to swing an axe can easily put a significant dent into an edge if it comes across a hard spot in the wood, or misses and hits a stone in the ground. I once managed to ding an axe when I hit a bolt that was buried in a small tree – at some point someone had bolted/screwed a sign to the tree and the tree had regrown around it.
Using a File on an Axe or Knife
I favour longer, flat files, such as those used for sharpening chainsaws (for dropping the height of the cutter guides, not the round ones used on the cutters themselves). I hold the knife or axe on a stump or other flat surface where I can hold it steady and push the file over the edge from behind – i.e. my hand stays behind the cutting edge and I DO NOT file towards the edge. It can be done that way but it does have a significant risk of slipping with the file and plunging your fingers into the blade.
Work carefully and steadily and be wary of removing too much material or making a gouge in the blade. Maintain the original angle of the cutting edge and replicate the effort on the other side of the blade – it is very easy to end up with an asymmetric blade when using a file.
I wear leather gloves when possible, and work in good light. A head torch can help, but there is no substitute for moving out from under the trees to a clearing where you can carefully examine what you are doing.
Cleaning a blade
If your knife or axe has seen some heavy use, particularly with woods or materials that can ‘stain’ the blade or leave deposits on the surface, then it’s probably a good idea to clean them from the blade before beginning to sharpen it. Depending on what it is you’re trying to remove it could prevent the blade from properly contacting with the sharpening stone, it could prevent the blade from cutting through material effectively or just carry on corroding into the steel.
There are several ways you can clean the blade, but my favourite is to use either an abrasive block (the Garryflex blocks are great) or an abrasive paper. Just be careful to not be too enthusiastic with your actions as you could end up dulling the edge of the blade or cutting yourself through a bit of careless finger placement. [/vc_column_text][vc_row_inner][vc_column_inner width=”1/2″][vc_single_image image=”9291″ img_size=”medium” add_caption=”yes” alignment=”center”][/vc_column_inner][vc_column_inner width=”1/2″][vc_single_image image=”9286″ img_size=”medium” add_caption=”yes” alignment=”center”][/vc_column_inner][/vc_row_inner][/vc_column][/vc_row][vc_row][vc_column][vc_column_text]
Stage 2 – Sharpening Stones
This is the stage in the sharpening process where most people begin, and with good reason – if you knife/axe is the right ‘shape’ but just blunt then you do not need to go through the heavy work with a file to regrind the blade.
As mentioned above – any sharpening of a blade involves removing material until you achieved the desired angle. The way you remove that material matters when it comes to cutting effectiveness, and there are a number of ways to achieve the desired level of sharpness.
All ‘sharpening stones’ (including stones plucked from a riverbed or shore) are an abrasive, and harder than the steel/metal of the knife or axe. By moving the blade across the stone you grind away material from the blade – although you may also remove material from the stone as well. Some stones require the use of a fluid or lubricant, normally water or some kind of oil, to aid the process. Some stones (increasingly difficult/expensive to obtain) are made from naturally-occurring material, others from a composite of materials, some artificial and some naturally-sourced.
Most stones are graded by ‘grit’, with a number denoting the grit. The smaller the number the more coarse the stone (and the more aggressively it will remove the material from the blade) – usually starting at about 250 for knife sharpening and moving on up to around 3-5000 or even higher.
The aim is to move from a coarse grit (small number) to a fine grit (large number) with several steps between. As you progress through the steps you remove some of the scratches/scoring made by the step before and create a uniform cutting edge.
[/vc_column_text][vc_column_text css=”.vc_custom_1533896498483{padding-top: 5px !important;padding-right: 5px !important;padding-bottom: 5px !important;padding-left: 5px !important;background-color: #eaeaea !important;}”]
Sharpening Stone Types
There are several commonly available sharpening stones, and hundreds of commercial products making use of these types of stone within their designs.
Whetstones (Oil Stones) – can be made from natural stone (usually Novaculite, AKA Arkansasa Oilstone) or synthetically using an abrasive such as silicon carbide or aluminium oxide. The synthetic variety are often sold as double sided, with a finer grit on one side and a coarser grit on the other. They are relatively cheap and robust, although heavy. They do not necessarily NEED the use of a lubricant (I use 3-in-1 oil) but this does help with the movement of the blade across the stone and remove swarf (material removed from the blade that may prevent the blade touching the stone evenly or even blocking the ‘pores’ of the stone that have the abrasive effect).
Japanese Water Stones – these are mostly made as synthetic product using naturally-occurring stone and are seen by many as being the ‘ultimate’ way of sharpening a blade – but I’ve personally had as good a result with an oilstone. There is certainly a strong cultural association with these Japanese stones, and there is a whole world of nagura, Shapton, Debado and Ao Toishithat you could dive into if you so wished. The grit sizes range from around 400 up to 12000 which takes you well into ‘polishing’ territory. These stones tend to be quite heavy but robust, and most require immersion in water prior to use (using water as a lubricant – never use oil on a water stone).
Diamond Stones – diamond has been used industrially for sharpening and cutting applications for a long time now, making use of the hardness of diamond and the relatively low cost of it in granule form. It is usually a coating on top of a steel plate, often with a plastic or resin surround – they often look a little like a cheese grater. These ‘stones’ can be used to sharpen a blade directly or even used to ‘true’ a sharpening stone – i.e. make it back into a flat surface, removing the depression often formed by repeated grinding and sharpening. They do not require the use of lubricant and have a long service life.
Abrasive Paper – high-quality abrasive and polishing papers, often bonded onto glass or flat wood. This is the method associated with the term ‘scary sharp‘ and is inexpensive and simple to master. It works best with blades that have a ‘flat’ bevel and where the whole blade can be run across the surface. It works very well with woodworking tools (chisels etc) but can be modified for use with an axe or knife.
Sharpening Tools – these sharpening kits and items are often one of the above types of stone set into a jig or pre-defined shape. The best types are ones that can accommodate various angles and knife shapes and use good materials – but there are several terrible sharpening kits on the market – beware and read several independent reviews before purchasing if you can.[/vc_column_text][vc_row_inner][vc_column_inner width=”1/3″][vc_single_image image=”9284″ img_size=”medium” add_caption=”yes” alignment=”center”][/vc_column_inner][vc_column_inner width=”1/3″][vc_single_image image=”9296″ img_size=”medium” add_caption=”yes” alignment=”center”][/vc_column_inner][vc_column_inner width=”1/3″][vc_single_image image=”9297″ img_size=”medium” add_caption=”yes” alignment=”center”][/vc_column_inner][/vc_row_inner][vc_column_text]
Sharpening Stone Technique (Knife)
Fortunately, despite the slightly confusing array of sharpening stones available on the market, the technique for actually sharpening a knife on a stone is fairly simple and common to most types of stone. The key points are:
- Ensure that whatever you do to one side you do to the other – ideally in alternating strokes
- Be consistent with your angles, pressure and movements to avoid imbalanced blade shapes
- Be conscious of where the cutting edge of the blade is relative to your hands and body etc
Sharpening Strokes
- Position yourself so you can stay comfortably in that position for a while, and place the stone on a flat, stable surface. When in the woods/field it can be tricky to find such a surface – tree stumps, logs, rocks, equipment cases and even the bonnet of a Land Rover have all been used by me in the past. The key is stability, flatness and a comfortable working height.
- Start with the ‘coarse’ grit of whatever stone system you are using and place the blade edge on the surface of the stone so that the very edge is touching the stone. You will need to know what kind of blade ‘grind’ you knife has in order to decide where that final flat surface you need to lay on the stone actually is. A simple test is to see if there is a shadow or ‘gap’ between the metal of the blade and the surface of the stone – if there’s a gap you need to tile the blade a little further. The angle is key, as too shallow an angle will remove material in the wrong place, and too steep an angle will actually make the knife blunter.
- Move the blade across the stone as if you are trying to take a slice off the top of the stone itself. Start at one end of the stone, aiming to finish at the other end of the stone having moved the entire length of the blade over the stone in a single pass. This will require care and practice to ensure you maintain the angle of the blade throughout the stroke length – most outdoor-oriented knives have a curve at one end of the blade, requiring the user to lift the handle of the knife to maintain the angle.
- After completing the stroke you can repeat, or turn the knife and perform the same action on the other side of the blade. When sharpening a knife on a stone all actions have to be repeated for the opposing side. Most people end up with a sharpening ‘pattern’ – mine is outlined below.
Push or Pull?
There are several schools of thought about whether a knife should be pushed across a stone with the cutting edge as the ‘leading’ edge of the blade, or whether it should be dragged, i.e. the cutting edge ‘trails’ over the stone. There is also a debate about whether you should ‘push’ the knife in the same direction (normally away from you, swapping the knife from hand to hand to maintain direction and angle) or if you should ‘push’ it away from you on one stroke, then turn the knife and ‘push’ it back towards you to sharpen the other side. The consensus seems to be for ‘push’ over ‘pull/drag’, but with a split over which way to perform that ‘push’ action.
Knife grind/shape certainly comes into it, with scandi and convex grinds easier maybe to sharpen with a ‘push’ and other grinds with a drag. Personal preference and a host of other factors come into play – so if you find a technique that you replicate time and again, it works for your equipment and you understand WHY it works then I wouldn’t worry too much about it.[/vc_column_text][vc_row_inner][vc_column_inner width=”1/3″][vc_single_image image=”9281″ img_size=”medium” add_caption=”yes” alignment=”center”][/vc_column_inner][vc_column_inner width=”1/3″][vc_single_image image=”9282″ img_size=”medium” add_caption=”yes” alignment=”center”][/vc_column_inner][vc_column_inner width=”1/3″][vc_single_image image=”9283″ img_size=”medium” add_caption=”yes” alignment=”center”][/vc_column_inner][/vc_row_inner][vc_column_text]
Sharpening Stone Technique (Axe)
Most axes you are going to come across in a bushcraft, campcraft and outdoor context will have a convex grind, and also be a bit too cumbersome to bring to a bench sharpening stone. There are several versions of the ‘hockey puck’ axe sharpening stones on the market – I use the Gransfors Bruks Yxsten/Axestone but others are available.
The technique with these stones is to sharpen the length of the blade in a circular motion, being careful to keep fingers out of the way. Again – all actions performed on one side of the blade should be repeated on the other, and a progression from coarse to fine grit sizes will ensure a sharp edge free from scratches and abrasion marks can be achieved.[/vc_column_text][/vc_column][/vc_row][vc_row][vc_column][vc_column_text]
Stage 3 – Polishing and Stropping
Once you have progressed through the sharpening stones you have you SHOULD already have a sharp blade – but it could be sharper, especially for fine work with wood or for skinning animals and game preparation.
The point where sharpening stops and polishing begins with regards to cutting tools is a little… fuzzy. As you progress through to around 3000 and higher you should start to see a ‘shiny’ surface on the area you have been sharpening. Scratches left behind by the earlier sharpening steps have begun to disappear and the surface will be a lot smoother.
There may also be a burr that develops at the very edge of the blade – a strip of metal that is the result of the grinding process of sharpening. Stropping removes this without further grinding of the edge.
The next stage normally involves the use of a ‘strop’ – usually a piece of leather, often in conjunction with a polishing compound like Autosol or similar.
A strop can be free-hanging (i.e. not attached to any surface, or just anchored at the ends) or bonded to a surface, usually a wooden board. The leather needs to be thick enough to ‘hold’ the polishing compound and some people look for a thicker leather as it can ‘wrap’ around the edge of the blade. An additional layer of foam between the leather and a the board can help with this effect –
Technique for stropping knives and axes
As with using a sharpening stone, the technique for stropping involves putting equal work into both sides. It’s best to ‘drag’ the blade as this helps remove the burr. It’s also very difficult to do it any other way as the blade would cut into the leather.
You’ll get better results with more strokes, and 50-100 strokes across the strop is what I aim for. If your strop is mounted to a wooden board you can keep the blade still and move the strop across it – but be careful to maintain the angle and not ‘roll’ over the edge of the blade. It’s very easy to undo all of the hard work you’ve put in already!
[/vc_column_text][vc_row_inner][vc_column_inner width=”1/3″][vc_single_image image=”9298″ img_size=”medium” add_caption=”yes” alignment=”center”][/vc_column_inner][vc_column_inner width=”1/3″][vc_single_image image=”9287″ img_size=”medium” add_caption=”yes” alignment=”center”][/vc_column_inner][vc_column_inner width=”1/3″][vc_single_image image=”9285″ img_size=”medium” add_caption=”yes” alignment=”center”][/vc_column_inner][/vc_row_inner][/vc_column][/vc_row][vc_row][vc_column width=”2/3″][vc_column_text]
Aftercare and Oiling
If you have performed the above steps correctly you SHOULD have a sharp blade with a smooth and consistent edge. It’s good practice to finish the day with a sharp cutting tool, and often my work days end with a sharpening session. Starting a long day with a set of sharp and well-maintained tools is always a morale boost, and doubly so if you weren’t the last person to use that tool.
Corrosion Prevention
If you have a carbon steel axe or knife (i.e. something that can rust) then you will need to perform some kind of post-sharpening oiling or corrosion prevention before putting it away. There are a number of things you can use to prevent corrosion on a knife or axe blade:
- Oil – something that can be applied safely to the blade that won’t evaporate or solidify (or turn rancid). I use either 3-in-1 oil or a silicone gun oil on my blades, but you may want to consider using a food-grade mineral oil for blades that will be used for food.
- Wax – either ordinary candle wax, beeswax or a dedicated corrosion-prevention product like Renaissance Wax (used in museums etc).
The key thing is to ensure that you treat the whole blade, but not excessively. A small amount of oil on a rag or piece of kitchen towel is normally sufficient. If your knife has a leather sheath (or leather mask on an axe) then the leather will probably begin to be impregnated by the oil and help prevent corrosion when stored for a longer period.
I tend to use mineral oil on my knives that live in leather sheaths, gun oil (that creates a thicker, corrosion-resistant layer on an uncovered steel surface) on knives and axes that are uncovered or in plastic sheaths (like Moras, Hultafors etc) and wax on other carbon steel surface (saws etc).[/vc_column_text][/vc_column][vc_column width=”1/3″][vc_single_image image=”9293″ img_size=”medium” add_caption=”yes” alignment=”center”][/vc_column][/vc_row][vc_row][vc_column width=”1/3″][vc_single_image image=”9275″ img_size=”medium” add_caption=”yes” alignment=”center”][/vc_column][vc_column width=”1/3″][vc_single_image image=”9276″ img_size=”medium” add_caption=”yes” alignment=”center”][/vc_column][vc_column width=”1/3″][vc_single_image image=”9277″ img_size=”medium” add_caption=”yes” alignment=”center”][/vc_column][/vc_row][vc_row css=”.vc_custom_1533897160026{padding: 5px !important;background-color: #eaeaea !important;}”][vc_column][vc_column_text]
My Sharpening Methods
The above is intended as a general guide to the separate stages of the sharpening process for most user types, and (hopefully) answers to some of the frequently asked sharpening questions. Below are my current methods for sharpening axes and knives for bushcraft and other outdoor activities at home and in the field.
Knife (at home/workshop)
The below steps are performed at a workbench with good lighting:
- Visually inspect edge for damage (looking for reflective spots along the edge, possibly with a loupe/jeweller’s lens if one is available). If no damage then proceed to Step 3.
- If damaged then begin to file back the blade to a level where the ding/dent is no longer visible
- 800 grit water stone – 10 strokes in one direction then 10 in other, then 10 alternating strokes. Repeat at least once.
- 1200 grit water stone – 10 strokes in one direction, one stroke in other, then another 10. Repeat for other side, then 20 alternating strokes.
- 5000 grit water stone – 10 strokes in one direction, one stroke in other, then another 10. Repeat for other side, then 20 alternating strokes.
- Strop the knife over a leather strop using Tormek paste. The strop is bonded to a thin layer of foam on a flat oak board.
Knife (in camp)
The below steps are performed on a tree stump or equipment case if possible, but the flattest, most stable surface I can find. If no flat surface is available then I will try and do it carefully by hand, but accept that it will be harder to get the same quality of sharpness. If I know that I will be performing a lot of carving and woodworking tasks at the camp then I will carry a more comprehensive sharpening kit, but I usually carry as a bare minimum a ‘pocket’ diamond or oil stone. there is always a balance to be struck between the amount of equipment you are willing to carry vs what you can realistically achieve with minimal equipment:
- Visually inspect edge for damage (looking for reflective spots along the edge, possibly with a loupe/jeweller’s lens if one is available). If no damage then proceed to Step 3.
- If damaged then begin to file back the blade to a level where the ding/dent is no longer visible
- 300 grit diamond stone (DMT folding type) – 10 strokes in one direction then 10 in other, then 10 alternating strokes. Repeat at least once.
- 650 grit diamond stone – 10 strokes in one direction, one stroke in other, then another 10. Repeat for other side, then 20 alternating strokes.
- 1200 grit abrasive paper on a board (if carried) – 10 strokes in one direction, 10 in other then 10 alternating. Must be ‘dragged’ or paper will catch and tear.
- Strop the knife over a leather strop (using Tormek paste if carried). The strop is either a dedicated strip of leather or even a leather belt.
Axe (at home or in camp)
The process for sharpening my axes is very similar in camp or at home – either way I normally take the sharpening stone to the axe rather than laying the stone down and moving the axe across it. The only difference may be that I use a (soft) vise or clamp to hold the axe securely if filing the edge at home:
- Visually inspect edge for damage (looking for reflective spots along the edge, possibly with a loupe/jeweller’s lens if one is available). If no damage then proceed to Step 3.
- If damaged then begin to file back the blade to a level where the ding/dent is no longer visible
- 180 grit axestone – careful rotational strokes along one edge, trying to replicate on both sides and maintain a balance in the shape.
- 600 grit axestone – as above, with extra care due to increasingly sharp edge
- 1200 grit abrasive paper on a board – use eye to estimate how much work you have done on one side, but use colour change in metal/reflection to estimate how much has been done in order to match on other side.
- 2500 grit abrasive paper on a board – as above
- Strop the knife using a leather bonded to an oak board using Tormek paste.
Essentially the stage are the same – progressive movement through from a coarse abrasive to a finer one and finishing with a ‘polishing’ stage using a leather strop. Consideration is given to how much equipment can be carried and, realistically how sharp you can get your tools when working from a camp. I can usually achieve a ‘shaving sharp’ edge using a diamond stone or axestone on a well-maintained blade with access to leather for stropping, but I am realistic about my expectations when it comes to working far from the trappings of civilisation (and my workshop…)[/vc_column_text][/vc_column][/vc_row][vc_row][vc_column width=”2/3″][vc_column_text]
How sharp does it need to be?
Depends on what you’re doing with it…
The point to where a blade is ‘sharp enough’ is subjective and varies from tool to tool, and is often dependent on the task you are going to perform with it. My wood carving knives are orders of magnitude sharper than my splitting maul, but my felling and woodworking axes are usually sharp enough to shave with (although I don’t recommend it). If my splitting maul was much sharper then I would likely dent the edge whenever I hit a knot in the wood (or miss and hit the ground), but my carving knives need to be that sharp so that I can remove fine layers of wood without much force and do so delicately and carefully.
As a very general rule I go and sharpen the blade of a cutting tool as soon as I find that I have to put in more effort than I expected to perform that task. A good number of the minor cuts and scars on my hands have come from using more force than was necessary with a slightly blunt tool. It’s a hard-won lesson, but it makes you appreciate the importance of a sharp tool.
For some tools that need a lot of force to use effectively (splitting mauls and larger axes normally, plus some machetes/parangs) there can be a point where the tool is too sharp. By this I mean that the edge could be slightly blunter and still perform the required task, but the consequences of a mistimed strike or swing could be at best a damaged tool – and at worse a damaged limb. I will leave it to the reader to decide how sharp their cutting tool should be, but does EVERY item in your kit need to be sharp enough to shave a gooseberry, or are you creating a potential safety issue by making everything that narrow/sharp?
[/vc_column_text][/vc_column][vc_column width=”1/3″][vc_single_image image=”9295″ img_size=”medium” add_caption=”yes” alignment=”center”][/vc_column][/vc_row][vc_row][vc_column][vc_column_text]
Testing the sharpness of a cutting edge
There are a couple of tests I use, although I will steer the novice user towards some rather than others. Any time you bring a sharp cutting tool into close proximity with your skin and flesh you are increasing the risk of an injury. Unless you are 100% confident in your abilities then stick with one of the methods that doesn’t involve testing the edge by shaving your arm or your fingernail!
We don’t have many disclaimers or warnings on this blog – but if you are swinging cutting tools around you need to be aware of the potential risks of things going wrong, and position yourself, your knife/axe and anybody watching accordingly.
- The Paper Test – take a piece of A4 printer paper (I use 80gsm stuff, straight from the printer in the office) and hold one corner, with the paper in landscape orientation. Holding the knife in your dominant hand (i.e. the had you write with normally) try and take a swipe at the corner of the paper. If you can take the tip of the corner off in one swipe without the paper bunching up or tearing then your knife or axe is sharp enough for most tasks, including carving. If you can take several (careful) swipes and remove stripe after stripe of the paper then you can be confident that your blade is sharp – although you may need to quickly perform the stropping stage again as paper is great for blunting a knife!
- The Onion Test – this one takes a little practice but is a good test if you are sharpening a knife for food prep, and it also works on ripe tomatoes and starchy potatoes. If the knife can ‘fall’ through the onion with little effort, cutting through the individual layers without crushing them together and no ‘notchy’ resistance then it’s pretty sharp. A slightly mad variation on this test is to put the knife blade-upwards on a chopping board and drop a cherry tomato onto it from about 30cm above. If the cherry tomato lands on the blade and cuts through, partially or wholly, then the knife is at the ‘scary’ end of the sharpness spectrum.
- The Wood Test – AKA the Featherstick Test. This is a good one when in the field and a quick test of a blade edge is required. Take a quartered log (i.e. something that has been split in two, then that half has been split again) and try to make a fine, curling shaving from the corner. If you can do this two or three times then it is sharp enough for most tasks.
- The Shaving Test – this works best on hairy forearms, and stay away from anywhere else on the body! If you can shave the fine hairs from the outside of a forearm with minimal effort then that blade is, of course, shaving-sharp. The potential risks with this method include cutting into the flesh (with possible infection as a result) and even the risk of hitting something VERY important, like a major blood vessel or a tendon.
- The Fingerprint Test – once again, a risky strategy. Turn the blade upwards and LIGHTLY place a fingertip on the blade. If you can feel the individual ridges of your fingertip ACROSS the blade edge then you are certainly holding a sharp tool – but DO NOT run your finger along the edge. I heard a story from a client about them watching an experienced ‘woodsman’ and outdoor gear reviewer at a trade show take a new knife from a vendor and go to perform this test – but instead absent-mindedly ran their finger ALONG the blade instead. The bloodstains apparently remained on that patch of carpet for the rest of the trade show.
- The Fingernail Test – as with the above, one of the outcomes of getting this wrong involves blood and missing/damaged flesh. Stick out your index finger and lay the knife on it perpendicular to the surface. If the blade leaves a mark without any effort required from the user then it is, again, at the ‘scary’ end of the sharpness spectrum. DO NOT slide the knife blade around or put any pressure on it – fingernails aren’t that thick and they are easily cut through.
With any of the tests above there is the potential risk of injury – but that risk is much lower when the material you are testing is not part of your body. The Paper Test and the Wood Test are probably the safest and most easily performed in a camp/outdoor environment.[/vc_column_text][/vc_column][/vc_row][vc_row][vc_column][vc_column_text]
Another Method
This is a video we shot with green woodworker Doug Don of Heartwood Treen a couple of years ago. In it he takes a factory-fresh Hultafors axe and brings the edge up to a razor-sharpness with a mirrored edge – all using cheap materials.[/vc_column_text][vc_video link=”https://youtu.be/39zvVKnFFao” align=”center”][/vc_column][/vc_row][vc_row][vc_column][vc_column_text]
Some of our related courses
[/vc_column_text][product_category per_page=”12″ columns=”4″ orderby=”rand” order=”ASC” category=”bushcraft-courses”][/vc_column][/vc_row][vc_row][vc_column width=”1/4″][vc_raw_html]JTNDaWZyYW1lJTIwc3R5bGUlM0QlMjJ3aWR0aCUzQTEyMHB4JTNCaGVpZ2h0JTNBMjQwcHglM0IlMjIlMjBtYXJnaW53aWR0aCUzRCUyMjAlMjIlMjBtYXJnaW5oZWlnaHQlM0QlMjIwJTIyJTIwc2Nyb2xsaW5nJTNEJTIybm8lMjIlMjBmcmFtZWJvcmRlciUzRCUyMjAlMjIlMjBzcmMlM0QlMjIlMkYlMkZ3cy1ldS5hbWF6b24tYWRzeXN0ZW0uY29tJTJGd2lkZ2V0cyUyRnElM0ZTZXJ2aWNlVmVyc2lvbiUzRDIwMDcwODIyJTI2T25lSlMlM0QxJTI2T3BlcmF0aW9uJTNER2V0QWRIdG1sJTI2TWFya2V0UGxhY2UlM0RHQiUyNnNvdXJjZSUzRHNzJTI2cmVmJTNEYXNfc3NfbGlfdGlsJTI2YWRfdHlwZSUzRHByb2R1Y3RfbGluayUyNnRyYWNraW5nX2lkJTNEb3JpZ2lvdXRkbzA1LTIxJTI2bGFuZ3VhZ2UlM0Rlbl9HQiUyNm1hcmtldHBsYWNlJTNEYW1hem9uJTI2cmVnaW9uJTNER0IlMjZwbGFjZW1lbnQlM0RCMDAwMDRXRlRXJTI2YXNpbnMlM0RCMDAwMDRXRlRXJTI2bGlua0lkJTNEZWFmMGQ5NTAyMzAzYjI2MGI3NTQxZWI2MGZlZDdlMTYlMjZzaG93X2JvcmRlciUzRHRydWUlMjZsaW5rX29wZW5zX2luX25ld193aW5kb3clM0R0cnVlJTIyJTNFJTNDJTJGaWZyYW1lJTNF[/vc_raw_html][/vc_column][vc_column width=”1/4″][vc_raw_html]JTNDaWZyYW1lJTIwc3R5bGUlM0QlMjJ3aWR0aCUzQTEyMHB4JTNCaGVpZ2h0JTNBMjQwcHglM0IlMjIlMjBtYXJnaW53aWR0aCUzRCUyMjAlMjIlMjBtYXJnaW5oZWlnaHQlM0QlMjIwJTIyJTIwc2Nyb2xsaW5nJTNEJTIybm8lMjIlMjBmcmFtZWJvcmRlciUzRCUyMjAlMjIlMjBzcmMlM0QlMjIlMkYlMkZ3cy1ldS5hbWF6b24tYWRzeXN0ZW0uY29tJTJGd2lkZ2V0cyUyRnElM0ZTZXJ2aWNlVmVyc2lvbiUzRDIwMDcwODIyJTI2T25lSlMlM0QxJTI2T3BlcmF0aW9uJTNER2V0QWRIdG1sJTI2TWFya2V0UGxhY2UlM0RHQiUyNnNvdXJjZSUzRHNzJTI2cmVmJTNEYXNfc3NfbGlfdGlsJTI2YWRfdHlwZSUzRHByb2R1Y3RfbGluayUyNnRyYWNraW5nX2lkJTNEb3JpZ2lvdXRkbzA1LTIxJTI2bGFuZ3VhZ2UlM0Rlbl9HQiUyNm1hcmtldHBsYWNlJTNEYW1hem9uJTI2cmVnaW9uJTNER0IlMjZwbGFjZW1lbnQlM0RCMDc1WVZOSFpYJTI2YXNpbnMlM0RCMDc1WVZOSFpYJTI2bGlua0lkJTNEZGIyNDRlYTA5MThjNzJjMDhkODRiN2RkYjg2YzcyMDAlMjZzaG93X2JvcmRlciUzRHRydWUlMjZsaW5rX29wZW5zX2luX25ld193aW5kb3clM0R0cnVlJTIyJTNFJTNDJTJGaWZyYW1lJTNF[/vc_raw_html][/vc_column][vc_column width=”1/4″][vc_raw_html]JTNDaWZyYW1lJTIwc3R5bGUlM0QlMjJ3aWR0aCUzQTEyMHB4JTNCaGVpZ2h0JTNBMjQwcHglM0IlMjIlMjBtYXJnaW53aWR0aCUzRCUyMjAlMjIlMjBtYXJnaW5oZWlnaHQlM0QlMjIwJTIyJTIwc2Nyb2xsaW5nJTNEJTIybm8lMjIlMjBmcmFtZWJvcmRlciUzRCUyMjAlMjIlMjBzcmMlM0QlMjIlMkYlMkZ3cy1ldS5hbWF6b24tYWRzeXN0ZW0uY29tJTJGd2lkZ2V0cyUyRnElM0ZTZXJ2aWNlVmVyc2lvbiUzRDIwMDcwODIyJTI2T25lSlMlM0QxJTI2T3BlcmF0aW9uJTNER2V0QWRIdG1sJTI2TWFya2V0UGxhY2UlM0RHQiUyNnNvdXJjZSUzRHNzJTI2cmVmJTNEYXNfc3NfbGlfdGlsJTI2YWRfdHlwZSUzRHByb2R1Y3RfbGluayUyNnRyYWNraW5nX2lkJTNEb3JpZ2lvdXRkbzA1LTIxJTI2bGFuZ3VhZ2UlM0Rlbl9HQiUyNm1hcmtldHBsYWNlJTNEYW1hem9uJTI2cmVnaW9uJTNER0IlMjZwbGFjZW1lbnQlM0RCMDA0NzMyQlNBJTI2YXNpbnMlM0RCMDA0NzMyQlNBJTI2bGlua0lkJTNEMWNiNTMwMGU2NjU1NDZiMDY1OWU1NzkzN2Q3Mzg2NTclMjZzaG93X2JvcmRlciUzRHRydWUlMjZsaW5rX29wZW5zX2luX25ld193aW5kb3clM0R0cnVlJTIyJTNFJTNDJTJGaWZyYW1lJTNF[/vc_raw_html][/vc_column][vc_column width=”1/4″][vc_raw_html]JTNDaWZyYW1lJTIwc3R5bGUlM0QlMjJ3aWR0aCUzQTEyMHB4JTNCaGVpZ2h0JTNBMjQwcHglM0IlMjIlMjBtYXJnaW53aWR0aCUzRCUyMjAlMjIlMjBtYXJnaW5oZWlnaHQlM0QlMjIwJTIyJTIwc2Nyb2xsaW5nJTNEJTIybm8lMjIlMjBmcmFtZWJvcmRlciUzRCUyMjAlMjIlMjBzcmMlM0QlMjIlMkYlMkZ3cy1ldS5hbWF6b24tYWRzeXN0ZW0uY29tJTJGd2lkZ2V0cyUyRnElM0ZTZXJ2aWNlVmVyc2lvbiUzRDIwMDcwODIyJTI2T25lSlMlM0QxJTI2T3BlcmF0aW9uJTNER2V0QWRIdG1sJTI2TWFya2V0UGxhY2UlM0RHQiUyNnNvdXJjZSUzRHNzJTI2cmVmJTNEYXNfc3NfbGlfdGlsJTI2YWRfdHlwZSUzRHByb2R1Y3RfbGluayUyNnRyYWNraW5nX2lkJTNEb3JpZ2lvdXRkbzA1LTIxJTI2bGFuZ3VhZ2UlM0Rlbl9HQiUyNm1hcmtldHBsYWNlJTNEYW1hem9uJTI2cmVnaW9uJTNER0IlMjZwbGFjZW1lbnQlM0RCMDAwMUs5Wk1TJTI2YXNpbnMlM0RCMDAwMUs5Wk1TJTI2bGlua0lkJTNEY2YwZjllMWU4YjFlNjc4YzA3N2RjMGI5MWM0OGM4Y2ElMjZzaG93X2JvcmRlciUzRHRydWUlMjZsaW5rX29wZW5zX2luX25ld193aW5kb3clM0R0cnVlJTIyJTNFJTNDJTJGaWZyYW1lJTNF[/vc_raw_html][/vc_column][/vc_row][vc_row][vc_column width=”1/4″][vc_raw_html]JTNDaWZyYW1lJTIwc3R5bGUlM0QlMjJ3aWR0aCUzQTEyMHB4JTNCaGVpZ2h0JTNBMjQwcHglM0IlMjIlMjBtYXJnaW53aWR0aCUzRCUyMjAlMjIlMjBtYXJnaW5oZWlnaHQlM0QlMjIwJTIyJTIwc2Nyb2xsaW5nJTNEJTIybm8lMjIlMjBmcmFtZWJvcmRlciUzRCUyMjAlMjIlMjBzcmMlM0QlMjIlMkYlMkZ3cy1ldS5hbWF6b24tYWRzeXN0ZW0uY29tJTJGd2lkZ2V0cyUyRnElM0ZTZXJ2aWNlVmVyc2lvbiUzRDIwMDcwODIyJTI2T25lSlMlM0QxJTI2T3BlcmF0aW9uJTNER2V0QWRIdG1sJTI2TWFya2V0UGxhY2UlM0RHQiUyNnNvdXJjZSUzRHNzJTI2cmVmJTNEYXNfc3NfbGlfdGlsJTI2YWRfdHlwZSUzRHByb2R1Y3RfbGluayUyNnRyYWNraW5nX2lkJTNEb3JpZ2lvdXRkbzA1LTIxJTI2bGFuZ3VhZ2UlM0Rlbl9HQiUyNm1hcmtldHBsYWNlJTNEYW1hem9uJTI2cmVnaW9uJTNER0IlMjZwbGFjZW1lbnQlM0RCMDAzQlVWMjI2JTI2YXNpbnMlM0RCMDAzQlVWMjI2JTI2bGlua0lkJTNEYTAyNmI4NGIxYzM2N2M4Y2I3YWEzMzc4NTMzNTZlMDYlMjZzaG93X2JvcmRlciUzRHRydWUlMjZsaW5rX29wZW5zX2luX25ld193aW5kb3clM0R0cnVlJTIyJTNFJTNDJTJGaWZyYW1lJTNF[/vc_raw_html][/vc_column][vc_column width=”1/4″][vc_raw_html]JTNDaWZyYW1lJTIwc3R5bGUlM0QlMjJ3aWR0aCUzQTEyMHB4JTNCaGVpZ2h0JTNBMjQwcHglM0IlMjIlMjBtYXJnaW53aWR0aCUzRCUyMjAlMjIlMjBtYXJnaW5oZWlnaHQlM0QlMjIwJTIyJTIwc2Nyb2xsaW5nJTNEJTIybm8lMjIlMjBmcmFtZWJvcmRlciUzRCUyMjAlMjIlMjBzcmMlM0QlMjIlMkYlMkZ3cy1ldS5hbWF6b24tYWRzeXN0ZW0uY29tJTJGd2lkZ2V0cyUyRnElM0ZTZXJ2aWNlVmVyc2lvbiUzRDIwMDcwODIyJTI2T25lSlMlM0QxJTI2T3BlcmF0aW9uJTNER2V0QWRIdG1sJTI2TWFya2V0UGxhY2UlM0RHQiUyNnNvdXJjZSUzRHNzJTI2cmVmJTNEYXNfc3NfbGlfdGlsJTI2YWRfdHlwZSUzRHByb2R1Y3RfbGluayUyNnRyYWNraW5nX2lkJTNEb3JpZ2lvdXRkbzA1LTIxJTI2bGFuZ3VhZ2UlM0Rlbl9HQiUyNm1hcmtldHBsYWNlJTNEYW1hem9uJTI2cmVnaW9uJTNER0IlMjZwbGFjZW1lbnQlM0RCMDA1MDRJNkxHJTI2YXNpbnMlM0RCMDA1MDRJNkxHJTI2bGlua0lkJTNEMTk2YmUxY2YwNTE4NDgwZjRmOWVhNzYxMWY4MGZmNzklMjZzaG93X2JvcmRlciUzRHRydWUlMjZsaW5rX29wZW5zX2luX25ld193aW5kb3clM0R0cnVlJTIyJTNFJTNDJTJGaWZyYW1lJTNF[/vc_raw_html][/vc_column][vc_column width=”1/4″][vc_raw_html]JTNDaWZyYW1lJTIwc3R5bGUlM0QlMjJ3aWR0aCUzQTEyMHB4JTNCaGVpZ2h0JTNBMjQwcHglM0IlMjIlMjBtYXJnaW53aWR0aCUzRCUyMjAlMjIlMjBtYXJnaW5oZWlnaHQlM0QlMjIwJTIyJTIwc2Nyb2xsaW5nJTNEJTIybm8lMjIlMjBmcmFtZWJvcmRlciUzRCUyMjAlMjIlMjBzcmMlM0QlMjIlMkYlMkZ3cy1ldS5hbWF6b24tYWRzeXN0ZW0uY29tJTJGd2lkZ2V0cyUyRnElM0ZTZXJ2aWNlVmVyc2lvbiUzRDIwMDcwODIyJTI2T25lSlMlM0QxJTI2T3BlcmF0aW9uJTNER2V0QWRIdG1sJTI2TWFya2V0UGxhY2UlM0RHQiUyNnNvdXJjZSUzRHNzJTI2cmVmJTNEYXNfc3NfbGlfdGlsJTI2YWRfdHlwZSUzRHByb2R1Y3RfbGluayUyNnRyYWNraW5nX2lkJTNEb3JpZ2lvdXRkbzA1LTIxJTI2bGFuZ3VhZ2UlM0Rlbl9HQiUyNm1hcmtldHBsYWNlJTNEYW1hem9uJTI2cmVnaW9uJTNER0IlMjZwbGFjZW1lbnQlM0RCMDc4WEI2QldYJTI2YXNpbnMlM0RCMDc4WEI2QldYJTI2bGlua0lkJTNEMzY4MmU3YzM0NmMyMTRlMjIxZjk0Nzg3ZjMxOTJiZDMlMjZzaG93X2JvcmRlciUzRHRydWUlMjZsaW5rX29wZW5zX2luX25ld193aW5kb3clM0R0cnVlJTIyJTNFJTNDJTJGaWZyYW1lJTNF[/vc_raw_html][/vc_column][vc_column width=”1/4″][vc_raw_html]JTNDaWZyYW1lJTIwc3R5bGUlM0QlMjJ3aWR0aCUzQTEyMHB4JTNCaGVpZ2h0JTNBMjQwcHglM0IlMjIlMjBtYXJnaW53aWR0aCUzRCUyMjAlMjIlMjBtYXJnaW5oZWlnaHQlM0QlMjIwJTIyJTIwc2Nyb2xsaW5nJTNEJTIybm8lMjIlMjBmcmFtZWJvcmRlciUzRCUyMjAlMjIlMjBzcmMlM0QlMjIlMkYlMkZ3cy1ldS5hbWF6b24tYWRzeXN0ZW0uY29tJTJGd2lkZ2V0cyUyRnElM0ZTZXJ2aWNlVmVyc2lvbiUzRDIwMDcwODIyJTI2T25lSlMlM0QxJTI2T3BlcmF0aW9uJTNER2V0QWRIdG1sJTI2TWFya2V0UGxhY2UlM0RHQiUyNnNvdXJjZSUzRHNzJTI2cmVmJTNEYXNfc3NfbGlfdGlsJTI2YWRfdHlwZSUzRHByb2R1Y3RfbGluayUyNnRyYWNraW5nX2lkJTNEb3JpZ2lvdXRkbzA1LTIxJTI2bGFuZ3VhZ2UlM0Rlbl9HQiUyNm1hcmtldHBsYWNlJTNEYW1hem9uJTI2cmVnaW9uJTNER0IlMjZwbGFjZW1lbnQlM0RCMDAzWEoxT0RNJTI2YXNpbnMlM0RCMDAzWEoxT0RNJTI2bGlua0lkJTNENGQ4MzYzN2Y5OTRlNDYwNWI1MzljMWFlZTI0ZGU2ZGElMjZzaG93X2JvcmRlciUzRHRydWUlMjZsaW5rX29wZW5zX2luX25ld193aW5kb3clM0R0cnVlJTIyJTNFJTNDJTJGaWZyYW1lJTNF[/vc_raw_html][/vc_column][/vc_row][vc_row][vc_column width=”1/4″][vc_raw_html]JTNDaWZyYW1lJTIwc3R5bGUlM0QlMjJ3aWR0aCUzQTEyMHB4JTNCaGVpZ2h0JTNBMjQwcHglM0IlMjIlMjBtYXJnaW53aWR0aCUzRCUyMjAlMjIlMjBtYXJnaW5oZWlnaHQlM0QlMjIwJTIyJTIwc2Nyb2xsaW5nJTNEJTIybm8lMjIlMjBmcmFtZWJvcmRlciUzRCUyMjAlMjIlMjBzcmMlM0QlMjIlMkYlMkZ3cy1ldS5hbWF6b24tYWRzeXN0ZW0uY29tJTJGd2lkZ2V0cyUyRnElM0ZTZXJ2aWNlVmVyc2lvbiUzRDIwMDcwODIyJTI2T25lSlMlM0QxJTI2T3BlcmF0aW9uJTNER2V0QWRIdG1sJTI2TWFya2V0UGxhY2UlM0RHQiUyNnNvdXJjZSUzRHNzJTI2cmVmJTNEYXNfc3NfbGlfdGlsJTI2YWRfdHlwZSUzRHByb2R1Y3RfbGluayUyNnRyYWNraW5nX2lkJTNEb3JpZ2lvdXRkbzA1LTIxJTI2bGFuZ3VhZ2UlM0Rlbl9HQiUyNm1hcmtldHBsYWNlJTNEYW1hem9uJTI2cmVnaW9uJTNER0IlMjZwbGFjZW1lbnQlM0RCMDFBR0MwNlZZJTI2YXNpbnMlM0RCMDFBR0MwNlZZJTI2bGlua0lkJTNEMTI2MWE3ZGI3ZGFkYmU4YTdlZmM1OTU2NDg0NmI5Y2IlMjZzaG93X2JvcmRlciUzRHRydWUlMjZsaW5rX29wZW5zX2luX25ld193aW5kb3clM0R0cnVlJTIyJTNFJTNDJTJGaWZyYW1lJTNF[/vc_raw_html][/vc_column][vc_column width=”1/4″][vc_raw_html]JTNDaWZyYW1lJTIwc3R5bGUlM0QlMjJ3aWR0aCUzQTEyMHB4JTNCaGVpZ2h0JTNBMjQwcHglM0IlMjIlMjBtYXJnaW53aWR0aCUzRCUyMjAlMjIlMjBtYXJnaW5oZWlnaHQlM0QlMjIwJTIyJTIwc2Nyb2xsaW5nJTNEJTIybm8lMjIlMjBmcmFtZWJvcmRlciUzRCUyMjAlMjIlMjBzcmMlM0QlMjIlMkYlMkZ3cy1ldS5hbWF6b24tYWRzeXN0ZW0uY29tJTJGd2lkZ2V0cyUyRnElM0ZTZXJ2aWNlVmVyc2lvbiUzRDIwMDcwODIyJTI2T25lSlMlM0QxJTI2T3BlcmF0aW9uJTNER2V0QWRIdG1sJTI2TWFya2V0UGxhY2UlM0RHQiUyNnNvdXJjZSUzRHNzJTI2cmVmJTNEYXNfc3NfbGlfdGlsJTI2YWRfdHlwZSUzRHByb2R1Y3RfbGluayUyNnRyYWNraW5nX2lkJTNEb3JpZ2lvdXRkbzA1LTIxJTI2bGFuZ3VhZ2UlM0Rlbl9HQiUyNm1hcmtldHBsYWNlJTNEYW1hem9uJTI2cmVnaW9uJTNER0IlMjZwbGFjZW1lbnQlM0RCMDAxNDlESUJFJTI2YXNpbnMlM0RCMDAxNDlESUJFJTI2bGlua0lkJTNEMGRmMmRmNTdlOGZkM2QyNzYyYzMyNWE4OTJiNWU4NmIlMjZzaG93X2JvcmRlciUzRHRydWUlMjZsaW5rX29wZW5zX2luX25ld193aW5kb3clM0R0cnVlJTIyJTNFJTNDJTJGaWZyYW1lJTNF[/vc_raw_html][/vc_column][vc_column width=”1/4″][vc_raw_html]JTNDaWZyYW1lJTIwc3R5bGUlM0QlMjJ3aWR0aCUzQTEyMHB4JTNCaGVpZ2h0JTNBMjQwcHglM0IlMjIlMjBtYXJnaW53aWR0aCUzRCUyMjAlMjIlMjBtYXJnaW5oZWlnaHQlM0QlMjIwJTIyJTIwc2Nyb2xsaW5nJTNEJTIybm8lMjIlMjBmcmFtZWJvcmRlciUzRCUyMjAlMjIlMjBzcmMlM0QlMjIlMkYlMkZ3cy1ldS5hbWF6b24tYWRzeXN0ZW0uY29tJTJGd2lkZ2V0cyUyRnElM0ZTZXJ2aWNlVmVyc2lvbiUzRDIwMDcwODIyJTI2T25lSlMlM0QxJTI2T3BlcmF0aW9uJTNER2V0QWRIdG1sJTI2TWFya2V0UGxhY2UlM0RHQiUyNnNvdXJjZSUzRHNzJTI2cmVmJTNEYXNfc3NfbGlfdGlsJTI2YWRfdHlwZSUzRHByb2R1Y3RfbGluayUyNnRyYWNraW5nX2lkJTNEb3JpZ2lvdXRkbzA1LTIxJTI2bGFuZ3VhZ2UlM0Rlbl9HQiUyNm1hcmtldHBsYWNlJTNEYW1hem9uJTI2cmVnaW9uJTNER0IlMjZwbGFjZW1lbnQlM0RCMDA3TkhSM0JDJTI2YXNpbnMlM0RCMDA3TkhSM0JDJTI2bGlua0lkJTNEOWQ3OTFkZTIwYTc5YWQxYzlhY2YyNWM3Y2I4ZGE5NDElMjZzaG93X2JvcmRlciUzRHRydWUlMjZsaW5rX29wZW5zX2luX25ld193aW5kb3clM0R0cnVlJTIyJTNFJTNDJTJGaWZyYW1lJTNF[/vc_raw_html][/vc_column][vc_column width=”1/4″][vc_raw_html]JTNDaWZyYW1lJTIwc3R5bGUlM0QlMjJ3aWR0aCUzQTEyMHB4JTNCaGVpZ2h0JTNBMjQwcHglM0IlMjIlMjBtYXJnaW53aWR0aCUzRCUyMjAlMjIlMjBtYXJnaW5oZWlnaHQlM0QlMjIwJTIyJTIwc2Nyb2xsaW5nJTNEJTIybm8lMjIlMjBmcmFtZWJvcmRlciUzRCUyMjAlMjIlMjBzcmMlM0QlMjIlMkYlMkZ3cy1ldS5hbWF6b24tYWRzeXN0ZW0uY29tJTJGd2lkZ2V0cyUyRnElM0ZTZXJ2aWNlVmVyc2lvbiUzRDIwMDcwODIyJTI2T25lSlMlM0QxJTI2T3BlcmF0aW9uJTNER2V0QWRIdG1sJTI2TWFya2V0UGxhY2UlM0RHQiUyNnNvdXJjZSUzRHNzJTI2cmVmJTNEYXNfc3NfbGlfdGlsJTI2YWRfdHlwZSUzRHByb2R1Y3RfbGluayUyNnRyYWNraW5nX2lkJTNEb3JpZ2lvdXRkbzA1LTIxJTI2bGFuZ3VhZ2UlM0Rlbl9HQiUyNm1hcmtldHBsYWNlJTNEYW1hem9uJTI2cmVnaW9uJTNER0IlMjZwbGFjZW1lbnQlM0RCMDA3SVMyS1hNJTI2YXNpbnMlM0RCMDA3SVMyS1hNJTI2bGlua0lkJTNENjcyYmQ1OTgxYWU5NmJjN2RlZTcwZDkzYmRkNmIxM2ElMjZzaG93X2JvcmRlciUzRHRydWUlMjZsaW5rX29wZW5zX2luX25ld193aW5kb3clM0R0cnVlJTIyJTNFJTNDJTJGaWZyYW1lJTNF[/vc_raw_html][/vc_column][/vc_row]
- Published in All Blog Posts, Articles, Bushcraft, Bushcraft General, Mountain General, Personal, Skills, Tools and Equipment
2018 UK Knife Law Changes
Tuesday, 01 May 2018

[vc_row][vc_column][vc_column_text]
2018 UK Knife Law Changes
Changes to UK Knife Law and what it means for the outdoor enthusiast
In the past weeks the news has featured several stories on UK knife crimes, knife law and the perception of knives as weapons as well as tools. This was followed by the announcement of a new Offensive Weapons Bill which will begin the process of changing of what is considered a legal knife, where they can be used/carried by the general public and how they can be acquired.
Last year a consultation on offensive and dangerous weapons was published, which caused a lot of discussion online from knife makers, owners and collectors from all sectors.
Whilst this is currently a bill (not yet an Act of Parliament, see the differences here) it is likely that some significant changes are coming for those who collect knives or purchase them for outdoor use.[/vc_column_text][vc_separator][vc_row_inner][vc_column_inner][vc_column_text]
Knives Purchased Online
The big changes are mostly about the types of knives and ‘weapons’ that can be owned in private and where they can be carried, but one change that is likely to have an impact on an outdoor user is a ban on knives being bought online being shipped to a residential address. Exactly how this will work and what workarounds can be created (shipping to a work address, pickup from a nominated place and so on) remains to be seen, but it will add a layer of complexity for those buying knives online.
Flick Knives and One-Handed Opening
Something mentioned in the original consultation document was an update to the definition of what constitutes an (already banned in the U.K.) flick knife:
England, Wales and Scotland
The current definition of flick knives in the Restriction of Offensive Weapons Act 1959 is
outdated and refers to the mechanism that activates the blade being in the handle. We will
delete the reference to the switch blade mechanism being in the handle, as manufacturers
now place the mechanism in a part of the knife that can be argued is part of the blade.
This means the prohibition on the sale, manufacture and importing of flick knives cannot
be circumvented through changes in their design.
Will this include knives with a thumbstud that can be opened with one hand? If so this will include knives that are very useful as rescue tools for climbing, mountaineering and canoeing/kayaking where one-handed operation could be crucial for a lifesaving cutaway from a rope entrapment.
UK Knife Law and EDC
This isn’t the first post we’ve put together on UK knife laws for the outdoor user, but it’s important in a country with strict knife-carry laws to be aware of any changes made and, potentially, how your useful outdoor tool is perceived by someone else.[/vc_column_text][/vc_column_inner][/vc_row_inner][/vc_column][/vc_row][vc_row][vc_column][vc_column_text]
UK Knife Law video on the Original Outdoors Youtube Channel
[/vc_column_text][vc_video link=”https://youtu.be/01yHH7iZuvU” align=”center” css_animation=”none”][/vc_column][/vc_row]
- Published in All Blog Posts, Articles, Bushcraft, Bushcraft General, Foraging, Law and Ethics, Mountain General, Personal, Skills, Tools and Equipment, Videos
GPS, Smartphones and Operational Security – is Strava the only problem?
Wednesday, 07 February 2018

[vc_row][vc_column][vc_single_image image=”8035″ img_size=”full” alignment=”center”][/vc_column][/vc_row][vc_row][vc_column][vc_column_text]
GPS, Smartphones and Operational Security – is Strava the only problem?
[/vc_column_text][/vc_column][/vc_row][vc_row][vc_column][vc_column_text]
The recent hullabaloo over the Strava heatmap reminded me of a strange case from a few years ago…
If you have any kind of interest in GPS, fitness apps, unusual maps or just technology news then you were probably at least vaguely aware of a story about the fitness app Strava and some analysis of the heatmap they published last month. This publicly-viewable heatmap of anonymised user data isn’t new – but the last update was from 2015 data. The 2017 data release included over 1 billion activities and 10 terabytes of raw data. The total distance clocked up was 27 billion KM – 180 times the distance from the Earth to the sun. It’s an impressive piece of user-generated information and it’s quite good fun to see which are the most popular routes to the summit of Snowdon, or the tracks made by people swimming, kayaking or SUP’ing in Llyn Padarn.
There’s also potentially a bit of a security risk – but that’s something I’ve got prior experience of, and it’s still a potential problem for those who work in ‘sensitive’ areas of the world.
The security issues raised over the Strava heatmap started off with Nathan Ruser, an analyst with the Institute for United Conflict Analysts:
Strava is arguably the most popular fitness app in the world, and members of the armed forces are no strangers to running, cycling and swimming to keep fit for their roles at work. It’s no surprise that many of them around the world (both on deployment and at home bases) use the app in the same way every other user does (me included). It’s almost certain that nobody in those roles is using Strava on operations, but running around the perimeter track of the base you’re deployed to is probably OK, right?
Well… although the data in the Strava heatmap is anonymised it does show the outline of that perimeter track. And all of the other tracks, and the access paths between accommodation blocks and admin areas. On bases that sometimes aren’t meant to exist, at least not officially. It’s something that the military forces of the world have probably been vaguely aware of, but it looks like it hasn’t been raised as a specific operational security (opsec) issue until now. I would put good money on there having been some rapid editing of operational procedures with regards to apps, smartphones and how those working and training in operationally-sensitive areas handle their own data. Knowing that the running app on your phone is going to share your movements with the enemy is something of a sobering thought. Strava have released a statement about the issue, and some advice for military personnel.
It’s not just fitness apps – a lot of people are surprised when I show them this link – if you have a Google account (all Android phone users and most of the western world probably do) then there is a good chance your daily position is being logged and uploaded to the Google servers. They even let you see your own personal location timeline – HERE.[/vc_column_text][/vc_column][/vc_row][vc_row][vc_column][vc_separator][/vc_column][/vc_row][vc_row][vc_column width=”1/3″][vc_column_text]
Strava released their global heatmap. 13 trillion GPS points from their users (turning off data sharing is an option). https://t.co/hA6jcxfBQI … It looks very pretty, but not amazing for Op-Sec. US Bases are clearly identifiable and mappable pic.twitter.com/rBgGnOzasq
— Nathan Ruser (@Nrg8000) January 27, 2018
[/vc_column_text][/vc_column][vc_column width=”1/3″][vc_column_text]
If soldiers use the app like normal people do, by turning it on tracking when they go to do exercise, it could be especially dangerous. This particular track looks like it logs a regular jogging route. I shouldn’t be able to establish any Pattern of life info from this far away pic.twitter.com/Rf5mpAKme2
— Nathan Ruser (@Nrg8000) January 27, 2018
[/vc_column_text][/vc_column][vc_column width=”1/3″][vc_column_text]
#stravaheatmap even helps to deanonymize map data: Military site in Germany pic.twitter.com/lpqLEJgS11
— DocMalloc (@DocMalloc) January 30, 2018
[/vc_column_text][/vc_column][/vc_row][vc_row][vc_column][vc_separator][/vc_column][/vc_row][vc_row][vc_column][vc_column_text]
But it’s not just smartphones and Strava – there’s another problem
This whole story reminded me of something that happened with a client of ours a few years ago. It has been long enough, and the story anonymous enough, for me to share it here – especially as it is probably still an overlooked opsec issue.
The advertised public courses on the Original Outdoors site probably only make up 40% of what we actually do. The rest is private training, consultancy and working with individuals and organisations to do something specific. A lot of that work doesn’t make it to the blog or our social media pages because we work under confidentiality agreements and our respect for the privacy, commercial sensitivity and sometimes opsec of those clients. We have worked with private military and security contractors on various things over the years and more than once doing work with GPS devices and navigation training.
There was one training session where I worked with a small group, all seasoned contractors with military backgrounds and who had been deployed to combat areas several times with their previous and current employers. I was about to deliver a session on GPS use and particularly the difference between routes, tracks, POIs and waypoints. One of the contractors handed me his GPS device – a Garmin model with no external connectivity – just an SD card and a port for attaching a data cable. Whilst scrolling through the menu screens and showing the rest of the group we discussed the relative merits of a standalone GPS versus a smartphone with a GPS/mapping app. The opinion of the group was that ‘dumb’ devices that didn’t transmit data to the wider world were more secure and ‘safer’ than smartphones.
Then I opened up the track history of that particular device.
There were several recorded tracks from the country the contractor had recently worked in, including from their base of operations out to various work sites on oil pipelines. Plus a long one that led from their compound to an airport, then another airport, then back to the UK.
Then along several motorways until it arrived at the contractor’s house. Where it squiggled around a bit whilst the GPS hunted for a signal until the battery died – presumably in their kitbag, forgotten until they next went to work.
This wasn’t from their most recent deployment either – they had more recent tracks, both ‘in-country’ and at home in the U.K.[/vc_column_text][/vc_column][/vc_row][vc_row][vc_column][vc_column_text]
Leaving your home address on the battlefield
Can you imagine what was going through that person’s head, realising that they had been carrying a map to their home (and family) around in a device strapped loosely to their belt or their chest rig?
They probably went through a ritual every time they left the gate of the compound to make sure they were as anonymous as they could be, and to separate their work life from their home life as much as they possibly could. They were very careful in how they used social media, and followed strict guidelines from their employer and colleagues about maintaining operational security – all whilst carrying around a map leading directly to everything they held dear in life.
As you would expect, this led to a discussion about deleting tracklogs from GPS devices and a greater understanding of exactly what information their GPS was gathering. I know that particular company has changed their procedures following that training session, and I make it part of the regular briefings when working with similar clients. I now have to mention Strava and fitness apps too I suppose…
It’s very similar to the Strava heatmap issue – a device of convenience being a little too convenient, and the data it gathers giving away more than you would like it to. Just like the Strava problem it can be avoided by understanding the technology used, and diving into the settings of the device to make sure it is only recording your position when you need it to, and that if it is sharing your location with the wider world you turn it off.[/vc_column_text][/vc_column][/vc_row][vc_row][vc_column][vc_column_text]
The Simple Advice
If you’ve read through this blog post and are wondering if it’s something that might affect you then here is the simple advice I give to clients when the subject comes up:
- If it’s a device that doesn’t transmit anything (most GPS devices without wifi or a sim-card slot) then make sure that you start and stop any track logs, don’t just let them run continuously
- If the device transmits information (smartphones, newer GPS devices, smartwatches etc) then pay careful attention to all of the settings of the app/device you are using. Most have the facility to turn off location sharing, or opt-out of sharing anonymised location data
- Be aware of apps running in the background that could be sharing your location – like Google Maps (see your location timeline here)
Being careful with potentially sensitive information is nothing new to those working in the military and security fields – but as technology and the way we use it continues to evolve we need to be more vigilant about what we share – and also what is being shared by those who work with us.[/vc_column_text][/vc_column][/vc_row][vc_row][vc_column width=”1/2″][vc_facebook][/vc_column][vc_column width=”1/2″][vc_tweetmeme share_via=”originaloutdoor” share_recommend=”originaloutdoor” share_hashtag=”stravaheatmap”][/vc_column][/vc_row][vc_row][vc_column width=”1/3″][product id=”7294″][/vc_column][vc_column width=”1/3″][product id=”7253″][/vc_column][vc_column width=”1/3″][product id=”7241″][/vc_column][/vc_row]
- Published in All Blog Posts, Articles, Land Navigation, Personal, Skills
The mystery of the Cwm Tryfan ice axe
Monday, 15 January 2018

The Mystery of the Cwm Tryfan Ice Axe
We found something long-forgotten on the slopes of Tryfan…
So, New Year’s Day 2018… chasing the last of that patch of snowy weather we decided to welcome in the new year with a gentle scramble to the summit of Tryfan (917m) via the Heather Terrace and then the South Ridge. This is a familiar route and we started late, quickly gaining height and feeling the force of the first storm of January.
Rather than Three Men in a Boat we were three men and an ecologist (who is also a girl called Rhian). We didn’t have a dog called Montmorency but we did make do with a cocker spaniel called Darcy.

Darcy and The Doctor
The trip to the summit and back was uneventful (apart from my stirring rendition of Auld Lang Syne on the South summit), but as we descended the path out of Cwm Tryfan alongside the stream leading to Gwern Gof Uchaf something strange occurred…
[divider]
The Discovery
The exact moment of discovery wasn’t quite captured on camera (although it was faithfully recreated for the GoPro in the video below), but it went something like this:
Tom, also known as Dr. Tom (mostly because he claims to be a doctor, but we rarely see evidence of it) ventured a short distance from the well-worn path to relieve himself in the heather. As the rest of the group reached his general location he finished and strode back up to the track. About a metre before reaching the track he spotted something sticking out of the heather and bilberry:

It turned out to be a Grivel ice axe, showing some considerable signs of weathering. It was buried, shaft downwards, in the vegetation and there is nothing to suggest that it had been placed there recently.
So, had Tom just discovered a vintage axe in the vegetation right next to a fairly busy Snowdonia footpath?
After a bit of examination on site Tom shoved it in his pack and we continued our descent – hastened onwards by the promise of hot chocolate at the Siabod Cafe.

Later that evening we examined the axe (aided by beer). It is definitely a Grivel axe, and the wooden shaft showed some significant aging and was consistent with a few decades in the elements (albeit protected by a screen of mountain vegetation). Some very gentle research (aka asking Alex Roddie) suggests that it’s a 1960s model but modified for a slightly dropped pick to suit the changing style of winter climbing in the last half of the 20th century. The surface corrosion wasn’t total so I don’t THINK it can have been left out there longer than a couple of decades, but my knowledge of the corrosion rate of mountaineering gear alloys is sadly lacking.
Tom is claiming stewardship of the axe – as he found it, and he is now armed with a vintage ice axe so probably shouldn’t be argued with…
So if you’re reading this and have any information on either this particular axe (which hundreds of thousands of mountaineers have walked within inches of and not noticed) or just the model or anything else we will happily pass it on to Tom. Please get in touch through the comments below or via email.
[divider]
Location
I was too distracted by the thought of warm sugar and milk served by a grumpy landscape photographer to remember to grab an accurate grid reference, but it was approximately SH 669 595 (although I am happy to be corrected on that).
This is the general area – not far above the fenceline that is crossed near Tryfan Bach:
[divider]
Dramatic re-enactment of the discovery of the axe
[divider]
Gallery


- Published in All Blog Posts, Articles, Behind The Scenes, Personal, Skills
Do I need to bother with bow drill?
Thursday, 07 September 2017

Bow Drill Skills: Are they worth learning?
One of the skills most associated with the world of ‘bushcraft’ is that of making fire by friction. The image that normally accompanies that description is somebody crouching over a contraption that looks like a fiddle crossed with a rolling pin, furiously sawing back and forth with (ideally) smoke billowing from the base of the device.
This is the ‘bow-drill’ (Bow Drill, Bowdrill, Firedrill, Fire Fiddle etc etc) method and has become inextricably linked with the popular image of bushcraft and survival skills.
We teach this method on our bushcraft courses, and it is often something that clients look forward to and specifically request when we have a free moment in the itinerary and ask them “what next?”.
So we break out some pre-prepared bow drill sets and get down to making some embers…
Richard Prideaux demonstrating bow drill technique
I’ve found over the years that the course participants normally pick up three very important things from seeing the demonstrations then having a go for themselves:
– It’s a lot harder than it looks to get a consistent rotation of the drill without something going awry
– It’s physically demanding and needs patience
– Success is not guaranteed
With skill, patience and the right materials an experienced user can normally get an ember with less than a minute of actual ‘drilling’ action but it is dependent on several variables all lining up correctly to achieve that.
Why do people want to learn how to do it?
Here are 3 direct quotes about fire by friction/bow-drill from instructors that I have heard over the years:
“This is the most important outdoor skill you can learn”
“If you lose all of your equipment this will save your life”
“If you can’t do this then you are not a real outdoorsman”
A quick trawl through the various bushcraft/wilderness skills Facebook groups, forums, YouTube channels and magazines will come up with statements and comments that might not be as succinct as those above but are along the same lines. Then there are the hundreds of articles, blog posts and videos offering tips and techniques that will improve your chances of success. “Bow Drill” is now one of the keywords of bushcraft, along with “knife”, “axe” and “Ray Mears”. You can even purchase knives with divots in the handle so that you can use it as a bearing block (the top of the ‘drill’) in a dire survival situation.
There is undoubtedly some merit to the bow drill firelighting technique:
– It mostly makes use of materials from the environment, not items carried
– Components can be replaced as they wear out or are damaged
– Does not require electricity, flammable liquids/gas or metal components to use
It is also a truly ‘primitive skill’ and would have been understood by our paleolithic ancestors (or indeed indigenous people around the world today). In a world before lighters, ferrocerium rods or even steel then fire by friction would have been a skill passed down throughout a community and as important as making a blade or finding edible plants.
For the modern outdoorsperson and enthusiast it is touted as being an “essential bushcraft skill” (see instructor quotes above) and it is both expected by bushcraft course participants and a requisite for all good bushcraft and wilderness skills course providers.
Are Bow Drill skills that useful?
Yes.
No.
Maybe.
It depends.
Deciding if something is actually useful is of course dependent on the intended use. In a world where we do have lighters, matches, ferrocerium rods, chemical firelighting, electronic firelighting (you can have a lot of flammable fun with wire wool and a battery) and dozens of ways of keeping them dry the Bowdrill set becomes a little redundant.
But what if you lose all of your other gear?
There is another quote from an eminent instructor that I think answers this quite eloquently:
“If you are stupid enough to lose your lighter and firestriker and get all of your matches wet then you are probably too stupid to learn how to bow drill”
A real survival situation is something you try to avoid by making good decisions and with careful preparation. If you lose your lighter your fallback shouldn’t be to rip the laces out of your boots and start whittling a drill – it should be to call yourself an idiot and then go get the other lighter from your pack. Or the firesteel on your belt or clipped to your pocket. Because you brought multiple firelighting methods, right?
If you are travelling somewhere that it is quite possible that you will find yourself in a situation where lighting a fire will make a big difference to your immediate health or safety then you need to carry a way of making fire.
If you are travelling somewhere that you will have to light a fire to cook on, purify water or perform other basic tasks then you will need to carry MULTIPLE methods of making fire.
Accidents happen. Kit is lost on river crossings or can fall overboard. You might be separated from your pack or kit due to unforeseen circumstances. Things break or get lost due to carelessness. We’re human and things happen. But in the modern age we have so many cheap, lightweight and reliable firelighting methods that there aren’t many reasons not to carry more than one way of making a spark, a flame or an ember.
If I am hiking, canoeing or otherwise moving or working in an environment where fire is either required or desireable I will have on my person or in my kit:
1. Ferrocerium rod and striker (clipped to trouser pocket loop or belt)
2. Disposable lighter with ferro (‘flint’) striker (normally in pouch on belt or in pocket of PFD if canoeing)
3. Lifeboat/windproof matches (2 or 3 packs in various places in rucksack)
I also normally carry some prepared tinder or similar either in waterproof plastic bags or in a waterproof form (such as strips of bicycle innertube).
So if I lose my firesteel or it breaks in two then I can use my lighter. If I lose that too then I can still light a fire using the matches and warm myself whilst simultaneously deciding if I need to re-examine the decision-making process that led to me losing all of my other kit…
But what if it’s unplanned?
There are of course situations where you can find yourself thrust unexpectedly into a genuine survival situation. However, outside of contrived and survival TV shows like Naked and Afraid or Alone the number of possible scenarios where you will need to make a fire and you have arrived there with no other equipment whatsoever are pretty slim:
The Plane Crash
If you were a passenger on the plane then chances are that you hit the ground somewhere close to, if not actually inside, the aircraft itself. A big pile of jagged metal, flammable liquids and materials and batteries, electrical components and probably SOME survival equipment like flares etc. You have plenty of options to explore before you need to start trying fire by friction.
The Stranded Vehicle
In this scenario it is a broken or stuck car or truck somewhere far from external help. It might be deep in winter or high summer in the desert, but as with the downed aircraft scenario you are basically sat in a big shelter/survival kit. It is powered by flammable liquid and needs a battery to keep the engine and ancillary components running. Also – if you are for some reason travelling through such a remote area why haven’t you thrown in a few emergency items for just this scenario?
The River/The Sea
It’s not beyond the realms of possibility for even an experienced kayaker or canoeist to find themselves washed on a beach or riverbank watching their very expensive canoe or kayak, stuffed with their camping and safety kit, drifting away downstream or on a current. Dressed only in a drysuit (at best), some kind of footwear and a PFD (Personal Flotation Device) what are they going to do? Well, if you have decided that yes, a fire is the thing that you need then you should just grab the small firelighting kit from the pocket of your PFD or belt and get cracking on looking for some dry kindling. You didn’t think of this possibility and have found yourself far from help, paddling alone with no provision for possibly falling out of the canoe? Well, natural selection is still in effect, and your corpse might provide food for another creature at least.
The scenarios could continue, but they all come down to either:
1. You will rarely travel without there being SOME other way of making fire around you
2. If you are travelling in a way that you won’t have other items around you – carry fire WITH you.
The root of all of this is that fire by friction and making a bow drill set should be a long way down your list of solutions when the need for a fire arises. It is fiddly and time consuming to make (especially if you need to make natural cordage), requires a lot of skill to use and success is NOT GUARANTEED. It is also quite wasteful of calories and can be very demoralising if not successful. It can be hard enough to get right when well-fed in ideal conditions under a parachute shelter in some pleasant woodland. There are normally aggravating factors in a survival situation, such as injury, lack of food/water and (if fire is required) the risk of hypothermia. Would you be better off building a simple shelter and getting out of the wind, off the cold ground and conserving body heat and energy?
What if I just want to learn how to do it?
That’s fine. It is very rewarding the first time you get an ember, and I admit that I really enjoy watching someone battle through the multiple failures to get to their first glowing coal in the notch of the hearth board. The point of this post is to highlight the difference between an IMPORTANT SKILL and one that is fun to learn and achieve, not to put you off learning how to do it for yourself.
It is also good to learn a skill that connects us with our ancestors and to start off with a pile of wood and maybe some cord and end with a roaring fire. The first time you see it it looks like a magic trick, and I suspect that is part of the reason that so many are interested in learning how to do it for themselves. The first time I saw it I immediately wanted to try for myself – a very similar thing happened the first time I saw someone turn a bowl on a lathe, shoot a bow or play Tomb Raider (a good indicator of my age/generation!).
So, should I bother to learn how to make and use a bow drill set?
This is normally where the demonstration of the bow drill comes to on our courses. After watching several people fail, succeed, get frustrated and learn patience with the technique the mood of the group can be a little less enthusiastic than it was. At this point I go through the points above – where are you going to use this technique? Is it as easy as you thought it would be? Are other methods easier/more reliable? What is your motivation for learning this skill?
The final decision is of course down to the individual user and it is up to you to form your opinions. I’ll leave you with a few things to consider:
- Are your fireskills good enough to reliably make a fire from a bow-drill ember every time?
- If you’re travelling somewhere you will need to light a fire are you carrying enough backup methods?
- If you lose your kit will you still have a firelighting method on your person?
- What’s your motivation for learning this technique?
- Do you need to improve your skills elsewhere too?
[divider]


- Published in All Blog Posts, Articles, Bushcraft, Bushcraft General, Personal, Skills
Private Expedition Training in North Wales
Tuesday, 05 September 2017

Private Expedition Training with Mike and Wayne
In the winter of 2016 I was contacted by a gentleman (Mike) who was enquiring about the possibility of some bespoke private training. Funnily enough, Mike had found us through the review of the Katadyn Gravity Camp Water Filter we wrote last year. You never know how things will work out…
After a brief conversation Mike explained that he and one or two others were interested in the idea of a week of navigation and expedition skills training with Original Outdoors, with a mix of woodland and mountain environments.
We discussed a few different ideas over the winter months and settled on a syllabus that included:
– map/compass navigation
– natural navigation
– route planning
– resource and logistics for expeditions
– campcraft in different environments
– emergency techniques
The venues for the course would be our basecamp in North Wales on the edge of the Vale of Clwyd and the Carneddau mountains in Northern Snowdonia.
Bespoke training courses are sometimes tricky to pull together. The client/s normally have a general sense of what they want to learn, but I always need to drill down into what the client’s vision is. Are they heading off on a trip to a specific place or environment? Do they need to perform certain tasks when they get there? Will they be able to resupply en-route or does everything need to be packed in? What about medical evacuation and calling for help?
The thing is – planning an expedition or trip for 3 days or 3 months is a similar process. It’s all a matter of scale and understanding the task. For courses like this I can only teach so many practical skills, the rest is all about decision making and having a strategy for dealing with the problems one is likely to encounter. So any bespoke expedition training has to cover as much about planning and contingency as it does about compass work and choosing a tent over a hammock and tarp.
A lot is down to personal preference too – and that cannot be taught, only experienced. The huge range of outdoor gear available these days means that there are nearly millions of combinations of gear one can choose from. Gas stove or meths? Stove or fire? Tarp and bivvy or tarp and hammock? Boots or trail shoes? I know experienced outdoors-people that would argue for hours over those combinations, and each one certain that they had the right idea.
So the week went along roughly as planned, with a minor change of plan to avoid some poor weather. I’ve pulled together some photos of the trip with Mike and Wayne, plus a short video showing what we got up to.
If you have your own idea for some private training or a trip then please do not hesitate to get in touch with us.
[divider]
[divider]


- Published in All Blog Posts, Bushcraft, Bushcraft General, Camping, Course Reports, Mountain, Mountain General, Personal, Skills, Videos
How to save yourself – a tale of survival from a friend
Monday, 03 July 2017

How to save your own life
A tale of everyday survival from a friend
If you have attended one of our courses or engaged me in conversation about the idea of survival training or prepping for potential survival situations then you will probably remember my having some fairly robust opinions on the whole subject. One of the points I often try to raise is that real survival situations – as opposed to heading out to ‘rough it’ with minimal gear – sneak up on you. You can’t see the situation building up in the distance, with a sweeping fanfare of your personal inner soundtrack heralding the arrival of your ‘moment’. The time when you get to put your training and preparation into action will probably just blindside you and throw you deep into a world of hurt – sometimes literally.
If you read up on real survival situations and those who have survived them (and more importantly, those who did not) then there is the common theme of being in denial about the whole situation. It isn’t just panic, although that plays a part – there is also an element of lethal familiarity.
If you spend extended periods in and around dangerous and life-threatening environments then the psychology of denial will help bury those risks and lead you to actions and behaviour that will betray you when the ‘bad thing’ actually happens. Inappropriate actions under threat can be anything from driving headlong into the raging river because it’s your regular route home and the water “can’t be THAT deep” to actively trying to push your rescuer underwater when your drowning reflexes kick in.
The way to combat these potentially lethal responses to danger is via two routes – awareness and training.
Survival Awareness
By being aware of your surroundings, the potential hazards and being realistic about how likely the various potential calamities are you can develop an appropriate response. Live in an area prone to earthquakes? You can read up on the current advice on what to do in case of a quake and what items you should have in your ‘earthquake survival kit’. Do you regularly travel in remote and wilderness areas? Then remote-area first aid training and equipment specific to wilderness first aid should be high on your list of priorities.
Survival Training
Television shows and gear manufacturers would have you believe that survival training is all about running up and down mountains, swimming in icey waters and knocking up a pile of useful equipment entirely from twigs and berries – but in nearly a decade of survival training with civilians, businesses, SAR, emergency services and the military the truth is a little less exciting.
Survival training can be split into two areas – prevention and reaction. Prevention is everything you do to make sure that you don’t end up in a survival situation, from ensuring your navigation skills are up to scratch to having a realistic approach to equipment and personal admin. Reaction is what you do in the seconds, hours and days following the ‘bad thing’ occurring. That kind of training is about building constructive automatic responses to life threatening situations and re-coding your brain so that your reflexes save your life and don’t kill you or endanger those around you.
Very recently a friend sent me an article she had written for somewhere else, and with her kind permission I have included it in this blog post. It perfectly illustrates all of the points raised above:
- Survival situations hit you quickly and often with little warning
- You won’t be as prepared as you think you might be
- Training and constructive reflexes will help you get past the inital adrenaline-filled moments
[divider]

The scene of the incident – the rope ladder has since been added
November 2015 – somewhere alongside a canal in the south of England
It was about midnight, -1ºC, nobody around, and I was due on an early shift the next morning. I’d spotted it was getting frosty so went out to the car to cover the windscreen so I could get away quicker in the morning.
I was wearing jeans with long boots underneath, a heavy fleece top, and was carrying my handbag.
As I returned to my boat, walking pretty briskly, my foot skidded on an icy metal panel and I fell flat with one arm – the one holding my bag – out in front of me. The weight of the bag and the fact that I was on a wet frosty wooden pontoon meant I just kept sliding. Strangely, I had two clear thoughts that I can still remember – 1) “I’ve fallen over”, closely followed by 2) “I’m under the water”.
Thankfully my keys were in my hand and I managed to fling them up onto the pontoon so that was one less thing to worry about.
It took a second for the feeling of cold to kick in, but sure enough, off went the gasping. I clearly owe a lot to my Wilderness First Aid training as we’d covered the gasp reflex and I knew in theory that it should stop soon – but now that I was actually in that situation did I risk waiting, or try to get out?? Because my clothes were so heavy with the water and there was no straightforward way out, I decided to test the theory. I held onto the pontoon, which thankfully I could just reach, and waited.
Sure enough, my breathing gradually came back under control.
Right then, I thought. NOW I’ll get out.
My first decision was that I needed 2 hands. Bye bye, handbag… Ideally I’d have got rid of my shoes but they were long leather boots which were under my jeans and it would have taken too long to struggle with them, so they stayed.
Even with both hands free it was far less easy than I’d anticipated. I was trapped in a small triangle of water between the bow of the boat and 2 pontoons at right angles to each other. The boat has smooth high sides, and the metal was frosty and there was no way I could climb up. I couldn’t touch the bottom of the canal – and frankly probably wouldn’t want to…
 The pontoon was a floating one and when I tried to heave myself up onto it my legs just swung up underneath it, so I had nothing to push off. I tried that 3-4 times, and was aware I was getting very cold and tired and probably didn’t have the strength to try again if I failed again.
Over my head I could just reach the rope that moors the boat to the pontoon. I held onto it for a few seconds’ rest while I considered my options.
I could shout for help, but it was very late and I probably wouldn’t be heard, plus I was so cold I doubt I’d have got much noise out, yet I could end up out of breath or swallowing water. I decided this was last-resort Plan C.
I could go under the pontoon because I knew there was a ladder on the other side. However, having got my head above the water, I didn’t fancy going back under again. It was very dark and I didn’t want to risk being stuck under the pontoon or attempting to surface in the wrong place. That route became Plan B.
That left me with the option that did get me out – a gargantuan effort to flick my legs out of the water and cling sloth-like upside-down to the rope overhead. I managed to do that, and then to flip myself from there onto the pontoon.
Relief!! I made it!!
The relief didn’t last long, though. I was shivering violently, and realised I needed to get the wet clothes off fast. With numb and trembling fingers I managed to strip the heavy fleece off on the front deck, retrieve my keys (Yes!!) from where I’d managed to throw them earlier, get inside, and towel down and get a dressing gown on.
This being a boat, the indoor temperature was about 10ºC so I needed to get a fire lit in the stove, which took a little bit of doing in the chilled and weary state I was in.
As the room warmed up, I took stock. My arms, legs and ribs were bruised, battered and pretty sore from the various attempts to climb out.
I couldn’t phone anyone because my phone was in my back pocket, full of water, and useless.
I’d lost my purse and all my bank cards, driving licence etc, plus my work pass, as they were in the bag. I went back out with a net and fished for it, but no luck. In fact, despite the canal being only about 7’ deep and the bottom visible depending on the weather, and knowing precisely where I let it go, I’ve never found it – mystery!
I was about to head to bed when I heard a funny noise, like someone blowing a loud and prolonged raspberry. Just to add insult to injury, the ‘Key Buoy’ keyring I had attached to my keys suddenly activated, and shot out a huge flashing orange balloon which proceeded to mock me for the next 3 days. “Well, that’s a lot of use NOW!”, I shouted at it. I may have added some other words too.
I was on time for my early shift…
[divider]
The RNLI is currently promoting a safety campaign that should be required reading for anybody who ever goes near water (so, pretty much everyone): How To Float
- Published in All Blog Posts, Articles, Bushcraft General, Emergency and Safety, Mountain General, Personal, Skills
How to put together a first aid kit for the outdoors
Tuesday, 20 June 2017

How to put together a first aid kit outdoors
Wilderness personal medical kits
How do you put a first aid kit together for the outdoors? Or a bushcraft first aid kit? Are first aid kits for mountain biking different to ones for kayaking?
Carrying a first aid kit in your rucksack or in your personal kit is pretty difficult to argue against. The problem is – how much do you carry, and what exactly do you carry? Once you start going down the road of visualising every possible emergency medical scenario and wanting to ‘be prepared’ for it. Before long you end up carrying several kilograms of equipment that in all likelihood you will never use – but you somehow feel that you need to.
The reality is actually a lot simpler. There are two important points to remember for outdoor emergency first aid:
- Training is the absolute most important thing you can put your time and money into. Knowledge weighs nothing and the most important lifesaving techniques require good personal skills but little to no equipment.
- If you are on your own in the middle of nowhere then the options open to you self-treatment are actually very limited.
With that mildly-sobering thought in mind – how do you put together a first aid kit for the outdoors?
The answer is dependent on several factors:
- The environment you are travelling too/through and specific hazards it may contain
- The length of trip
- Distance/time to evacuation and medical care in case of emergency
- The number of people (and animals) in the party
- The existing medical conditions of those in the party
- The training and skill level of those in the party
- The activities you are performing
- Your carrying capacity (rucksack, canoe, vehicle, porters etc)
For example – the medical kit for a 5-week sailing voyage to the Lofoten islands would be different to that of a solo lightweight backpacker on a 3-day summer trip in the Cairngorms. For the former a Bag Valve Mask (BVM) and full suture kit would be appropriate but would a little ridiculous for the solo hiker.
I have used various medical kits in my work over the years. In my time in a Mountain Rescue team I carried a small personal first aid kit that contained a minimal number of items and drugs – but it was designed to be pooled with the other kits carried by fellow rescuers to form a larger and more comprehensive kit. I supplemented this with items purchased myself such as Tuffcut shears and nitrile gloves. When working as a remote-area medic as support on long-distance races and outdoor challenges I was either carrying a very comprehensive kit issued by the company employing me, or I was given a budget to supply my own equipment at my own specification. I have also put together my own for various trips, plus also kits for Original Outdoors staff and freelance contractors to use when working with our own clients. Each case has been slightly different…
The easy answer to “what’s the best outdoor first aid kit?” is – they all are. The real skill is choosing or building one that suits where you are going, what you are doing and what you’re doing when you get there. To that end I’ve put together a video on the decision-making process that I go through for any trip or scenario, and the items I carry in one of my personal kits:
[clear]
[clear]
First Aid Kit Contents
The list below is based on the items shown in the video, with links to buy them directly from Amazon. Some of the brands or sizes are slightly different or only a few representations of what I carry. The items are not listed in order of importance, just to roughly match the order from the video.
I’ve also put a link to the Lifesystems first aid kit which is a very similar off-the-shelf kit that I can personally recommend – even if it’s used as a base to add other items to.
[divider]
[two_third]
Nitrile Gloves
Get them in any colour other than red or black – you need to be able to see if blood suddenly appears on them when giving a primary or secondary survey as it will steer you towards a major bleed you may have missed.
[/two_third]
[one_third_last]
[/one_third_last]
[divider]
[two_third]
Resus Face Shield
An item of personal safety that should be somewhere easy to reach but can also make your CPR technique more effective.
[/two_third]
[one_third_last]
[/one_third_last]
[divider]
[two_third]
Anti Bacterial Wipes
Great for cleaning up after dealing with a minor wound and preventing your kit contaminating everything it touches.
[/two_third]
[one_third_last]
[/one_third_last]
[divider]
[two_third]
Alcohol Hand Gel
Be aware that carrying alcohol in your first aid kit may cause issues when travelling to countries where alcohol is banned or severely restricted
[/two_third]
[one_third_last]
[/one_third_last]
[divider]
[two_third]
Normasol Sachets
Sterile topical solution in sachets for careful application over wider areas.
[/two_third]
[one_third_last]
[/one_third_last]
[divider]
[two_third]
Sterile Eye Wash Pods
Sterile topical solution in pods for washing foreign bodies from eyes.
[/two_third]
[one_third_last]
[/one_third_last]
[divider]
[two_third]
Fabric Adhesive Dressing Strip
Adhesive dressing strip on a roll for making custom plasters/band-aids for tricky areas like between fingers.
[/two_third]
[one_third_last]
[/one_third_last]
[divider]
[two_third]
SteriStrips
Temporary adhesive suture strips for wound closure.
[/two_third]
[one_third_last]
[/one_third_last]
[divider]
[two_third]
Blister Plasters
Being able to treat or manage a blister can make the difference between carrying on or turning around to go home
[/two_third]
[one_third_last]
[/one_third_last]
[divider]
[two_third]
Non-Adherent Dressings
General use dressings without any adhesive.
[/two_third]
[one_third_last]
[/one_third_last]
[divider]
[two_third]
Triangular Bandage
I have yet to use one of these as a sling, but they are quite useful for holding other dressings on or wrapping over wide areas.
[/two_third]
[one_third_last]
[/one_third_last]
[divider]
[two_third]
Wound dressings (Various sizes)
Absorbent wound dressings in various sizes
[/two_third]
[one_third_last]
[/one_third_last]
[divider]
[two_third]
Travel Mirror
Great for reaching places that the eyeball can’t!
[/two_third]
[one_third_last]
[/one_third_last]
[divider]
[two_third]
Glucose Gel
Glucose gel for hypoglycemic emergencies.
[/two_third]
[one_third_last]
[/one_third_last]
[divider]
[two_third]
Round-Tip Scissors
Small scissors with rounded ends for safety
[/two_third]
[one_third_last]
[/one_third_last]
[divider]
[two_third]
TuffCut Shears
Tough shears for emergency clothing removal
[/two_third]
[one_third_last]
[/one_third_last]
[divider]
[two_third]
Tweezers
For removal of small foreign bodies
[/two_third]
[one_third_last]
[/one_third_last]
[divider]
[two_third]
Microlance Needles
Tiny sterile needles for making small holes to drain blisters etc
[/two_third]
[one_third_last]
[/one_third_last]
[divider]
[two_third]
Disposable Thermometer
Of limited use in a first aid environment but helpful for long-term monitoring of a patient
[/two_third]
[one_third_last]
[/one_third_last]
[divider]
[two_third]
Tick Removal Card
For safe removal of ticks
[/two_third]
[one_third_last]
[/one_third_last]
[divider]
[two_third]
CAT Tourniquet
Not for general carry and must be trained in use
[/two_third]
[one_third_last]
[/one_third_last]
[divider]
[two_third]
SAM Splint
Useful but heavy and other items can be improvised to replace it.
[/two_third]
[one_third_last]
[/one_third_last]
[divider]
[two_third]
Lifesystems Mountain Leader First Aid Kit
A comprehensive and well-designed outdoor first aid kit.
[/two_third]
[one_third_last]
[/one_third_last]
- Published in All Blog Posts, Articles, Bushcraft General, Emergency and Safety, First Aid, Mountain General, Personal, Skills, Tools and Equipment, Videos
The Importance of Being… a navigator
Wednesday, 06 May 2015

The Importance of being a Navigator
A few years ago in an interview I was asked by the keen young journalist what my ‘Top 3 Survival Skills’ are. I paused for a moment to consider which I would choose, the immediate needs of water and shelter followed by food springing to mind. But I chose to go in a slightly different direction, and this was my answer:
“For the UK environments? Hmmm… Navigation, First Aid and Fitness for Task.”
This led to a raised eyebrow (wasn’t I meant to be talking about sharpening big knives or tinder bundles?) and more questions. I’ve been asked why I chose those answers, several times since – and this is part of the explanation I normally give.
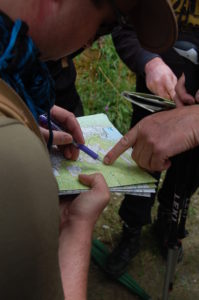 Navigation is a Lifesaver
A big part of my background working in the outdoors was as part of a North Wales Mountain Rescue team. Like most emergency services, we only tended to meet our ‘clients’ when something had gone wrong, which gave me a good chance to see where most people made mistakes. A quick look over the published statistics of Mountain Rescue England and Wales or the Mountain Rescue Council of Scotland will show a distinct trend – people get themselves into big trouble by not knowing where they are.
Let’s look at a common example; getting lost in one of the busiest places in North Wales – Snowdon. Wales’ highest peak attracts around half a million people to the summit every year. It is no coincidence that the valley below is home to one of the busiest mountain rescue teams in the UK – around 150 or so of those visitors require the assistance of Llanberis Mountain Rescue Team or the RAF Sea King helicopter from nearby RAF Valley every year. Sadly, there also a handful of deaths every year, in all conditions.
So where do people go wrong? As well as not bringing the correct clothing and footwear, or essential items like a headtorch, a common error is not knowing where they are, or how to get safely back down to the valley from where they are. It is easy to find your way to the summit and back on a bright summer day (just follow the crowds on one of the 8 main paths!), but the mountain can become a nightmare in low cloud or when the weather turns. Snowdon is only a few miles from the sea, and as warm, wet air hits the mountain and rises it makes cloud and rain – British mountains are quite literally rain-factories! I have experienced the weather change in Snowdonia from warm sunshine and light winds to snow and sub-zero windchill in less than an hour – and the visibility drops from miles to metres as quickly.
So what happens when you have walked up to the summit via the PYG Track in great visibility and warm weather, but on your return journey the wind and rain are battering you and you need to find that crucial turning off the ridge and back onto your original path? Well if you have prepared properly (both in your kit and your personal skills) then you will take out your map and compass, work out where you are, work out where you need to go, and plan a route to get you onto the correct path safely. Simples. If you haven’t brought a map and compass, or have them and don’t know how to use them then you might be in trouble. You may also soon be meeting my old colleagues in red jackets with Mountain Rescue badges!
 But that’s just the mountains, right?
This isn’t just something that happens in the mountains. One of the callouts I coordinated in my final year in Mountain Rescue was dealing with a call from a rally spectator. He had been watching a stage of the World Rally Championships in Clocaenog Forest, and had found a remote corner of the course to get a good view of the action.
He had sat around until the final car had gone past, and then noticed that it was dark.
That his headtorch didn’t work.
That his phone had no signal.
And that he had absolutely no clue where his car was parked, or where he was.
Bugger.
After a couple of hours of following seemingly identical forest tracks he managed to find a high point and get a phone signal. He phoned 999, spoke to the Police, who contacted Mountain Rescue.
Using a tool called SARLOC we were able to locate him (he had walked a couple of miles further away from the road, and was about in the middle of nowhere as it is possible to be in North Wales) using the GPS in his phone. We despatched a Land Rover to collect him and make sure he was healthy and fit to drive home.
Now this was a warm-ish November evening, and he was well dressed for the conditions. Not so the three guys rescued a few years earlier who had brought plenty of beer but not much gear for a night of ‘wild camping’ in a Scottish forest, only to lose a rucksack in a river and end up being rescued 24hrs later (very cold and wet) when by chance they stumbled into a group of hillwalkers. I know of several people who have become misplaced in the smaller forests of Southern England, and even two renowned wilderness skills experts who became ‘alcoholically misplaced’ in the wilds of London after leaving an unfamiliar pub and being unable to find the tube station. You know who you are guys!
How do I prevent becoming a statistic?
Time for some good news – learning how to navigate in the UK is easy enough, as long as you go about it in the right way. Navigation is a perishable skill – if you don’t use it, you lose it. However you choose to learn – book, articles, online or through a navigation course – make sure that you go out and practice regularly. I always tell my students at the end of a course to go out and buy a map of the area they often walk in, and then just study it and have it to hand when walking the dog or walking back from the shops. I guarantee you will find something nearby that you didn’t know was there, and your overall skill level will improve.
5 Tips for Improving your Navigation Skills
- Practice. Don’t be the person who only gets the map out when you need it – regularly consult the map even when you know exactly where you are. It will keep your brain ‘tuned in’ to the symbols and scale of the map, and it means you will be able to make good navigation decisions under pressure.
- Challenge yourself. Even if you are confident as a navigator, it is good to challenge your skills and make sure you aren’t becoming rusty. This is the biggest area of improvement we find when working with our military clients – you learn once and then the skills start to turn to sludge in your brain. So pick a point on your route on the map, and try to work out how long it will take you to get there – then see how accurate you were.
- Learn about your compass. A good compass should cost more than £10 and be able to have a bearing set by moving a turning ring on the top. There are dozens on the market – my favourite is the Silva Type 4. Make use of the scales to measure distance accurately, and learn how to plot a grid reference to six figures.
- Don’t rely just on GPS. GPS devices are cheaper than ever, and most of us have them in our phones these days. They are good for finding your position – as long as the battery lasts, you don’t break it and you know how to use it. Plenty of people have been rescued who are holding a fully functioning GPS, but no idea how it works.
- Take the time to learn. Navigation is a skill that is easy to pick up – there are dozens of books out there on the subject, as well as online articles and videos. I normally recommend that people go and book on to a course for beginners, as it is a good way of being shown the basics which they can then go and develop in their own way. Everybody learns differently, and we need to give ourselves time to develop our own skills in our own way – any good outdoor coach will agree with me.
You can learn these vital outdoor skills for yourself on one of our UK navigation courses held throughout the year in North Wales and beyond.
- Published in All Blog Posts, Articles, Bushcraft General, Land Navigation, Mountain, Mountain General, Personal, Skills