It's safe to say that Andy has made his way through life so far by pushing himself and deliberately pitting...
Read More3:8 :: Big wall climbing, real-life survival and accidental comedy with Andy Kirkpatrick
Sunday, 14 May 2023


Bestseller
Coastal Foraging
The Coastal Foraging Walk from Original Outdoors is an introduction to edible plants, seaweeds, shellfish and other wild foods on the beaches of North Wales.
Bestseller
Foraging and Wild Food
The Foraging and Wild Foods Course from Original Outdoors is an introduction to edible plants, fungi and other wild foods in the fields and woodlands of North Wales. It is, by far, our most popular course.
New for 2023
Modern Bushcraft
Bushcraft and Wilderness Skills courses for the modern age. Courses that focus on the equipment, skills and mindset for practising bushcraft in the 21st century.

Bespoke
Private Training
All of our standard public courses are available to book as private events for individuals or groups. We have availability all year round and can recommend timings and locations to suit your needs.

3:7 :: Gear advice, time-travelling explorers and book recommendations
Richard Prideaux answers questions from our patrons, discord members and audience with a backdrop of crackling campfire, interfering dogs and...
Read More
3:6 :: UK military survival training with Chris Smart
Chris Smart is ex-military and now runs 112 Survival, a survival training company based out of a wood in Shropshire,...
Read More
3:5 :: Assumption of Function
This episode is delving into the importance of not making assumptions. You've bought a brand new stove for an outing...
Read More- Published in All Blog Posts, Emergency and Safety, Modern Outdoor Survival, Personal, Podcasts, Skills
No Comments
3:7 :: Gear advice, time-travelling explorers and book recommendations
Thursday, 04 May 2023


Bestseller
Coastal Foraging
The Coastal Foraging Walk from Original Outdoors is an introduction to edible plants, seaweeds, shellfish and other wild foods on the beaches of North Wales.
Bestseller
Foraging and Wild Food
The Foraging and Wild Foods Course from Original Outdoors is an introduction to edible plants, fungi and other wild foods in the fields and woodlands of North Wales. It is, by far, our most popular course.
New for 2023
Modern Bushcraft
Bushcraft and Wilderness Skills courses for the modern age. Courses that focus on the equipment, skills and mindset for practising bushcraft in the 21st century.
Bespoke
Private Training
All of our standard public courses are available to book as private events for individuals or groups. We have availability all year round and can recommend timings and locations to suit your needs.

3:8 :: Big wall climbing, real-life survival and accidental comedy with Andy Kirkpatrick
It's safe to say that Andy has made his way through life so far by pushing himself and deliberately pitting...
Read More
3:7 :: Gear advice, time-travelling explorers and book recommendations
Richard Prideaux answers questions from our patrons, discord members and audience with a backdrop of crackling campfire, interfering dogs and...
Read More
3:6 :: UK military survival training with Chris Smart
Chris Smart is ex-military and now runs 112 Survival, a survival training company based out of a wood in Shropshire,...
Read More
3:5 :: Assumption of Function
This episode is delving into the importance of not making assumptions. You've bought a brand new stove for an outing...
Read More- Published in All Blog Posts, Emergency and Safety, Modern Outdoor Survival, Personal, Podcasts, Skills
3:6 :: UK military survival training with Chris Smart
Friday, 14 April 2023


Bestseller
Coastal Foraging
The Coastal Foraging Walk from Original Outdoors is an introduction to edible plants, seaweeds, shellfish and other wild foods on the beaches of North Wales.
Bestseller
Foraging and Wild Food
The Foraging and Wild Foods Course from Original Outdoors is an introduction to edible plants, fungi and other wild foods in the fields and woodlands of North Wales. It is, by far, our most popular course.
New for 2023
Modern Bushcraft
Bushcraft and Wilderness Skills courses for the modern age. Courses that focus on the equipment, skills and mindset for practising bushcraft in the 21st century.
Bespoke
Private Training
All of our standard public courses are available to book as private events for individuals or groups. We have availability all year round and can recommend timings and locations to suit your needs.
3:8 :: Big wall climbing, real-life survival and accidental comedy with Andy Kirkpatrick
It's safe to say that Andy has made his way through life so far by pushing himself and deliberately pitting...
Read More
3:7 :: Gear advice, time-travelling explorers and book recommendations
Richard Prideaux answers questions from our patrons, discord members and audience with a backdrop of crackling campfire, interfering dogs and...
Read More
3:6 :: UK military survival training with Chris Smart
Chris Smart is ex-military and now runs 112 Survival, a survival training company based out of a wood in Shropshire,...
Read More
3:5 :: Assumption of Function
This episode is delving into the importance of not making assumptions. You've bought a brand new stove for an outing...
Read More- Published in All Blog Posts, Emergency and Safety, Modern Outdoor Survival, Personal, Podcasts, Skills
Lost on Snowdon? Find a fence.
Friday, 14 June 2019

[vc_row][vc_column][vc_column_text]
What are those blue circles on Snowdonia fences and stiles?
Grid references, mountain safety and a different kind of blue plaque
[/vc_column_text][/vc_column][/vc_row][vc_row][vc_column width=”2/3″][vc_column_text]If you have visited the mountains of Snowdonia, in particular the area around Snowdon itself, you will probably have come across one of these small, blue circular plaques pinned to a gatepost or stile. Their purpose is fairly self-explanatory, with “CYFEIRNOD GRID/GRID REFERENCE” printed around the edge. As one would expect – the number in the centre of the plaque is the Ordnance Survey grid reference for that particular location, accurate to within 100m or so. They are intended to act as both confirmation of location for navigators, and as a way of casualties informing mountain rescue teams where they are located – “can you see a stile? Is there a blue circular plaque with writing on it?”
The discs were first installed as a trial on Snowdon itself by the Snowdonia National Park in collaboration with Llanberis Mountain Rescue team and the MountainSafe Partnership (now bundled together as part of AdventureSmart) in the early 2010s, and were officially rolled out in 2012 . The grid reference plaques can now be found elsewhere in the National Park.
There have been multiple incidents in the following years where casualties have been able to report their location to emergency services and SAR teams, plus presumably thousands of incidents where no external assistance was needed as the grid reference provided by the disc was enough to prevent calamity.[/vc_column_text][/vc_column][vc_column width=”1/3″][vc_single_image image=”10689″ img_size=”medium” add_caption=”yes” alignment=”center”][vc_single_image image=”10693″ img_size=”medium” alignment=”center”][/vc_column][/vc_row][vc_row][vc_column][vc_column_text]Obviously the existence of these discs aren’t any kind of excuse for not carrying a map, compass and KNOWING HOW TO USE THEM (see below…), but it is about as close as you are likely to get to true ‘signposting’ in the mountains of the UK.[/vc_column_text][/vc_column][/vc_row][vc_row][vc_column][vc_separator][product_category per_page=”12″ columns=”4″ orderby=”rand” order=”ASC” category=”navigation-courses”][/vc_column][/vc_row]
- Published in All Blog Posts, Articles, Emergency and Safety, Land Navigation, Mountain, Mountain General, Navigation, Skills
The Six-Bundle Fire Lay
Sunday, 11 November 2018

[vc_row][vc_column][vc_column_text]
The Six-Bundle Fire Lay
A stick-bundle method of lighting a fire
This fire lay requires six bundles of dry, straight dead wood and a good ignition source. It relies on good airflow at the beginning, and the fire lay ‘collapsing’ in on itself in the later stages to ensure a good bed of coals and ash to cook over.
It is also a good option for making a ‘One Match Fire’.
The thickness of the wood in each bundle increases as the fire develops, staring with match stick-sized twigs, moving through pencil-sized ones and finally finger-sized branches.
This is one of the first ways we teach new clients to arrange kindling and fire wood for a simple, reliable camp fire. It works particularly well in the areas we use to run training courses (mature Western Hemlock Spruce woodland) where there is an abundance of dry and easily-accessed materials that works particularly well with a stick-bundle fire lay. It would also work with dry/dead-standing Birch branches and some other straight, small branches.
This video is part of the training materials given to clients participating in training courses under the EST Framework
Learn more at:
OutdoorProfessional.co.uk
[/vc_column_text][/vc_column][/vc_row][vc_row][vc_column][vc_video link=”https://youtu.be/aQLeFTp6x9Y” align=”center”][/vc_column][/vc_row][vc_row][vc_column][vc_column_text]
Some of our North Wales and UK Bushcraft Courses
[/vc_column_text][product_category per_page=”12″ columns=”4″ orderby=”rand” order=”ASC” category=”bushcraft-courses”][/vc_column][/vc_row]
- Published in All Blog Posts, Articles, Bushcraft, Bushcraft General, Camping, Emergency and Safety, EST Framework, Firecraft, Skills, Videos
Survival Tips for Travellers
Tuesday, 30 October 2018

[vc_row][vc_column][vc_column_text]
Survival Tips For Travellers
Quick tips that SHOULD work for anybody travelling to anywhere
Earlier this week I was asked by a writer for an upcoming Lonely Planet book called Travel Goals. The request was for some simple tips on ‘wilderness survival’ and…, well I’ll let you read for yourself:[/vc_column_text][vc_column_text]
I am getting in touch as I am currently looking to include an ‘expert voice’ in a feature I am writing for a new Lonely Planet book called Travel Goals.
The feature is on survival in the wilderness, including around five/six expert tips. I’m afraid, though, that there is a fairly tight turnaround and I would need your input by tomorrow, if possible – so sorry for the short notice!
These are the points I’d love to cover and have your opinion on:
– What would be your top tips for surviving in the wilderness? Please feel free to go into step-by step detail on everything from foraging (and what to watch out for) to lighting a fire without matches, building a shelter, using medicinal plants, using a map and compass, mountain navigation, river crossings, etc. Our aim is to present you as the expert here and hopefully give you (and Wales!) some great exposure.
I look forward to hearing from you.
[/vc_column_text][vc_column_text]As you have probably guessed – what Lonely Planet wanted was somebody to write some unique content for them (for free) and then for them to make money from selling that content as one of the ‘expert voices’ in the book. Apparently they “never pay interviewees (they benefit in terms of exposure)“. Well, quite. Exposure can be a dangerous thing – too much of it and it can kill you. That’s why our survival courses always include some training in awareness and prevention of hypothermia.
However, it prompted me to write this post – are there any generic survival tips I can give for people travelling the globe? Something quick and easy to read and as applicable to someone travelling to Mongolia as it would be to Mali? Tips that would work in Belgium or Belize?
It turns out I can. So here are some of those top travelling survival tips – given away to you for free – but I like you, so it’s OK.[/vc_column_text][/vc_column][/vc_row][vc_row][vc_column][vc_separator][/vc_column][/vc_row][vc_row][vc_column width=”1/4″][vc_single_image image=”7761″ img_size=”medium” alignment=”center”][/vc_column][vc_column width=”3/4″][vc_column_text]
Knowledge weighs nothing
It’s easy to get distracted by shiny equipment and expensive outdoor toys, but the really important survival skills rely on good decision making and improvisation. Basic first aid training is easy to access and the lifesaving basics of being able to clear an airway, stop a major bleed and perform CPR requires only a few hours of training and either very basic or improvised equipment. When I teach people about survival in different environments there is always a lot more time spent on learning how to make good decisions and plan well rather than relying on gear and equipment.
[/vc_column_text][/vc_column][/vc_row][vc_row][vc_column][vc_separator][/vc_column][/vc_row][vc_row][vc_column width=”1/4″][vc_single_image image=”9425″ img_size=”medium” alignment=”center”][/vc_column][vc_column width=”3/4″][vc_column_text]
Pay attention to maps
Unless you’re going out do something like climb a mountain or travel along a certain route it’s unlikely that you will be carrying a detailed map of the area with you. Smartphones and online map sources are great but rely on access to the internet, or at the very least a functioning device with a charged battery. You can at least retain a good idea of what is around you by paying attention to any tourist or information maps you pass – probably found at ‘hub’ sites like fuel stops, railway and bus stations and some tourist sites. You don’t have to memorise each one, but it’s worth checking where important places are relative to your current position – which direction is the nearest town where you are likely to find medical care? Is that waterfall more than, or less than, halfway along the next section of trail? Does this road head more to the north, or more to the east? It may seem trivial at the time but being able to quickly orientate yourself in the direction of the nearest help will remove a lot of confusion and uncertainty from an emergency situation.[/vc_column_text][/vc_column][/vc_row][vc_row][vc_column][vc_separator][/vc_column][/vc_row][vc_row][vc_column width=”1/4″][vc_single_image image=”7157″ img_size=”medium” alignment=”center”][/vc_column][vc_column width=”3/4″][vc_column_text]
Carry the fire with you
If you are travelling to somewhere where there is an outside chance that if you are stranded you may need to light a fire to save your life then carry some form of firelighting with you. This could just be a box of matches, but it would be better to carry something that’s easy to use, is reliable and doesn’t weigh very much. It’s also worth taking something to help get that fire going – dry firewood can always be gathered without cutting tools, but finding dry tinder can be very hard in some environments. When I travel to places like that I take several cigarette lighters (the type with a spark wheel) and scatter them throughout my kit along with some strips of bicycle innertube. They’re cheap, light and small and you can put one in your first aid kit, one in your rucksack lid and one in something you ALWAYS have with you – like the bag you carry your camera in perhaps?[/vc_column_text][/vc_column][/vc_row][vc_row][vc_column][vc_separator][/vc_column][/vc_row][vc_row][vc_column width=”1/4″][vc_single_image image=”9043″ img_size=”medium” alignment=”center”][/vc_column][vc_column width=”3/4″][vc_column_text]
File a ‘flight plan’
When travelling in remote places away from other humans and access to reliable communications the best chance of someone getting help to you when you need is from somebody reporting you missing or overdue. If you are planning on returning to a hostel or other accommodation after completing a hike or other excursion see if there is a facility for you to leave notes of your intended route, your details and when you expect to be home. That way if you don’t return then there is at least SOMEBODY who will send help to the right area. You MUST make sure that you check in with that person when you get back from your trip – plenty of SAR missions have been sent out in search of somebody who had just forgotten to tell their accommodation that they were back safely![/vc_column_text][/vc_column][/vc_row][vc_row][vc_column][vc_separator][/vc_column][/vc_row][vc_row][vc_column width=”1/4″][vc_single_image image=”8976″ img_size=”medium” alignment=”center”][/vc_column][vc_column width=”3/4″][vc_column_text]
You don’t have to go far to get into trouble
When most people start to think about ‘survival situations’ they tend to picture themselves as a castaway on some strangely uninhabited island or shivering atop a remote mountain. The reality is more likely to come from doing something fairly ‘safe’, like hiking along a trail not too far from a busy tourist area or exploring an area away from where you left your kit. A broken ankle or just misplaced footwear can incapacitate you very quickly in a place where you thought was ‘just a short walk’. Don’t assume the survival situation will be a big, dramatic moment – it’s going to arrive dressed up as something fairly boring and ordinary. Consider the ‘penalty of failure’ for what you’re about to do – although considering and working within that risk are an important part of any adventure.[/vc_column_text][/vc_column][/vc_row][vc_row][vc_column][vc_separator][/vc_column][/vc_row][vc_row][vc_column][vc_column_text]
Make Good Decisions at the Right Times
Survival training is fun. It often involves knives and fire and learning weird and fun skills in the woods or halfway up a mountain. But that’s not the lesson that we hope our course participants take away with them – what we want is for them to take away one VERY important lesson:
MAKE
GOOD
DECISIONS
Good decisions before you go out. Good decisions whilst you are there. Good decisions when you are back at home and planning the next trip. That’s all it is really – and the single best survival tip I can give any traveller is to learn how to make good decisions. That might mean learning about the potential environmental risks of the country you are travelling to – or how to do some basic first aid so you can make good decisions about whcih way round D,R,A,B, and C go.
I can outline every potential survival situation here, but you can take a good look at where you’re going to, what you’re planning to do when you get there and then decide if you are equipped to make those decisions yet.
[/vc_column_text][/vc_column][/vc_row][vc_row][vc_column][vc_column_text]
Some of our public survival courses
[/vc_column_text][product_category per_page=”12″ columns=”4″ orderby=”rand” order=”ASC” category=”survival-courses”][/vc_column][/vc_row]
- Published in All Blog Posts, Articles, Bushcraft General, Emergency and Safety, EST Framework, Mountain General, Personal, Skills, Survival
Why tracking doesn’t work for misper SAR in the UK
Wednesday, 13 June 2018

[vc_row][vc_column][vc_single_image image=”8775″ img_size=”large” alignment=”center”][vc_column_text]
Why tracking doesn’t work for Misper SAR in the UK
(And why every SAR team member needs to learn basic tracking skills)
Here we go… this post will attract a minimum of two types of response:
1. “you don’t know what you’re talking about, if your skills were as good as mine you could follow a flea across a glacier”
2. “tracking is too slow/doesn’t work/is overrated”
Well, quite.
Both views have some validity, and that’s the point of this post.
Tracking, within the context of SAR/non-combat scenarios, is often represented by evangelists who want to present tracking as a panacea to locating any human OR by those who have sworn off it having tried the techniques (sold to them on a course) on a live operation and found that it just slows everything down and eats up resources. Each side will defend their own hilltop to the last man – neither attitude being actually that helpful to achieving the end goal.
[/vc_column_text][/vc_column][/vc_row][vc_row][vc_column][vc_column_text]
Looking for Jim
Let’s consider Jim. Jim wasn’t actually called Jim, wasn’t necessarily a him and didn’t necessarily have this motivation – but Jim is roughly based on a real person and a real job.
******
Jim knows this forest well and runs here regularly. He likes to drive into the forest, park at one of the secluded public car parks and head off into the woods for a 5-10km run along the paths and forest roads.
It’s 06:44 and he has just locked the car and has set off on the trail leading to the lake. It’s a last-minute decision but it’s a trail he knows well.
At 08:44 Jim’s wife is wondering what time he will be back. At 11:30 she is really starting to get worried and at 12:37 she tentatively rings 999 and asks for the Police.
By 14:00 a police officer has contacted her to see if Jim has made contact yet. By 15:00 a PolSA (Police Search Advisor) has started to co-ordinate the early response to this incident, and by 17:00 a police officer in a vehicle has discovered Jim’s car in the secluded car park. It’s sat safely amongst the slamming of car doors and shouts of dog walkers, families with kids on bikes and mountain bikers returning or leaving their vehicles at the beginning or end of their forest adventures.
At 17:32 a message is sent through SARCALL to the local volunteer search and rescue team and the incident moves to the next level of response.
******
It’s a fairly standard missing person callout – someone without any previous indications of despondency, medical distress or other factor goes out into a relatively remote area for a short activity and just doesn’t return to their vehicle, and a steady but measured response unfurls from the emergency services – allowing for various scenarios but also not assuming immediately that Jim is dying in a ditch, and it’s most likely to be a miscommunication between Jim and his wife, and Jim is happily doing something blissfully unaware of the multi-agency search developing in the forest.
The volunteer Search and Rescue (volSAR) team will follow their own protocol for calling the team members together, establishing a search control/staging area and gathering other assets – dogs, helicopters, even drones. A Search Manager will speak with the PolSA, Jim‘s wife and possibly anyone else involved in the response thus far. This will lead the Search Manager to come up with a variety of scenarios in the following categories:
- Jim is in the area, but stationary and possibly in medical distress (or worse)
- Jim is in the area but mobile (either in a good cognitive state or otherwise)
- Jim is somewhere completely different (Rest of World)
Search Managers may be good but they are not omniscient so they must focus on the first two categories – Jim is somewhere out there in an area they can search with the resources they have now, and the resources they are likely to have in the future.
So they work out a search area, based on a combination of barriers to travel, previous search incident data for profiles similar to Jim, his own patterns of behaviour and fitness and what can be accomplished in the next few hours and days. They have a Last Known Point (LKP) – Jim‘s car, as he HAD to be there in order to park it and run off somewhere. He did this unseen by anyone else (as far as the Search Manager can know) but it gives them an Initial Planning Point (IPP) to set a radius around and begin the process of planning search areas, calculating probability and the other wizardry and dark arts of Search Theory.
The next steps are a combination of good personal skills exercised by both SAR team members on the ground and their party leaders and data gathering/handling. Search parties are deployed to an area or areas with a brief of what Search Control expects them to do – it might be a ‘hasty’ (fast search along trails and tracks to ensure that the misper isn’t lying in plain sight) or an area search of a section of woodland or open ground marked out on the map. They perform their search brief, return to control and pass on the information they gathered. This feeds back into the search plan and a new tasking might be generated.
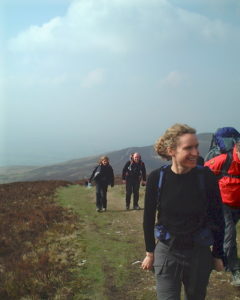
Rinse, and repeat. Until either Jim is found or a decision is made to stop searching for Jim.[/vc_column_text][/vc_column][/vc_row][vc_row][vc_column width=”1/3″][vc_single_image image=”8781″ img_size=”300×300″ alignment=”center”][/vc_column][vc_column width=”1/3″][vc_single_image image=”8973″ img_size=”300×300″ add_caption=”yes” alignment=”center”][/vc_column][vc_column width=”1/3″][vc_single_image image=”8972″ img_size=”300×300″ add_caption=”yes” alignment=”center”][/vc_column][/vc_row][vc_row][vc_column][vc_column_text]
Deploying the trackers
The above is probably familiar to anyone involved in misper SAR around the world. A person leaves their car in a busy parking area, heads off into increasingly ‘wild’ terrain and doesn’t return. They had to leave SOME sign of their passage surely, so couldn’t trained trackers be deployed to go out, find those signs of passage and link them together into SOME kind of narrative?
When it comes to looking for humans and the physical signs they leave behind on the ground (training humans to search by scent has been largely unsuccessful and unpleasant for all involved) there are two things a tracker will hope to find:
- Prints (foot or occasionally hand, often referred to as a subject-print) – including partial prints, vague smears on muddy banks and impressions left in soft surfaces
- Physical sign – everything from vegetation bent at unnatural angles and broken off in unusual ways, foliage turned over the wrong way by a trailing foot or hand and even broken cobwebs and a thousand other clues
Finding signs of some human passage through an area isn’t that hard – in a few hours you can train somebody to look for the obvious signs of a track in most terrain. It’s the noise-to-signal ratio that matters – which of these dozen prints or physical signs belong to your misper and which are just the dogwalkers and hikers?
In the above scenario any SAR tracker deployed as part of the search would either hope to find a print or series of prints that they could, with good certainty, assign to Jim and use for tracking further down the trail.
In an ideal world they would be able to find out exactly what brand, model and size of running shoe Jim wore that day, if they had any unique wear patterns and even what clothing he was wearing, which snacks/gels he carried and anything else he might discard by the trailside. They might even be able to get a calibrated photograph of a print from somewhere at Jim‘s home.
It isn’t an ideal world though – and Jim‘s wife doesn’t know what shoes he wore other than “the blue ones”. He’s a size 11, but sometimes 10. He probably took a water bottle but maybe not. She can’t find his expensive GPS watch she bought for him last Christmas though… And so it goes. Information dribbles in over time and analysis is made as to how accurate or useful it is.
On the ground
The gravel area around the car has been heavily trod since Jim was declared missing. Several members of the public parked close by and walked either side of the car, the police poked around the vehicle when they first found it and again when they forced entry to see if there was any clue inside to Jim‘s whereabouts. The volSAR team members had a good poke around too. Any hope of discovering a sterile print is probably lost – but what about further out?
As the laid surface of the car park ends it turns back to mud and soil and there is a chance of finding a print at the start of the various trails that radius out from the parking area. There are plenty of partial prints – from the public, police and volSAR. They are layered down into the damp soil and the most recent start to obscure the previous ones. There is a bottleneck at the start of most trails and the prints cluster together. It takes time and careful examination to find a few candidates that match the vague criteria for a Jim-print: running shoe, roughly UK size 10-11 and laid roughly twelve hours previously. With several possible trails and a limited number of trackers they must make a decision about where to move to next.
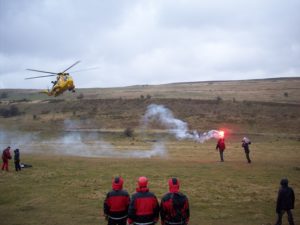
Meanwhile the search parties move along the trails, sweep through open areas at a regular spacing and gradually reduce the Probability of Area (POA, the likelihood that Jim is in that bit of woodland or open ground) for their tasked areas. They trample and crush, make new trails through vegetation and turn untouched wilderness into a footpath – but move far ahead and faster than the tracker teams.[/vc_column_text][/vc_column][/vc_row][vc_row][vc_column][vc_single_image image=”8974″ img_size=”large” add_caption=”yes” alignment=”center”][/vc_column][/vc_row][vc_row][vc_column][vc_column_text]
Limited Resources
The enemy for Search Managers is not nature herself or the elements – it’s depletion of limited resources:
Time and Daylight
Jim could be lying somewhere in a poor medical condition and getting worse by the second. Eventually he will reach a point where his recovery is unlikely and then expire. All searches run the possibility of becoming a recovery rather than a rescue if too much time passes before the search subject is located. A slow and methodical search would probably find that misper EVENTUALLY, but the whole point of SAR is to try and locate that person and help them.
The sun is also setting over in the west and it’s not unusual for volSAR to not be called on until the end of the day – to allow enough time for the misper to be located by the initial response, or just wander home under their own steam. As soon as darkness falls the whole job has become harder – reducing the effectiveness of the searchers and potentially compromising their safety.
Personnel Availability
Voluntary SAR teams all suffer the issue of availability of their team members. You don’t join unless you are able to help and attend callouts, but the 24/7 nature of volSAR means that not everybody will be able to attend every callout. Work, family, health and even finances can keep a team member away for part or all of a search and a volSAR team that boasts 50 members might be only able to field 15-25 at one time. Those team members on the ground also have a limited time they can search for – whether due to fatigue/operational effectiveness or just the demands of their ‘real’ lives. Eventually every volSAR team member will need to return home and a Search Manager cannot guarantee how long they will have that team member for. A good Search Manager will start to stack up potential reinforcement and replacements from neighbouring teams as soon as it looks like a search will run for that long.
Skills
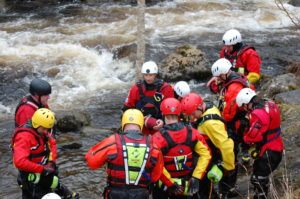
Specialist search teams are a boon for any Search Manager, but use of them can pull resources away from other parts of the operation. The moment the search moves to near-water (T6 or T7 terrain) then a decision needs to be made about whether that area is left unsearched or to redploy part of the search teams for water search – something that cannot be done without several team members plus specialist equipment and PPE.
Dogs are another exhaustable resource – they can only work for so long, and although they can cover a large acreage quickly they can still only ‘search’ part of the area at once.
So with the above resources dwindling, does a dedicated tracking cell within a volSAR team actually work? Where and when would they deploy – prior to the hasty teams and when the minimal amount of damage had been done to what trail remains? Are trackers a specialist search asset to be deployed from the SAR toolkit like Swiftwater Rescue Technicians and dogs?
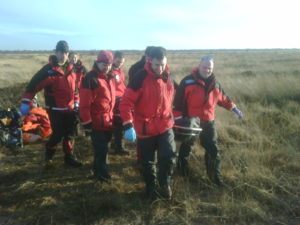
You’re burning daylight and with a limited number of searchers available for the next few hours is it appropriate to separate out a few tracking-trained team members to faff around on the fringes with elastic bands and sticks?[/vc_column_text][/vc_column][/vc_row][vc_row][vc_column width=”1/2″][vc_single_image image=”8975″ img_size=”medium” add_caption=”yes” alignment=”center”][/vc_column][vc_column width=”1/2″][vc_single_image image=”8976″ img_size=”medium” add_caption=”yes” alignment=”center”][/vc_column][/vc_row][vc_row][vc_column][vc_column_text]
The cohesive approach
Although we teach tracking as a distinct skill from search techniques as part of the EST Framework courses I do not think the two can be completely separated. By the very nature of the skills required a good searcher can be a good tracker, and vice versa. The skills of Land-SAR search (searching the cube, staying in formation, personal safety) are all essential skills for a SAR-tracker, but an understanding of the importance of certain patterns (or indeed, breaks in those patterns) can highlight certain things to a tracking-trained searcher.
When a tracker is either looking for a specific print or any relevant sign of passage then she or he can pick them out from the background scenery and analyse them – if they are also searching then they can do that in-context and feedback information to their Party Leader of Search Control.
Basic tracking skills and an understanding of both the benefits and limitations of those skills within a SAR context should be seen as an essential skill for any volSAR ground team member (and indeed, understood by Search Managers and Search Coordinators).
Any sign of Jim?
What if every team member on the ground in this search had been given some basic training in tracking (e.g. how to extrapolate an entire print from several partial prints, or to spot the signs of passage by an adult human through dense vegetation etc) and had been deployed by a Search Manager who also understood this?
What if those initial hasty parties had been on the lookout not only for an adult male runner somewhere within their search radius, but also slowing down to check likely track-traps such as the edges of puddles or choke points between trees? Or if they had performed their first search around the edges of the car park, looking for candidates for a Jim-print?
This is how it SHOULD be done, but rarely is. Tracking is often seen as a separate skill or occasionally an afterthought when previous efforts are proving fruitless – but it should be part of the mindset of any volSAR deployment where the misper could possibly leave sign of their passage. Too much emphasis is often put on looking for the body of the misper, not a 20% partial print that could become the next LKP and shift the whole search in a positive direction.
How to deploy tracking in a SAR operation
This is part of the guidance that we give to candidates on the Level 3 Search Operations Management Course but is relevant for anyone involved in planning search operations and deployment of SAR assets for missing person search:
- Tracking awareness should be seen as a vital skill for all trained searchers deployed on the ground and training should reflect this, challenging team members and preventing skill-fade whilst promoting personal skill development.
- Search teams should be equipped and prepared for tracking re-deployment in the field.
- Acquiring information for tracking-trained search teams should be a vital part of witness and family interview techniques and efforts made to isolate footwear type and shape – social media photos, prints at home and so on.
- Tasking of search parties should reflect the potential usefulness of tracking, and time allowed for an initial search around the IPP for potential print candidates.
- Be ready to re-deploy search teams to another area/track if they discover a potential trail on the ground – this highlights the need for Search Managers to have a good awareness of the limitations of tracking and the relative importance of the information being fed back in to Search Control.
For most applications tracking should be seen as a vital SAR skill, not a specialism and subset of strange folk with feathers sticking out of their gear and castration rings on a trekking pole. Of course training contact time is limited for volSAR teams, but once those skills have been gained they can be maintained fairly easily.
SAR Tracking isn’t THAT hard
Unlike some of my clients, nobody is going to be shooting at you whilst you are tracking within a SAR context. Your search subject is unlikely to be actively trying obscure their tracks or slow pursuers down with traps and IEDs, and they aren’t a small and fast mammal scurrying across a forest floor without even turning over a dead leaf.
Humans (well, ones not trying to avoid capture) are pretty lazy and bumbling. We step into soft mud, scrape our feet across mossy logs and boulders and trample over leaves and twigs crushing them into the floor under our bulk. We wade through long grass and vegetation turning the leaves and blades of grass over to flag our passage and even discard plastic and paper objects from our pockets as we walk.
It’s why our Level 1 Tracking Technician course is run over only 3 days, and that also includes crossover with navigation skills and interoperability with other organisations and a final exercise – tracking shouldn’t be seen as a mysterious and ethereal skill, but nor should it be dismissed out of hand because your deployment plan doesn’t allow for it.[/vc_column_text][/vc_column][/vc_row][vc_row][vc_column][vc_column_text]
TL;DR
Tracking is good and useful within a misper SAR context in the UK, but is often misrepresented by poor deployment and inflexibility of existing deployment procedures. There is also a lack of understanding by Search Managers who see it as an ineffective delay in the search operation and don’t ask pertinent questions when speaking to informants and witnesses. Tracking-awareness should be a vital part of any SAR search party members and be an intrinsic part of the training programme.
Tracking also has many limitations, and more so in the densely-populated UK where volSAR teams have to try and identify a potential subject-print early on in the search rather than hoping to the find the ‘sign of passage’ in the wilderness and following the resultant trail.
It’s also not that hard, and with a bit of training most competent SAR party members can become effective trackers.[/vc_column_text][/vc_column][/vc_row]
- Published in All Blog Posts, Articles, Bushcraft General, Emergency and Safety, EST Framework, Mountain, SAR, Skills, Tracking
How to save yourself – a tale of survival from a friend
Monday, 03 July 2017

How to save your own life
A tale of everyday survival from a friend
If you have attended one of our courses or engaged me in conversation about the idea of survival training or prepping for potential survival situations then you will probably remember my having some fairly robust opinions on the whole subject. One of the points I often try to raise is that real survival situations – as opposed to heading out to ‘rough it’ with minimal gear – sneak up on you. You can’t see the situation building up in the distance, with a sweeping fanfare of your personal inner soundtrack heralding the arrival of your ‘moment’. The time when you get to put your training and preparation into action will probably just blindside you and throw you deep into a world of hurt – sometimes literally.
If you read up on real survival situations and those who have survived them (and more importantly, those who did not) then there is the common theme of being in denial about the whole situation. It isn’t just panic, although that plays a part – there is also an element of lethal familiarity.
If you spend extended periods in and around dangerous and life-threatening environments then the psychology of denial will help bury those risks and lead you to actions and behaviour that will betray you when the ‘bad thing’ actually happens. Inappropriate actions under threat can be anything from driving headlong into the raging river because it’s your regular route home and the water “can’t be THAT deep” to actively trying to push your rescuer underwater when your drowning reflexes kick in.
The way to combat these potentially lethal responses to danger is via two routes – awareness and training.
Survival Awareness
By being aware of your surroundings, the potential hazards and being realistic about how likely the various potential calamities are you can develop an appropriate response. Live in an area prone to earthquakes? You can read up on the current advice on what to do in case of a quake and what items you should have in your ‘earthquake survival kit’. Do you regularly travel in remote and wilderness areas? Then remote-area first aid training and equipment specific to wilderness first aid should be high on your list of priorities.
Survival Training
Television shows and gear manufacturers would have you believe that survival training is all about running up and down mountains, swimming in icey waters and knocking up a pile of useful equipment entirely from twigs and berries – but in nearly a decade of survival training with civilians, businesses, SAR, emergency services and the military the truth is a little less exciting.
Survival training can be split into two areas – prevention and reaction. Prevention is everything you do to make sure that you don’t end up in a survival situation, from ensuring your navigation skills are up to scratch to having a realistic approach to equipment and personal admin. Reaction is what you do in the seconds, hours and days following the ‘bad thing’ occurring. That kind of training is about building constructive automatic responses to life threatening situations and re-coding your brain so that your reflexes save your life and don’t kill you or endanger those around you.
Very recently a friend sent me an article she had written for somewhere else, and with her kind permission I have included it in this blog post. It perfectly illustrates all of the points raised above:
- Survival situations hit you quickly and often with little warning
- You won’t be as prepared as you think you might be
- Training and constructive reflexes will help you get past the inital adrenaline-filled moments
[divider]

The scene of the incident – the rope ladder has since been added
November 2015 – somewhere alongside a canal in the south of England
It was about midnight, -1ºC, nobody around, and I was due on an early shift the next morning. I’d spotted it was getting frosty so went out to the car to cover the windscreen so I could get away quicker in the morning.
I was wearing jeans with long boots underneath, a heavy fleece top, and was carrying my handbag.
As I returned to my boat, walking pretty briskly, my foot skidded on an icy metal panel and I fell flat with one arm – the one holding my bag – out in front of me. The weight of the bag and the fact that I was on a wet frosty wooden pontoon meant I just kept sliding. Strangely, I had two clear thoughts that I can still remember – 1) “I’ve fallen over”, closely followed by 2) “I’m under the water”.
Thankfully my keys were in my hand and I managed to fling them up onto the pontoon so that was one less thing to worry about.
It took a second for the feeling of cold to kick in, but sure enough, off went the gasping. I clearly owe a lot to my Wilderness First Aid training as we’d covered the gasp reflex and I knew in theory that it should stop soon – but now that I was actually in that situation did I risk waiting, or try to get out?? Because my clothes were so heavy with the water and there was no straightforward way out, I decided to test the theory. I held onto the pontoon, which thankfully I could just reach, and waited.
Sure enough, my breathing gradually came back under control.
Right then, I thought. NOW I’ll get out.
My first decision was that I needed 2 hands. Bye bye, handbag… Ideally I’d have got rid of my shoes but they were long leather boots which were under my jeans and it would have taken too long to struggle with them, so they stayed.
Even with both hands free it was far less easy than I’d anticipated. I was trapped in a small triangle of water between the bow of the boat and 2 pontoons at right angles to each other. The boat has smooth high sides, and the metal was frosty and there was no way I could climb up. I couldn’t touch the bottom of the canal – and frankly probably wouldn’t want to…
 The pontoon was a floating one and when I tried to heave myself up onto it my legs just swung up underneath it, so I had nothing to push off. I tried that 3-4 times, and was aware I was getting very cold and tired and probably didn’t have the strength to try again if I failed again.
Over my head I could just reach the rope that moors the boat to the pontoon. I held onto it for a few seconds’ rest while I considered my options.
I could shout for help, but it was very late and I probably wouldn’t be heard, plus I was so cold I doubt I’d have got much noise out, yet I could end up out of breath or swallowing water. I decided this was last-resort Plan C.
I could go under the pontoon because I knew there was a ladder on the other side. However, having got my head above the water, I didn’t fancy going back under again. It was very dark and I didn’t want to risk being stuck under the pontoon or attempting to surface in the wrong place. That route became Plan B.
That left me with the option that did get me out – a gargantuan effort to flick my legs out of the water and cling sloth-like upside-down to the rope overhead. I managed to do that, and then to flip myself from there onto the pontoon.
Relief!! I made it!!
The relief didn’t last long, though. I was shivering violently, and realised I needed to get the wet clothes off fast. With numb and trembling fingers I managed to strip the heavy fleece off on the front deck, retrieve my keys (Yes!!) from where I’d managed to throw them earlier, get inside, and towel down and get a dressing gown on.
This being a boat, the indoor temperature was about 10ºC so I needed to get a fire lit in the stove, which took a little bit of doing in the chilled and weary state I was in.
As the room warmed up, I took stock. My arms, legs and ribs were bruised, battered and pretty sore from the various attempts to climb out.
I couldn’t phone anyone because my phone was in my back pocket, full of water, and useless.
I’d lost my purse and all my bank cards, driving licence etc, plus my work pass, as they were in the bag. I went back out with a net and fished for it, but no luck. In fact, despite the canal being only about 7’ deep and the bottom visible depending on the weather, and knowing precisely where I let it go, I’ve never found it – mystery!
I was about to head to bed when I heard a funny noise, like someone blowing a loud and prolonged raspberry. Just to add insult to injury, the ‘Key Buoy’ keyring I had attached to my keys suddenly activated, and shot out a huge flashing orange balloon which proceeded to mock me for the next 3 days. “Well, that’s a lot of use NOW!”, I shouted at it. I may have added some other words too.
I was on time for my early shift…
[divider]
The RNLI is currently promoting a safety campaign that should be required reading for anybody who ever goes near water (so, pretty much everyone): How To Float
- Published in All Blog Posts, Articles, Bushcraft General, Emergency and Safety, Mountain General, Personal, Skills
How to put together a first aid kit for the outdoors
Tuesday, 20 June 2017

How to put together a first aid kit outdoors
Wilderness personal medical kits
How do you put a first aid kit together for the outdoors? Or a bushcraft first aid kit? Are first aid kits for mountain biking different to ones for kayaking?
Carrying a first aid kit in your rucksack or in your personal kit is pretty difficult to argue against. The problem is – how much do you carry, and what exactly do you carry? Once you start going down the road of visualising every possible emergency medical scenario and wanting to ‘be prepared’ for it. Before long you end up carrying several kilograms of equipment that in all likelihood you will never use – but you somehow feel that you need to.
The reality is actually a lot simpler. There are two important points to remember for outdoor emergency first aid:
- Training is the absolute most important thing you can put your time and money into. Knowledge weighs nothing and the most important lifesaving techniques require good personal skills but little to no equipment.
- If you are on your own in the middle of nowhere then the options open to you self-treatment are actually very limited.
With that mildly-sobering thought in mind – how do you put together a first aid kit for the outdoors?
The answer is dependent on several factors:
- The environment you are travelling too/through and specific hazards it may contain
- The length of trip
- Distance/time to evacuation and medical care in case of emergency
- The number of people (and animals) in the party
- The existing medical conditions of those in the party
- The training and skill level of those in the party
- The activities you are performing
- Your carrying capacity (rucksack, canoe, vehicle, porters etc)
For example – the medical kit for a 5-week sailing voyage to the Lofoten islands would be different to that of a solo lightweight backpacker on a 3-day summer trip in the Cairngorms. For the former a Bag Valve Mask (BVM) and full suture kit would be appropriate but would a little ridiculous for the solo hiker.
I have used various medical kits in my work over the years. In my time in a Mountain Rescue team I carried a small personal first aid kit that contained a minimal number of items and drugs – but it was designed to be pooled with the other kits carried by fellow rescuers to form a larger and more comprehensive kit. I supplemented this with items purchased myself such as Tuffcut shears and nitrile gloves. When working as a remote-area medic as support on long-distance races and outdoor challenges I was either carrying a very comprehensive kit issued by the company employing me, or I was given a budget to supply my own equipment at my own specification. I have also put together my own for various trips, plus also kits for Original Outdoors staff and freelance contractors to use when working with our own clients. Each case has been slightly different…
The easy answer to “what’s the best outdoor first aid kit?” is – they all are. The real skill is choosing or building one that suits where you are going, what you are doing and what you’re doing when you get there. To that end I’ve put together a video on the decision-making process that I go through for any trip or scenario, and the items I carry in one of my personal kits:
[clear]
[clear]
First Aid Kit Contents
The list below is based on the items shown in the video, with links to buy them directly from Amazon. Some of the brands or sizes are slightly different or only a few representations of what I carry. The items are not listed in order of importance, just to roughly match the order from the video.
I’ve also put a link to the Lifesystems first aid kit which is a very similar off-the-shelf kit that I can personally recommend – even if it’s used as a base to add other items to.
[divider]
[two_third]
Nitrile Gloves
Get them in any colour other than red or black – you need to be able to see if blood suddenly appears on them when giving a primary or secondary survey as it will steer you towards a major bleed you may have missed.
[/two_third]
[one_third_last]
[/one_third_last]
[divider]
[two_third]
Resus Face Shield
An item of personal safety that should be somewhere easy to reach but can also make your CPR technique more effective.
[/two_third]
[one_third_last]
[/one_third_last]
[divider]
[two_third]
Anti Bacterial Wipes
Great for cleaning up after dealing with a minor wound and preventing your kit contaminating everything it touches.
[/two_third]
[one_third_last]
[/one_third_last]
[divider]
[two_third]
Alcohol Hand Gel
Be aware that carrying alcohol in your first aid kit may cause issues when travelling to countries where alcohol is banned or severely restricted
[/two_third]
[one_third_last]
[/one_third_last]
[divider]
[two_third]
Normasol Sachets
Sterile topical solution in sachets for careful application over wider areas.
[/two_third]
[one_third_last]
[/one_third_last]
[divider]
[two_third]
Sterile Eye Wash Pods
Sterile topical solution in pods for washing foreign bodies from eyes.
[/two_third]
[one_third_last]
[/one_third_last]
[divider]
[two_third]
Fabric Adhesive Dressing Strip
Adhesive dressing strip on a roll for making custom plasters/band-aids for tricky areas like between fingers.
[/two_third]
[one_third_last]
[/one_third_last]
[divider]
[two_third]
SteriStrips
Temporary adhesive suture strips for wound closure.
[/two_third]
[one_third_last]
[/one_third_last]
[divider]
[two_third]
Blister Plasters
Being able to treat or manage a blister can make the difference between carrying on or turning around to go home
[/two_third]
[one_third_last]
[/one_third_last]
[divider]
[two_third]
Non-Adherent Dressings
General use dressings without any adhesive.
[/two_third]
[one_third_last]
[/one_third_last]
[divider]
[two_third]
Triangular Bandage
I have yet to use one of these as a sling, but they are quite useful for holding other dressings on or wrapping over wide areas.
[/two_third]
[one_third_last]
[/one_third_last]
[divider]
[two_third]
Wound dressings (Various sizes)
Absorbent wound dressings in various sizes
[/two_third]
[one_third_last]
[/one_third_last]
[divider]
[two_third]
Travel Mirror
Great for reaching places that the eyeball can’t!
[/two_third]
[one_third_last]
[/one_third_last]
[divider]
[two_third]
Glucose Gel
Glucose gel for hypoglycemic emergencies.
[/two_third]
[one_third_last]
[/one_third_last]
[divider]
[two_third]
Round-Tip Scissors
Small scissors with rounded ends for safety
[/two_third]
[one_third_last]
[/one_third_last]
[divider]
[two_third]
TuffCut Shears
Tough shears for emergency clothing removal
[/two_third]
[one_third_last]
[/one_third_last]
[divider]
[two_third]
Tweezers
For removal of small foreign bodies
[/two_third]
[one_third_last]
[/one_third_last]
[divider]
[two_third]
Microlance Needles
Tiny sterile needles for making small holes to drain blisters etc
[/two_third]
[one_third_last]
[/one_third_last]
[divider]
[two_third]
Disposable Thermometer
Of limited use in a first aid environment but helpful for long-term monitoring of a patient
[/two_third]
[one_third_last]
[/one_third_last]
[divider]
[two_third]
Tick Removal Card
For safe removal of ticks
[/two_third]
[one_third_last]
[/one_third_last]
[divider]
[two_third]
CAT Tourniquet
Not for general carry and must be trained in use
[/two_third]
[one_third_last]
[/one_third_last]
[divider]
[two_third]
SAM Splint
Useful but heavy and other items can be improvised to replace it.
[/two_third]
[one_third_last]
[/one_third_last]
[divider]
[two_third]
Lifesystems Mountain Leader First Aid Kit
A comprehensive and well-designed outdoor first aid kit.
[/two_third]
[one_third_last]
[/one_third_last]
- Published in All Blog Posts, Articles, Bushcraft General, Emergency and Safety, First Aid, Mountain General, Personal, Skills, Tools and Equipment, Videos
Beware the GWR… The rise of the Facebook guides
Sunday, 06 March 2016

Beware the Guy With Rucksack (GWR)
We’ve seen a troubling rise in online groups taking people into the mountains without training, experience or any of the necessary skills over the last couple of years.
There is a term in commercial photography, particularly the type involving models – G.W.C., or ‘Guy With Camera’. The best description I can find is from the ‘enlightening’ website urbandictionary.com (beware, possible NSFW wording on there!):
Guy With Camera
Commonly used in the modelling/photographer biz, ‘GWC’ is any poser/creep with a digital camera pretending to be a pro/semi-pro photographer. With the introduction of digital cameras, GWC’s have appeared like an explosion in a toy store.
GWC’s typically steal the work of others and don’t have any references.
It’s something that I had been aware of, mainly through professional photographer friends, but it wasn’t something I expected to see in the ‘outdoors’ world…
Over the past 2 years or so there has been an upswell in the popularity and membership of Facebook ‘community’ groups. Following on the back of Meetup.com and other dedicated ‘group’ sites, the Facebook groups are a good way of bringing people together in a forum-style conversation that has all of the extra functionality of the Facebook behemoth. We have one for our clients and fans, and there are hundreds of thousands of others out there for every activity and hobby.
Of particular relevance to the work we do are the UK-centric outdoor groups. There are dozens of really very useful sites (Ground Conditions in UK Mountain Areas, Wild Camping and Bothying in Snowdonia etc) that we regularly visit to either get information quickly, or to post it and share useful information ourselves.
But then there are the other type…
There has also been a rise in groups set up as ‘communities’, whereas in fact they are actually commercial enterprises operating on morally, ethically and legally dodgy ground. It takes only a few minutes to set up a Facebook group, and clever marketing to gain members. Facebook would charge reduced rates for advertising of those groups because they were not openly trading as businesses. Often these pages are set up by keen amateurs who want a change in lifestyle and fancy the idea of running an outdoor activities business. Many of these groups run trips into the mountains as guided walks or activity weekends, in a similar way to mountaineering clubs, but without the hive-mind of experience that those older and more responsible organisations have.
So what’s the problem?
Well, the problem is that being able to gather a huge following of ‘Likes’ and fans is definitely a skill (although you can buy followers from online services – around £8-£10 for 500-800 Facebook likes seems to be the average), that does not translate into being able to competently or legally run trips into the mountains or give advice to clients. A complete novice looking to take their first steps into the mountains may look to join a group or other organisation to show them the way (literally and figuratively), and one of these free-to-join pages is a good place to start. By deciding to come along on one of the organised trips they would naturally assume that they would be in safe hands… but their actions seem to be anything but.
Some of the things we have witnessed from these groups:
- Group ratios of 1:20, or even 1:50 (1:3-1:10 is the norm for professional leaders)
- Stealing images from professional photographers and other providers to publicise their own sites
- Covertly contacting legitimate providers to gain route advice, weather forecasts and even ground condition reports so they can then use them for their own trips (as happened to us twice last week)
- Asking qualified professionals to work for free on commercial trips as ‘exposure’
- Running trips regardless of the conditions because they have advertised it and booked accommodation
Moel Siabod on Saturday
We met one of these groups yesterday on Moel Siabod – the big lump to the south of the A5 in Capel Curig. It was under full winter conditions above the 600m contour – deep snow, windscoured icy patches and cornices over the eastern slopes. Despite the reasonable forecasts the visibility was down to around 5-10m at times and a hasty descent from the summit was necessary mid-afternoon. We had full winter kit (axes, crampons, goggles, the usual safety items) and were happily within our comfort zones – but it was still tough enough to require some careful route choice. We also met around 30-40 other people (busy day!) on the mountain during the 4 hrs we were out. The one group (around a dozen members) that we spoke to led to this slightly ranty blog post – they were being ‘led’ by one of the admins from a Facebook group. They had organised the trip months before and had planned to climb Moel Siabod, so they were going to do it no matter what the conditions. They were very under-equipped for even this normally ‘friendly’ hill (no axes, mostly wearing light waterproofs and carrying tiny rucksacks and summer-season boots) and walking on terrain that an experienced walker would know to avoid (right over the corniced eastern slope).
This isn’t the first time we’ve met groups like this – online groups led by slightly wannabe (but well-intentioned) unqualified leaders, taking groups of novices into dangerous terrain. There is no legal requirement for qualifications for leading adults in the mountains (if there were I would never have discovered my love of the hills in my late teens!) but there is a duty of care that rests on anybody introducing somebody to activities like this. Some of the best ‘guides’ I have met have been un-qualified but very experienced and intuitive mountaineers and walkers who took a careful approach to leading people in the outdoors.
This isn’t a pitch for our guided walks and trips, or to advertise our own group – just a plea to anybody putting their trust in one of these Facebook group trips or leaders. Beware.
In all likelihood you will get somebody who is keen to become a leader (or ‘guide’) in the mountains but without wanting to become suitably trained or qualified to do the job. It may be they want to run a side-business, it might be just that they want to have the prestige of being the head of a group on their way to a summit… If they are unwilling to go through the established process of getting training and consolidating experience, getting insurance and building up a good reputation then you can also wonder how they will react if somebody becomes injured. Or is separated from the group. Or one of the hundreds of other eventualities a qualified and/or experienced leader has taken into account and is planning for.
Do your research. Gain the skills you need. Push yourself, but be aware of where you will end up if you push too far. Enjoy yourself. Don’t have your early experiences ruined by a Guy (or Girl) With Rucksack.
- Published in All Blog Posts, Articles, Emergency and Safety, Mountain, Skills
How to join a mountain rescue team
Friday, 17 October 2014

How to join a Mountain Rescue team…
Whilst doing that awful but necessary thing of trawling through a long list of social media feeds earlier this week I came across this blog post from the Ordnance Survey – ‘Become a Search and Rescue Volunteer’.
At first glance, it seems to be all OK – references to a wide range of SAR volunteering opportunities and agencies, with references to the experiences and training policies of those agencies. All good.
Apart from the bits which are either made up, poorly researched (hopefully the author was presented with duff info) or just complete cobblers…
I spent the best part of a decade in a Mountain Rescue team in North Wales. I have blogged about it previously and occasionally we make reference to a certain skill or anecdote to demonstrate a point when teaching on a course. During my time in MR, I became the Training Officer and eventually a Deputy Team Leader so oversaw the recruitment procedures of both the team I was a member of, and other teams, for a number of years. I want to make clear here that my contribution to UK Mountain Rescue team world was insignificant – there are hundreds out there who have done a quarter-century or more volunteering for MRTs around the country. I did have a beard though…
As we occasionally get asked about joining an MRT by clients and others we work with, I think that my experience (and the experiences of our staff) would be valuable to those of you who are looking to join a mountain rescue team in the UK. I don’t claim that the guide below is definitive, but hopefully I have captured all of the relevant points. This guide is based on my experiences in an Mountain Rescue England and Wales team but most of the points should be relevant to Lowland SAR and other volunteer SAR teams.
 1. Ask the team
This might seem obvious, but go and speak to your local team. If you don’t have a local team then you might have to move… (I do know people who have moved areas to be part of a team!).
Each team is an individual charity, and member of a regional organisation (which is also a charity) which in turn is a member of a Mountain Rescue England and Wales. Currently MREW is still largely a guidance and coordination body, representing the member teams at a national level and providing some centralised funding and training opportunities and advice on legal matters. As such, each team is (mostly) a law unto itself, with a unique identity and structure. The identity of the team is often created by the history of the team and the types of callout (‘job’) it is asked to assist with. In North Wales there are 6 MRTs, and each one is culturally distinct from its neighbours. The experience one would have joining one team would vary noticeably from the experience of joining another, even though their bases may be less than 5 miles apart as the crow flies…
By seeking out the members of a team (don’t stalk them, they don’t like that) then you will have the best chance of finding out directly what the recruiting procedures for that team are, when they recruit, what their requirements are and so on. For example, the team I was a member of required a good basic outdoor skillset (navigation, basic ropework, good fitness, good personal skills) plus the ability to turn up to 75% of training sessions (roughly 45 per year) and to assist with fundraising etc. The neighbouring team required a much higher personal technical ability but less in the way of commitment of time.
The best places to speak to the team you are looking to join are through their website (look for ‘Secretary’), their social media or by looking for places the team will be publicly displaying, such as a fundraising or publicity event. The worst times are:
- During a callout (this happened to me, whilst packaging a casualty into a stretcher prior to a helicopter evacuation!)
- In the pub – often the team will retire to their local after a callout or training session to unwind. Probably not the best time to be asking searching questions…
Teams are used to being asked these questions – often you will get re-directed to a certain page of their website or asked to submit a form. Most teams only recruit once a year so it may be several months before you hear anything more about your application.
 2. Look at your own skills
Now you have (hopefully) found out what is likely to be required of you then you can examine what your skills are. Most teams have a multi-stage recruitment procedure, with an interview, practical skill assessment and probationary period before you are taken on as a full trainee. You will normally get good notice of these assessments/interviews, so use the time wisely. As above, the standards required for a hill recruit will vary from team to team, but the normal desired level for the ‘perfect’ recruit is:
- The ability to navigate in all weathers to an 8-figure grid reference from another 8-figure grid reference. This is to 10m accuracy, and slightly higher than normally required for outdoor navigation. This is the level we teach on our Intermediate Navigation course.
- The ability to tie several knots – including variations on the Figure of Eight, Clove Hitch, Italian Hitch, Bowline and French and Classic Prussiks.
- Knowing how to ‘look after yourself’ in the mountains. You are the people who come to assist those who have buggered things up – you are worse than useless if you don’t know how to regulate your own body temperature through use of your kit, how to cross a steep grass slope safely and just how to cope with poor weather and still function.
- How to work under direction as part of a team.
- Have a reasonable level of fitness. You don’t have to be a mountain athlete, but you will be expected to walk uphill with a reasonably heavy rucksack (15-18kg) without stopping every five minutes. If you can get from, say, Pen y Pass car park to the summit of Snowdon and back in less than 4 hours then you are in the right area.
- How to do all of the above in the dark. At 3am. When you have to be at work at 8:30am.
It is not crucial that you have ALL of the above skills, but it is a good target to aim for. The team will normally have a training procedure to ‘fill in the gaps’, whilst also giving you the specific technical skills required. In the weeks before my initial interview I was manicly practising my navigation whilst wearing a heavy rucksack. I kept a bit of rope by the toilet and practised my knots regularly – even though I had been climbing for several years! I soon discovered that the ropework in Mountain Rescue had little in common with climbing, and much more in common with industrial rope access.
3. Look at the jobs the team gets
A common ‘mistake’ made by prospective recruits at interviews I helped to conduct was that they knew little of what our team actually did. They had a general idea of Mountain Rescue being all about helicopters and hanging off cliffs, whereas the reality for our team was lots and lots of searching fields and woodland at night. In the rain. Whilst the missing person was happily asleep elsewhere, oblivious to the drama they were causing.
You can normally get a good feel for the types of jobs the team gets from its website, social media feeds and occasionally an ‘annual report’ it may publish. The teams that actually get involved in technical rescues on big hills every weekend are relatively few – most teams deal with missing person incidents, spot-pickups from rolling moorland and even water rescues. By having a good knowledge of the team and the jobs they get you can demonstrate that you are fully aware of what you intend to volunteer for, and what the team expects of you.
 4. Speak to your family and employer
This is a big one, and often overlooked. When you join a Mountain Rescue team, your family join with you. People tend to get into trouble at mealtimes, just before bedtime and when you have booked to spend the day together with your significant other. Although it may be very exciting for you, your family may soon get tired of you buggering off into the night every time your phone goes bleep. You also have to keep a rucksack packed and in the boot of the car, your phone close to hand (most teams use SMS to alert their team members, not pagers these days) and maybe limit your evening alcohol intake. Whilst your attendance is not expected 100% of the time, most teams monitor attendance at training and callouts as there is little point having an experienced, skilled and valuable team member on the books who cannot turn up. Everybody in the team is in the same situation – which is why the inability to juggle ‘team life’ with real life is often cited as the reason for somebody having to resign. It was the same for me – there came a point where I had to decide if I was going to put more and more time (already 20+hrs a week) into ‘team life’ or into the business, and the business won.
Your employer may need to be supportive of you joining MR as you will be occasionally losing lots of sleep to the search for a missing person, or add the extra mileage to a company car. Most people in Mountain Rescue are self-employed, shift-workers or retired. We even developed a term for those who were able to turn up to jobs in the middle of the day during the working week – “Silver MR”…
5. Look at your bank balance
Mountain Rescue is expensive. Again, this varies from team to team, but usually you are expected to mostly supply your own kit. You will probably be outfitted with waterproofs, fleece and other protective clothing and maybe a helmet and harness. Your boots, rucksack, headtorch etc etc are usually down to you to provide. Fuel is rarely reimbursed (teams cannot afford to normally, particularly those with large areas to cover and few donations) nor is wear-and-tear on your vehicle. I calculated that being in Mountain Rescue cost me approximately £2-3,000 per year. Unless you live within running distance of the MR base, chances are that you will need an income of a certain level in order to take part.
 6. Put in the time and be prepared to wait
For most teams, there is a waiting period between recruitment and actually hitting the ‘callout list’. This might be a few weeks, it might be a few months. It normally becomes frustrating, particularly in that period between feeling like you have reached the required standard, but the team still wants more from you. This is quite a good training experience for being an operational member – the saying “hurry up and wait” could have been coined just for volunteer SAR jobs. It is normal to go through the rush and hurry of getting to an RV, only to discover that crucial information still needs to be gathered before you can be deployed…
7. Look to the future
Okay, maybe this one is more about what happens after you join. Well, there are a number of ways you can progress within the Mountain Rescue world in the U.K., as loosely structured as it is. You can become trained to a high level of technical skill in rope and water rescue, learn advanced remote-area first aid procedures, study the mathematics and statistics of missing person behaviour or just become really, really good at loading and unloading a Land Rover.
There is a lot more I could say, but the guide above reflects the experiences of both my own time in MR and that of my staff, my friends and others we have spoken to. Most agree that it was much more involved and committing than they first anticipated, and that they had to adjust their expectations as they went. They also agree that they largely enjoyed the experience, but for one reason or another there came the time for them to leave and move on.
I hope some of the above helps.
- Published in All Blog Posts, Articles, Bushcraft General, Emergency and Safety, Mountain, Mountain General, Skills
International Distress Signals
Monday, 10 March 2014

International Inland Distress Signals
In European and North American countries there are commonly recognised distress signals for use by persons in distress to communicate with the outside world:
Europe
In the mountains and remote areas of Europe a signal (a noise such as a whistle blast, or a light flash) should be repeated 6 times within a minute, then a minute pause, followed by a further 6 signals within a minute. This cycle should be repeated until rescue arrives.
A rescuer responding to this call should respond with three signals within a minute, followed by a minute’s pause.
North America
Here the rule is of ‘three’ – three flashes, three whistle blasts, three gunshots or even triangles of three bright objects. If the signal is repeatable it should be followed by a minute of no-signal, and then repeated.
Wherever you are in the world, a regular signal in an unusual place for an extended period of time should attract attention. To communicate with a helicopter or other aircraft then use arm signals – raise both together to form the letter ‘Y’ to indicate a positive, and lower one arm to form the letter ‘N’ to indicate a negative.
- Published in All Blog Posts, Articles, Bushcraft General, Emergency and Safety, Mountain, Mountain General, Skills