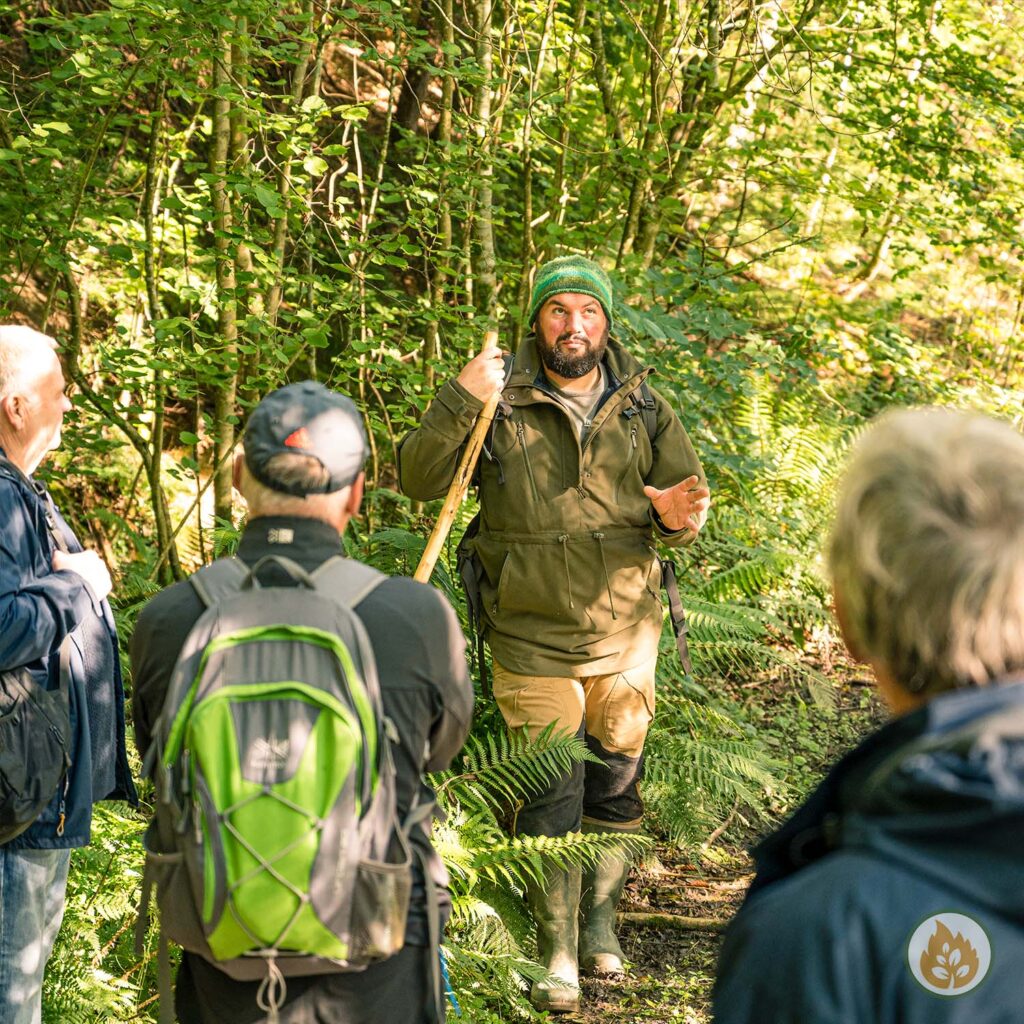
It's safe to say that Andy has made his way through life so far by pushing himself and deliberately pitting...
Read More3:8 :: Big wall climbing, real-life survival and accidental comedy with Andy Kirkpatrick
Sunday, 14 May 2023


Bestseller
Coastal Foraging
The Coastal Foraging Walk from Original Outdoors is an introduction to edible plants, seaweeds, shellfish and other wild foods on the beaches of North Wales.
Bestseller
Foraging and Wild Food
The Foraging and Wild Foods Course from Original Outdoors is an introduction to edible plants, fungi and other wild foods in the fields and woodlands of North Wales. It is, by far, our most popular course.
New for 2023
Modern Bushcraft
Bushcraft and Wilderness Skills courses for the modern age. Courses that focus on the equipment, skills and mindset for practising bushcraft in the 21st century.

Bespoke
Private Training
All of our standard public courses are available to book as private events for individuals or groups. We have availability all year round and can recommend timings and locations to suit your needs.

3:7 :: Gear advice, time-travelling explorers and book recommendations
Richard Prideaux answers questions from our patrons, discord members and audience with a backdrop of crackling campfire, interfering dogs and...
Read More
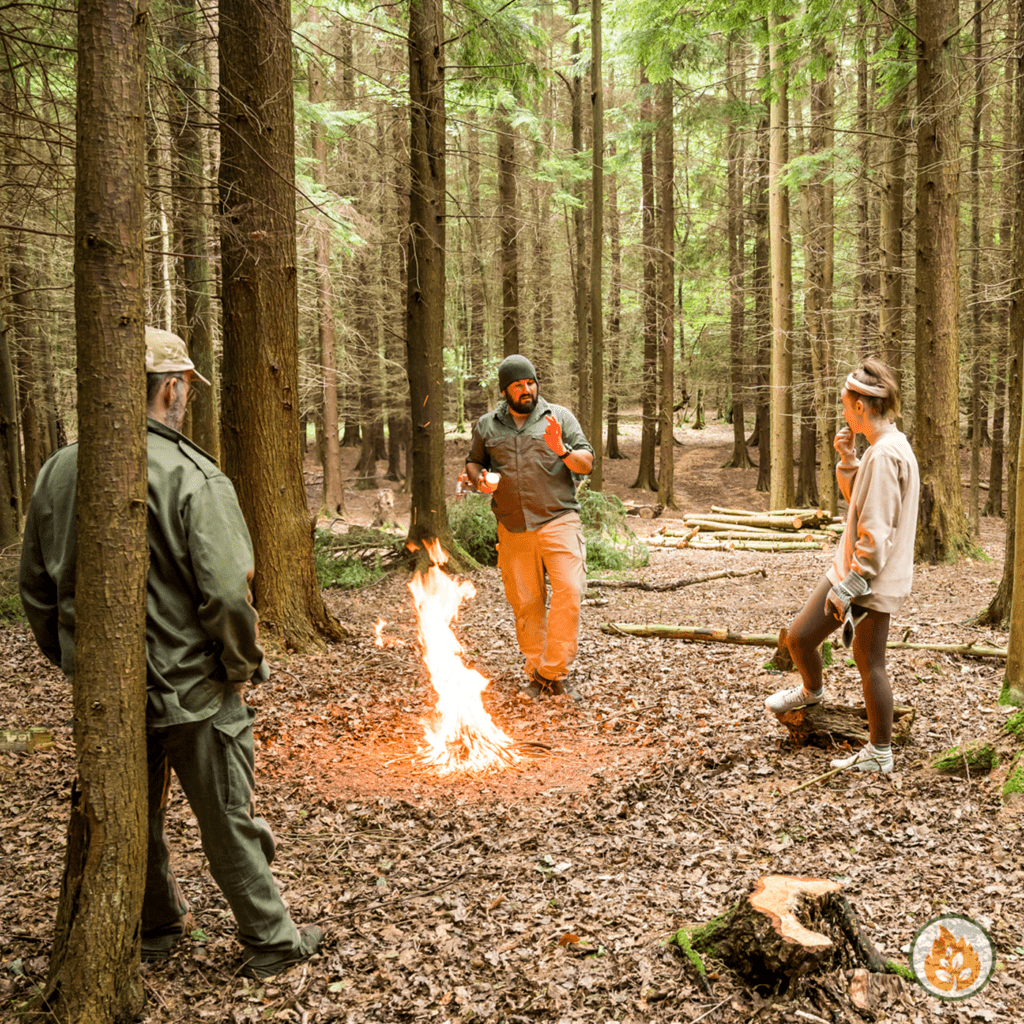
3:6 :: UK military survival training with Chris Smart
Chris Smart is ex-military and now runs 112 Survival, a survival training company based out of a wood in Shropshire,...
Read More
3:5 :: Assumption of Function
This episode is delving into the importance of not making assumptions. You've bought a brand new stove for an outing...
Read More- Published in All Blog Posts, Emergency and Safety, Modern Outdoor Survival, Personal, Podcasts, Skills
No Comments
3:7 :: Gear advice, time-travelling explorers and book recommendations
Thursday, 04 May 2023


Bestseller
Coastal Foraging
The Coastal Foraging Walk from Original Outdoors is an introduction to edible plants, seaweeds, shellfish and other wild foods on the beaches of North Wales.
Bestseller
Foraging and Wild Food
The Foraging and Wild Foods Course from Original Outdoors is an introduction to edible plants, fungi and other wild foods in the fields and woodlands of North Wales. It is, by far, our most popular course.
New for 2023
Modern Bushcraft
Bushcraft and Wilderness Skills courses for the modern age. Courses that focus on the equipment, skills and mindset for practising bushcraft in the 21st century.
Bespoke
Private Training
All of our standard public courses are available to book as private events for individuals or groups. We have availability all year round and can recommend timings and locations to suit your needs.

3:8 :: Big wall climbing, real-life survival and accidental comedy with Andy Kirkpatrick
It's safe to say that Andy has made his way through life so far by pushing himself and deliberately pitting...
Read More
3:7 :: Gear advice, time-travelling explorers and book recommendations
Richard Prideaux answers questions from our patrons, discord members and audience with a backdrop of crackling campfire, interfering dogs and...
Read More
3:6 :: UK military survival training with Chris Smart
Chris Smart is ex-military and now runs 112 Survival, a survival training company based out of a wood in Shropshire,...
Read More
3:5 :: Assumption of Function
This episode is delving into the importance of not making assumptions. You've bought a brand new stove for an outing...
Read More- Published in All Blog Posts, Emergency and Safety, Modern Outdoor Survival, Personal, Podcasts, Skills
3:6 :: UK military survival training with Chris Smart
Friday, 14 April 2023


Bestseller
Coastal Foraging
The Coastal Foraging Walk from Original Outdoors is an introduction to edible plants, seaweeds, shellfish and other wild foods on the beaches of North Wales.
Bestseller
Foraging and Wild Food
The Foraging and Wild Foods Course from Original Outdoors is an introduction to edible plants, fungi and other wild foods in the fields and woodlands of North Wales. It is, by far, our most popular course.
New for 2023
Modern Bushcraft
Bushcraft and Wilderness Skills courses for the modern age. Courses that focus on the equipment, skills and mindset for practising bushcraft in the 21st century.
Bespoke
Private Training
All of our standard public courses are available to book as private events for individuals or groups. We have availability all year round and can recommend timings and locations to suit your needs.
3:8 :: Big wall climbing, real-life survival and accidental comedy with Andy Kirkpatrick
It's safe to say that Andy has made his way through life so far by pushing himself and deliberately pitting...
Read More
3:7 :: Gear advice, time-travelling explorers and book recommendations
Richard Prideaux answers questions from our patrons, discord members and audience with a backdrop of crackling campfire, interfering dogs and...
Read More
3:6 :: UK military survival training with Chris Smart
Chris Smart is ex-military and now runs 112 Survival, a survival training company based out of a wood in Shropshire,...
Read More
3:5 :: Assumption of Function
This episode is delving into the importance of not making assumptions. You've bought a brand new stove for an outing...
Read More- Published in All Blog Posts, Emergency and Safety, Modern Outdoor Survival, Personal, Podcasts, Skills
Camping, survival, bushcraft or primitive skills?
Tuesday, 28 March 2023


- Published in All Blog Posts, Articles, Bushcraft, Bushcraft General, Outdoor Skills, Skills, Survival, Videos
Can you eat shoots and leaves?
Thursday, 16 March 2023

- Published in All Blog Posts, Articles, Bushcraft, Bushcraft General, Edible plants, Foraging, Gather, Herbs and Roots, Outdoor Skills, Plants, Skills
How do women wee outdoors?
Tuesday, 07 March 2023

- Published in All Blog Posts, Articles, Bushcraft, Bushcraft General, Camping, Outdoor Skills, Skills
Synthetic fabrics and campfires – how to avoid spark holes
Sunday, 16 January 2022


- Published in All Blog Posts, Articles, Bushcraft, Bushcraft General, Camping, Outdoor Skills, Skills
Ep19 :: Mountain Gear for October
Wednesday, 27 October 2021

Bestseller
Coastal Foraging
The Coastal Foraging Walk from Original Outdoors is an introduction to edible plants, seaweeds, shellfish and other wild foods on the beaches of North Wales.
Bestseller
Foraging and Wild Food
The Foraging and Wild Foods Course from Original Outdoors is an introduction to edible plants, fungi and other wild foods in the fields and woodlands of North Wales. It is, by far, our most popular course.
New for 2023
Modern Bushcraft
Bushcraft and Wilderness Skills courses for the modern age. Courses that focus on the equipment, skills and mindset for practising bushcraft in the 21st century.
Bespoke
Private Training
All of our standard public courses are available to book as private events for individuals or groups. We have availability all year round and can recommend timings and locations to suit your needs.
3:8 :: Big wall climbing, real-life survival and accidental comedy with Andy Kirkpatrick
It's safe to say that Andy has made his way through life so far by pushing himself and deliberately pitting...
Read More
3:7 :: Gear advice, time-travelling explorers and book recommendations
Richard Prideaux answers questions from our patrons, discord members and audience with a backdrop of crackling campfire, interfering dogs and...
Read More
3:6 :: UK military survival training with Chris Smart
Chris Smart is ex-military and now runs 112 Survival, a survival training company based out of a wood in Shropshire,...
Read More
3:5 :: Assumption of Function
This episode is delving into the importance of not making assumptions. You've bought a brand new stove for an outing...
Read More- Published in All Blog Posts, Modern Outdoor Survival, Mountain, Podcasts, Skills
Welsh shoreline foraging – Porth Trecastell
Sunday, 08 August 2021

- Published in All Blog Posts, Coastal, Fishing, Foraging, Gather, Microadventures, Outdoor Skills, Seaweeds, Shellfish, Skills, Videos
A new UK Survival Podcast
Monday, 02 August 2021

Bestseller
Coastal Foraging
The Coastal Foraging Walk from Original Outdoors is an introduction to edible plants, seaweeds, shellfish and other wild foods on the beaches of North Wales.
Bestseller
Foraging and Wild Food
The Foraging and Wild Foods Course from Original Outdoors is an introduction to edible plants, fungi and other wild foods in the fields and woodlands of North Wales. It is, by far, our most popular course.
New for 2023
Modern Bushcraft
Bushcraft and Wilderness Skills courses for the modern age. Courses that focus on the equipment, skills and mindset for practising bushcraft in the 21st century.
Bespoke
Private Training
All of our standard public courses are available to book as private events for individuals or groups. We have availability all year round and can recommend timings and locations to suit your needs.
3:8 :: Big wall climbing, real-life survival and accidental comedy with Andy Kirkpatrick
It's safe to say that Andy has made his way through life so far by pushing himself and deliberately pitting...
Read More
3:7 :: Gear advice, time-travelling explorers and book recommendations
Richard Prideaux answers questions from our patrons, discord members and audience with a backdrop of crackling campfire, interfering dogs and...
Read More
3:6 :: UK military survival training with Chris Smart
Chris Smart is ex-military and now runs 112 Survival, a survival training company based out of a wood in Shropshire,...
Read More
3:5 :: Assumption of Function
This episode is delving into the importance of not making assumptions. You've bought a brand new stove for an outing...
Read More- Published in All Blog Posts, Articles, Bushcraft General, Outdoor Skills, Podcasts, Skills, Survival
Ne’er cast a clout til May be out
Monday, 03 May 2021


- Published in All Blog Posts, Edible plants, Flowers, Fruits, Gather, Nature and Conservation, Outdoor Skills, Plants, Skills, Trees and Shrubs
You’ve just completed your Mountain Navigation course – what next?
Thursday, 28 November 2019

[vc_row][vc_column][vc_column_text]
So you have just completed your Mountain Navigation Course with Original Outdoors…?
…what should you do next?
This blog post is primarily aimed at those who have just attended one of our Level 2 (Mountain) Navigation courses, either on a public course or as a private client. That doesn’t mean that the information below is ONLY of relevance to those who have just visited us in North Wales, but that is the intended audience.[/vc_column_text][/vc_column][/vc_row][vc_row][vc_column width=”1/2″][vc_single_image image=”11243″ img_size=”full” alignment=”center”][/vc_column][vc_column width=”1/2″][vc_single_image image=”11240″ img_size=”full” alignment=”center”][/vc_column][/vc_row][vc_row][vc_column][vc_column_text]
Getting out Again
I am in the lucky position where I not only get to earn a living from teaching navigation – I get to regularly go out and practice all of the essential skills. Navigation is a PERISHABLE SKILL and if you don’t use it, you will lose it. We can only fit so much content into the course, and some of the more complex skills will take time to fully get to grips with. Below are some exercises that you can try out at home – even if you live far from the mountains.
Pacing Squares
Find an open patch of level ground (a public playing field is ideal) and stand at one corner, facing away from the corner. Place a £1 coin on the ground and then find a magnetic bearing that runs down one side of the playing field. Once you have set the bearing, walk 100m (using the double-pacing you calculated on the course) and then stop. Turn 90° to either the left or right (whichever way takes you out into open space) and fix another bearing. Walk 100m, turn 90° again and repeat. After 4 x 100m ‘legs’ you should find yourself standing over your £1 coin. If you are not standing there then you now how a financial incentive to become very accurate with your bearings and pacing!
[clear]
Calibrate Timing
Go for a walk that starts off on the flat, then has an ascent of some type (one that you can measure both horizontally and vertically). Work out your average pace in minutes per kilometre for a measured horizontal distance of somewhere between 500m-1000m. This is almost certainly going to be somewhere between 10 min/km and 15min/km for a flat walk. Try to walk as naturally as you can and don’t rush.
Once you reach the start of an uphill section you will need to get the map out, measure both the horizontal (map) distance and the expected ascent (count contours) between where you are now and somewhere that is easily recognised when you get there (a path junction or similar). Walk the ascent as naturally as you can, and measure your time. You should then be able to calculate how much longer it took you to walk uphill than the same flat distance would have taken. For example – if you are walking at 12min/km on the flat, and a climb that covers 500m of horizontal distance and ascends 70m and it takes you 9 minutes 30 seconds to get to your finish point then it has taken you an extra 30 seconds to climb every 10m of ascent.
E.G: 500m horizontal distance = 6 minutes at 12min/km
An extra 3 minutes 30 seconds to climb 70m of vertical ascent = 30 seconds for every 10m of vertical ascent
[clear]
Navigate a Familiar Path
Take the relevant 1:25,000 Ordnance Survey map out to somewhere that is familiar to you – somewhere you can walk a linear or circular route of at least 2km. Even though the terrain is familiar to you – use the map as if you were carefully navigating. Ask yourself testing questions – “how many fencelines will you pass on your left before you reach the next road?”, 2what is that building on the other side of the river?”, “how much ascent/descent is on this route?”. You can discover a lot about your local area this way, but it will also make you much more comfortable with using the map key, paying attention to identifiable features you may pass and even spotting map errors or outdated markings.
[clear]
Tabletop Adventure
Okay, I’m not saying that a cup of tea/coffee/bovril and a biscuit is compulsory for this exercise, but it’s a good start.
Grab a map for somewhere hilly and interesting (ideally somewhere you have never visited) and start plotting some routes. Find a parking place on a roadside or in a valley and then plot a circular walk. Give yourself a limit, such as:
- “Must be able to complete in 8hrs”
- “Must include at least 800m of ascent”
- “Must be more than 10km, but less than 15km”
It can be quite good fun, and may inspire you to go out and try a few of the routes you have plotted. More importantly it will get you used to checking things like Contour Interval, measuring distance and estimating the time it will take to complete a route.[/vc_column_text][/vc_column][/vc_row][vc_row][vc_column width=”1/2″][vc_single_image image=”11245″ img_size=”full” alignment=”center”][/vc_column][vc_column width=”1/2″][vc_single_image image=”10420″ img_size=”full” alignment=”center”][/vc_column][/vc_row][vc_row][vc_column][vc_column_text]
Test Yourself, Test Each Other
If you have attended a course focusing on mountain navigation then you are probably planning to go out and USE those skills in the mountains. This, of course, is something that Original Outdoors wholeheartedly endorses.
The thing is – unless you actually put some real effort into it then it’s quite difficult sometimes to find a need to bring the compass out and navigate to a higher standard than simple contour/map interpretation. In order to prevent skillfade and losing your edge you will need to test yourself a little.
The exercises below can be done solo, but also work well if shared with someone else who is interested in improving their navigation skills and is happy to be given simple ‘tasks’ to complete.
Point to Point
Once you find yourself at a feature that you can positively identify on a map (a ‘Green’ location) you can give yourself a new destination. When I worked with you on the course I would look for a feature that is prominent in the landscape (but could be easily missed) and ask you to ‘take me HERE‘. Now you are on your own/away from an instructor you can simply repeat this process – pick a feature less than 1.5km away from where you currently stand, and then work out:
- A safe, sensible route to that destination
- how far that route is, i.e. how far will you walk
- how much ascent or descent is there between your point of departure and your destination
- how long it will take you get there, i.e. estimate what the time will be when you get there
On any navigation assessment those will be the kind of questions I will ask a student. If you are honest with yourself (don’t cheat) and you are happy to work through any errors that might develop then you can refresh and improve your skills through repetition and repeatedly hitting the point of failure.
[clear]
Imaginary Emergencies
This can done at any point along a walk through the mountains (or indeed, anywhere else) and will help focus the mind when it has drifted away to thoughts of stunning views, tired feet or an empty belly. You grab the map and say to yourself something along the lines of “what if I needed to get back down to civilisation quickly – what would I do, where would I go?“. Then look across the immediate area on the map and see what your ‘Escape Route’ would be. It might just be to reverse the route you have done, or even to continue onwards on the same path. It might however be to follow a ridge down the hill until you hit a broad valley and follow it down to the nearest road. Whatever route you choose make sure it is safe and ‘viable’, i.e. not straight over a cliff or through 74 river crossings.[/vc_column_text][/vc_column][/vc_row][vc_row][vc_column][vc_separator][vc_column_text]
The Next Course?
If you have just completed the Level 2 Mountain Navigation course then the next step is the Level 3 Advanced Navigation course – which involves an assessment day with an external examiner. There are also a few skill-specific workshops, such as the Night Navigation course or the Contour Map Workshop listed below. We also have a course on NAtural Navigation, where you learn to navigate in a very different way – using the shape of trees, the movement of the sun and stars and even the wind to navigate across a landscape.
[/vc_column_text][product_category per_page=”12″ columns=”4″ orderby=”rand” order=”ASC” category=”navigation-courses”][vc_separator][/vc_column][/vc_row][vc_row][vc_column][vc_column_text]
Offline Learning – the books we recommend
Some people prefer to learn from a text, or at least have an offline resource they can quickly refer to if they wish to look something up quickly. Below are links out to the books we recommend for learning more about mountain navigation. [/vc_column_text][vc_row_inner][vc_column_inner width=”1/3″][vc_raw_html]JTNDaWZyYW1lJTIwc3R5bGUlM0QlMjJ3aWR0aCUzQTEyMHB4JTNCaGVpZ2h0JTNBMjQwcHglM0IlMjIlMjBtYXJnaW53aWR0aCUzRCUyMjAlMjIlMjBtYXJnaW5oZWlnaHQlM0QlMjIwJTIyJTIwc2Nyb2xsaW5nJTNEJTIybm8lMjIlMjBmcmFtZWJvcmRlciUzRCUyMjAlMjIlMjBzcmMlM0QlMjIlMkYlMkZ3cy1ldS5hbWF6b24tYWRzeXN0ZW0uY29tJTJGd2lkZ2V0cyUyRnElM0ZTZXJ2aWNlVmVyc2lvbiUzRDIwMDcwODIyJTI2T25lSlMlM0QxJTI2T3BlcmF0aW9uJTNER2V0QWRIdG1sJTI2TWFya2V0UGxhY2UlM0RHQiUyNnNvdXJjZSUzRHNzJTI2cmVmJTNEYXNfc3NfbGlfdGlsJTI2YWRfdHlwZSUzRHByb2R1Y3RfbGluayUyNnRyYWNraW5nX2lkJTNEb3JpZ2lvdXRkbzA1LTIxJTI2bGFuZ3VhZ2UlM0Rlbl9HQiUyNm1hcmtldHBsYWNlJTNEYW1hem9uJTI2cmVnaW9uJTNER0IlMjZwbGFjZW1lbnQlM0QwMDA3NDI0NjA0JTI2YXNpbnMlM0QwMDA3NDI0NjA0JTI2bGlua0lkJTNEODBmOTc2MTAyMjQyNGYyNDRkYjJmNzEyYjIzZmY0YTIlMjZzaG93X2JvcmRlciUzRHRydWUlMjZsaW5rX29wZW5zX2luX25ld193aW5kb3clM0R0cnVlJTIyJTNFJTNDJTJGaWZyYW1lJTNF[/vc_raw_html][/vc_column_inner][vc_column_inner width=”1/3″][vc_raw_html]JTNDaWZyYW1lJTIwc3R5bGUlM0QlMjJ3aWR0aCUzQTEyMHB4JTNCaGVpZ2h0JTNBMjQwcHglM0IlMjIlMjBtYXJnaW53aWR0aCUzRCUyMjAlMjIlMjBtYXJnaW5oZWlnaHQlM0QlMjIwJTIyJTIwc2Nyb2xsaW5nJTNEJTIybm8lMjIlMjBmcmFtZWJvcmRlciUzRCUyMjAlMjIlMjBzcmMlM0QlMjIlMkYlMkZ3cy1ldS5hbWF6b24tYWRzeXN0ZW0uY29tJTJGd2lkZ2V0cyUyRnElM0ZTZXJ2aWNlVmVyc2lvbiUzRDIwMDcwODIyJTI2T25lSlMlM0QxJTI2T3BlcmF0aW9uJTNER2V0QWRIdG1sJTI2TWFya2V0UGxhY2UlM0RHQiUyNnNvdXJjZSUzRHNzJTI2cmVmJTNEYXNfc3NfbGlfdGlsJTI2YWRfdHlwZSUzRHByb2R1Y3RfbGluayUyNnRyYWNraW5nX2lkJTNEb3JpZ2lvdXRkbzA1LTIxJTI2bGFuZ3VhZ2UlM0Rlbl9HQiUyNm1hcmtldHBsYWNlJTNEYW1hem9uJTI2cmVnaW9uJTNER0IlMjZwbGFjZW1lbnQlM0QwOTU0MTUxMTk0JTI2YXNpbnMlM0QwOTU0MTUxMTk0JTI2bGlua0lkJTNEMDU4YTY4YTBlZWI2ZjNlMTZhYTBhMjUzZDkxZDJiYjElMjZzaG93X2JvcmRlciUzRHRydWUlMjZsaW5rX29wZW5zX2luX25ld193aW5kb3clM0R0cnVlJTIyJTNFJTNDJTJGaWZyYW1lJTNF[/vc_raw_html][/vc_column_inner][vc_column_inner width=”1/3″][vc_raw_html]JTNDaWZyYW1lJTIwc3R5bGUlM0QlMjJ3aWR0aCUzQTEyMHB4JTNCaGVpZ2h0JTNBMjQwcHglM0IlMjIlMjBtYXJnaW53aWR0aCUzRCUyMjAlMjIlMjBtYXJnaW5oZWlnaHQlM0QlMjIwJTIyJTIwc2Nyb2xsaW5nJTNEJTIybm8lMjIlMjBmcmFtZWJvcmRlciUzRCUyMjAlMjIlMjBzcmMlM0QlMjIlMkYlMkZ3cy1ldS5hbWF6b24tYWRzeXN0ZW0uY29tJTJGd2lkZ2V0cyUyRnElM0ZTZXJ2aWNlVmVyc2lvbiUzRDIwMDcwODIyJTI2T25lSlMlM0QxJTI2T3BlcmF0aW9uJTNER2V0QWRIdG1sJTI2TWFya2V0UGxhY2UlM0RHQiUyNnNvdXJjZSUzRHNzJTI2cmVmJTNEYXNfc3NfbGlfdGlsJTI2YWRfdHlwZSUzRHByb2R1Y3RfbGluayUyNnRyYWNraW5nX2lkJTNEb3JpZ2lvdXRkbzA1LTIxJTI2bGFuZ3VhZ2UlM0Rlbl9HQiUyNm1hcmtldHBsYWNlJTNEYW1hem9uJTI2cmVnaW9uJTNER0IlMjZwbGFjZW1lbnQlM0QxODUyODQ1OTg4JTI2YXNpbnMlM0QxODUyODQ1OTg4JTI2bGlua0lkJTNEMGUwZmMyZjRlNDI4Mzg3ZmFlYWY0YmZhNzY4MTY4MjIlMjZzaG93X2JvcmRlciUzRHRydWUlMjZsaW5rX29wZW5zX2luX25ld193aW5kb3clM0R0cnVlJTIyJTNFJTNDJTJGaWZyYW1lJTNF[/vc_raw_html][/vc_column_inner][/vc_row_inner][/vc_column][/vc_row][vc_row][vc_column][vc_column_text]
Practice beats theory (most of the time)
Mountain navigation is a practical skill, and the very best advice I can give you is to try and get out there and use those skills as soon as you can – even if it’s just for 30 minutes in the local park. You might get some funny looks as you stride around with a compass in hand, but these are complex skills and you will need time to practice and go through them again and again. Be honest with yourself, don’t worry if you make an error and focus on solving problems rather than being perfect.[/vc_column_text][/vc_column][/vc_row][vc_row][vc_column][vc_column_text]
 Pacing, timing or ticking off - measuring distance when navigating on foot
 How to choose the right map scale - 25k, 40k or 50k?
 Lost on Snowdon? Find a fence.
 You've just completed your Mountain Navigation course - what next?
 Learn a new skill in 2020 with Original Outdoors!
- Published in All Blog Posts, Articles, EST Framework, Land Navigation, Mountain, Mountain General, Navigation, Skills
Lost on Snowdon? Find a fence.
Friday, 14 June 2019

[vc_row][vc_column][vc_column_text]
What are those blue circles on Snowdonia fences and stiles?
Grid references, mountain safety and a different kind of blue plaque
[/vc_column_text][/vc_column][/vc_row][vc_row][vc_column width=”2/3″][vc_column_text]If you have visited the mountains of Snowdonia, in particular the area around Snowdon itself, you will probably have come across one of these small, blue circular plaques pinned to a gatepost or stile. Their purpose is fairly self-explanatory, with “CYFEIRNOD GRID/GRID REFERENCE” printed around the edge. As one would expect – the number in the centre of the plaque is the Ordnance Survey grid reference for that particular location, accurate to within 100m or so. They are intended to act as both confirmation of location for navigators, and as a way of casualties informing mountain rescue teams where they are located – “can you see a stile? Is there a blue circular plaque with writing on it?”
The discs were first installed as a trial on Snowdon itself by the Snowdonia National Park in collaboration with Llanberis Mountain Rescue team and the MountainSafe Partnership (now bundled together as part of AdventureSmart) in the early 2010s, and were officially rolled out in 2012 . The grid reference plaques can now be found elsewhere in the National Park.
There have been multiple incidents in the following years where casualties have been able to report their location to emergency services and SAR teams, plus presumably thousands of incidents where no external assistance was needed as the grid reference provided by the disc was enough to prevent calamity.[/vc_column_text][/vc_column][vc_column width=”1/3″][vc_single_image image=”10689″ img_size=”medium” add_caption=”yes” alignment=”center”][vc_single_image image=”10693″ img_size=”medium” alignment=”center”][/vc_column][/vc_row][vc_row][vc_column][vc_column_text]Obviously the existence of these discs aren’t any kind of excuse for not carrying a map, compass and KNOWING HOW TO USE THEM (see below…), but it is about as close as you are likely to get to true ‘signposting’ in the mountains of the UK.[/vc_column_text][/vc_column][/vc_row][vc_row][vc_column][vc_separator][product_category per_page=”12″ columns=”4″ orderby=”rand” order=”ASC” category=”navigation-courses”][/vc_column][/vc_row]
- Published in All Blog Posts, Articles, Emergency and Safety, Land Navigation, Mountain, Mountain General, Navigation, Skills
Wild Camping Food – What should I take?
Wednesday, 22 May 2019

[vc_row][vc_column][vc_column_text]
Wild Camping – what are we going to eat?
A short guide to the food options for wild camping trips in the UK
[/vc_column_text][vc_column_text]This is a common question from clients who are heading out for their first ‘wild’ camping trips in the mountains and forests of the UK – what am I going to eat?
We have normally gone through the laws of wild camping and taken a good look at the other parts of the equipment list, but food can sometimes be a bit of an afterthought. Wet or dry, bought or made – and just how much do I need to bring?
In this article I am going to look at two different aspects of packing food for a wild camping or UK backpacking trip – the type of food carried, and the amount. Pack weight and volume come into it, as do cooking options, access to water and just how much energy you are going to expend.[/vc_column_text][/vc_column][/vc_row][vc_row][vc_column][vc_single_image image=”7663″ img_size=”medium” alignment=”center”][/vc_column][/vc_row][vc_row][vc_column][vc_column_text]
Camping Food Types
When I am looking at food for camping and backpacking it comes down to three things:
– Weight/packed volume
– Taste
– Nutrition
It’s easy enough to find foods that can be carried in a rucksack for a day or two and will be perfectly edible once reheated in a pan over a stove – but if they are the heaviest and bulkiest items in your kit then you won’t get very far. The food also needs to be tasty enough to eat when you are cold, wet or tired – it’s not unusual for an appetite to disappear when fatigued and a warm sleeping bag is calling to you, but food is fuel and your physical and mental performance may start to suffer when you miss out on the calories. The mountains and wilderness regions are not the places to take up intermittent fasting or the 5:2 diet.
Nutrition is another key factor; sugar and simple carbohydrates are both lightweight and tasty – but not much good for a slow, steady release of energy or for long mountain days.
If you can keep an eye on all three of those factors when considering the food on your kitlist then you can start to make decisions on which type of foods you’re going to choose. They can be broken down into the following types:[/vc_column_text][vc_separator][vc_row_inner][vc_column_inner][vc_column_text]
Pre-Prepared ‘wet’ Meals
These are the types often found in soft, foil pouches on racks in camping shops, or as components in civilian or military ration packs/MREs. They are pre-cooked and can be safely eaten cold, or heated up in the pouch by dunking the (unopened) pouch in boiling or hot water.
Because they are ready-to-eat when cold and without additional preparation (a bit like a tin of baked beans – edible unheated, but not the best) they are also heavy, and quite bulky. Sometimes referred to as ‘wet’ food, packs and pouches like this contain a substantial amount of water/fluid in the accompanying sauces which makes them fairly heavy. They are often about twice the weight of dehydrated/dry meal pouches, if not slightly more.
[/vc_column_text][/vc_column_inner][/vc_row_inner][vc_row_inner][vc_column_inner width=”1/2″][vc_column_text]
Good because
- Can be eaten cold or with no preparation
- No mess, can be heated without dirtying a pan and eaten straight from the pouch
- Good selection available
- Long shelf life
[/vc_column_text][/vc_column_inner][vc_column_inner width=”1/2″][vc_column_text]
Not -so-good because
- Heavy due to water/liquid content
- Often high in sugar and palm oil
[/vc_column_text][/vc_column_inner][/vc_row_inner][vc_separator][vc_column_text]
Dehydrated and Freeze-Dried Meals
Over the past 20 years or so this type of camping meal has become more popular, and there are lots of new companies springing up every year. We reviewed the Firepot range last year, and a review of the TentMeals range is coming in a few weeks.
The two main methods for removing moisture from these meals are dehydration and freeze-drying. Dehydration involves passing warm air over the food and removes around 90-95% of the moisture, whereas freeze-drying involves lowering the temperature of the food, then removing the ice by sublimation – this removes about 97-99% of the moisture. Freeze-dried meals have a longer shelf life, but there is minimal weight difference between dehydrated and freeze-dried foods. A lot of people claim that dehydrated foods taste slightly better, but I personally don’t notice much of a difference.
Whatever the method for removing the moisture in the food, the method for rehydration is often the same. As the food is already cooked before being dried it can be safely rehydrated with cold water, but taste and consistency is always improved by using boiling or hot water. [/vc_column_text][vc_row_inner][vc_column_inner width=”1/2″][vc_column_text]
Good because
- Lightweight (roughly 100-200g per meal)
- No mess, can be eaten straight from the pouch once rehydrated
- Often healthier than ‘wet food’ pouches
- Long shelf life
[/vc_column_text][/vc_column_inner][vc_column_inner width=”1/2″][vc_column_text]
Not-so-good because
- Requires some preparation and additional resources to be edible
- Gas/heat source consumables need to be considered
- Clean water needed for every meal
[/vc_column_text][/vc_column_inner][/vc_row_inner][vc_separator][vc_udesign_recent_posts title=”Latest from the Blog” num_posts=”3″ post_offset=”0″ num_words_limit=”13″ show_date_author=”” show_more_link=”” more_link_text=”Read more” show_thumbs=”yes” remove_thumb_frame=”” thumb_frame_shadow=”” default_thumb=”yes” post_thumb_width=”60″ post_thumb_height=”60″ class=”” category_id=””][vc_separator][vc_column_text]
Supermarket Dried Meal Ingredients
Although broadly similar to the dedicated dried food pouches for camping and backpacking, these food types are sold for domestic use. With a bit of careful thought and creativity they can be used by wild campers and trampers – indeed, dried noodles and instant cup-soups have been a staple of my backpacking menus for nearly two decades.
The main drawback is the extra preparation and mess that comes with buying individual ingredients – they will need to be rehydrated in a pan or container of some sort, so you run the risk of accidentally welding it to the inside of a pan. There is also potential problem of calculating portion sizes and measuring it out at camp and avoiding the problem of inadvertently eating more than your daily allocation.
If you can live with that extra hassle then you can create some elaborate and varied meals with a short list of ingredients, and combining dried ingredients with small amounts of ‘wet’ food (such as adding a tin of tuna to cooked dried pasta) gives you even more variety. It is worth exploring the dried goods aisles of your local supermarket to see just what you can pick up easily – but always remember that you are limited to a stove and pan in your preparation equipment.[/vc_column_text][vc_row_inner][vc_column_inner width=”1/2″][vc_column_text]
Good because
- Lightweight
- Much cheaper
- Variable combinations and portion sizes
[/vc_column_text][/vc_column_inner][vc_column_inner width=”1/2″][vc_column_text]
Not-so-good because
- Requires some careful preparation and measurement
- Takes longer to shop/procure
[/vc_column_text][/vc_column_inner][/vc_row_inner][vc_separator][vc_column_text]
DIY Camping Meals
Although combining various off-the-shelf dried and long-life foods is a DIY solution, there are plenty of other ways you can prepare your own camping meals – even if it’s just putting cooked leftovers in tupperware and throwing it into your rucksack.
Domestic counter-top dehydrators are surprisingly cheap and easy to use (something like this), so cooking meals at home and then dehydrating them to take with you on trips is a realistic option. If you combine a dehydrator with other gadgets such as a vacuum-sealer then you aren’t far off making your own long-life camping meals.
As well as the extra work involved in preparing and experimenting with your own camping foods there is another factor to consider – food safety. You may be quite happy eating leftover food two days after cooking it when it has been stored in a fridge, but what about when it has been festering in a ziploc bag in your rucksack for a day or two? This is much less of a problem when dehydrating food yourself, but when carrying fresh food and ingredients you should give careful consideration to how you are going to store and transport it.[/vc_column_text][vc_row_inner][vc_column_inner width=”1/2″][vc_column_text]
Good because
- Cheaper (after initial outlay)
- Lots of variation and choice
- Comfortable/familiar food from known sources
[/vc_column_text][/vc_column_inner][vc_column_inner width=”1/2″][vc_column_text]
Not-so-good because
- Experimentation and preparation needed
- Requires cooking skills
- Potential food-safety risks
[/vc_column_text][/vc_column_inner][/vc_row_inner][vc_separator][vc_column_text]
Snacks
This is a little easier than finding main-meal options for backpacking and wild camping as bars, biscuits and nibbles often come in smaller packets and are made for reasonably long shelf-lives. Chococlate, cereal and biscuit bars are the obvious choice, along with dried fruits, nuts and small sweets. The infamous mix of those fruit, nuts and small pieces of chocolate and sweets has proven popular with many trail hikers and long-distance backpackers (me included…).
Homemade biscuits, bites and other small foods are easy to make and there are thousands of recipes online on blogs and forums – from peanut-butter balls to Lembas bread for the Tolkein fans.[/vc_column_text][vc_separator][/vc_column][/vc_row][vc_row][vc_column][vc_single_image image=”9176″ img_size=”medium” alignment=”center”][/vc_column][/vc_row][vc_row][vc_column][vc_column_text]
How much food will I need?
The very short answer is “slightly more than you expect to eat”…
There are many possible approaches to this, and my strategies for food and eating for a short or medium-length backpacking trip are very different to what I would take for a day trip into the mountains or forests. For single-day trips I tend to take food that I can nibble on at various points throughout the day – specially if I am going to be moving all day without stopping for longer than 15-30 minutes at a time.
When backpacking the pace slows right down, and I take advantage of the fact I have more time and don’t have to return back to the valley by stopping for a meal somewhere in the middle of the day.
With that in mind, I calculate how much food I will need by how many meals I will be consuming whilst walking/moving, and then work things out from there. If I am heading out for a two-night trip my food list might look something like this:[/vc_column_text][vc_row_inner][vc_column_inner width=”1/4″][vc_column_text]
Breakfast (x2)
- Breakfast bar
- Instant oats/porridge
- Coffee
[/vc_column_text][/vc_column_inner][vc_column_inner width=”1/4″][vc_column_text]
Lunch (x3)
- Oatcakes
- Peanut butter (squeezy tube)
- Instant soup
- Dried fruits/nuts
[/vc_column_text][/vc_column_inner][vc_column_inner width=”1/4″][vc_column_text]
Evening Meal (x2)
- Dehydrated meal pouch
- Chorizo (sliced) or tuna
- Instant soup,or noodles if a particularly long or hard day
[/vc_column_text][/vc_column_inner][vc_column_inner width=”1/4″][vc_column_text]
Snacks and Drinks
- Cereal bars
- Peanut balls (homemade)
- Dried fruit/nut/chocolate mix
- Coffee (either instant or ground depending on weight and length of trip)
[/vc_column_text][/vc_column_inner][/vc_row_inner][vc_column_text]That list would just about supply me with the calories I need, plus enough to cover any possible mishaps (losing food, gas stove not working so I cannot rehydrate food properly etc) or even just miscalculation about how much food I would eat. I always aim to end short mountain trips with food still in my bag, and if I run out then something has gone wrong somewhere in my planning.
If you are working your way up to your first wild camping trip then you’ll probably have a good idea of how hungry you are, and how your body responds to more or less food. For your first trip it is better to err on the side of caution and carry plenty of food, but not enough to slow you down.
If you are concentrating on calorie intake then the previously recommended adult guidelines of 2,000 calories for women and 2,500 for men is a good starting point. How you acquire those calories does make a difference of course – too much sugar and you will be on a constant cycle of peaking and crashing on a glucose high, but your first overnight backpacking trip is not the time to experiment with the paleo diet. [/vc_column_text][/vc_column][/vc_row][vc_row][vc_column][vc_separator][/vc_column][/vc_row][vc_row][vc_column width=”1/4″][product id=”7606″][/vc_column][vc_column width=”1/4″][product id=”7267″][/vc_column][vc_column width=”1/4″][product id=”9519″][/vc_column][vc_column width=”1/4″][product id=”7338″][/vc_column][/vc_row][vc_row][vc_column][vc_separator][/vc_column][/vc_row]
- Published in All Blog Posts, Articles, Bushcraft General, Camping, Mountain General, Skills
How to choose the right map scale – 25k, 40k or 50k?
Friday, 25 January 2019

[vc_row][vc_column][vc_column_text]
How to choose the right map scale – 25k, 40k or 50k?
Choosing the right mapping scale for hiking and walking in the UK
[/vc_column_text][vc_column_text]Anyone who as attended one of our North Wales navigation courses will be familiar with one of the tabletop sessions dealing with the various maps available for the UK. We run these sessions during the brief indoor part of the courses (usually accompanied by a cup of something warm and caffeinated) because it is not quite as straightforward as it might appear to be.
I am of the confident assertion that in the UK we have probably the best topographical mapping in the world, especially for hillwalking, mountaineering and outdoor activities. There can occasionally be a bit TOO much choice though, and choosing the correct map scale (and publisher) for the area you are about to go adventuring in needs a little careful thought.
This post should cover the basics of choosing a map scale for the UK.[/vc_column_text][/vc_column][/vc_row][vc_row][vc_column][vc_column_text]
Mapping Scale Options for the UK
There are two mapping scales that tend to be used for walking, mountaineering and other human-powered travels across the landscape in the UK – 1:25,000 and 1:50,000 scales. The main producer of topographical maps for outdoor activities (and everything else) is the Ordnance Survey (OS), and the 1:25,000 (Explorer) and 1:50,000 (Landranger) scales are readily available at outdoor shops, online and local retailers. They also produce various digital mapping products, as well as an online mapping service and smartphone app.
Harvey Maps, founded in 1977, produce maps that cover the popular hillwalking and mountaineering areas of the UK, plus some of the designated long-distance trails and other areas. They also produce maps for cyclists, fell runners and orienteering.
Their maps differ from OS maps in that they are produced at the slightly less common 1:40,000 scale, sometimes referred to as the ‘magic scale’ as it has enough detail to navigate by whilst also covering a wide area. They also produce a 1:25,000 series called Superwalker.
1:25,000 Scale (OS Explorer Maps Series and Harvey Superwalker)
At this scale 4cm on the map is equal to 1km and public rights of way, fence/wall lines and even individual crags and large boulders. This scale is about as detailed as you would want it to be for hiking and mountain walking, but it can show TOO much detail for some users. More on that below!
1:50,000 Scale (OS Landranger Maps Series)
This is the ‘next’ level of mapping up from 1:25,000 scale. At this level 2cm is equal to 1km, and in one sense you can fit four times the area of mapped land into the same space on the paper. Roads, major paths/trails and watercourses are shown and the contour interval is always 10m.
1:40,000 Scale (Harvey Maps various)
This is the in-between scale that some people favour because it balances detail with coverage. At this scale 2.5cm is equal to 1km, and the contour interval is at 15m. Harvey Maps also include ‘extra’ contour lines that show complex terrain that would otherwise be missed by the 15m contour interval. Some fencelines and paths are shown, but not all. The features that are chosen to be included on the map are biased towards hillwalkers and mountaineers, and extra shading is included to show ‘bands’ of relative altitude.[/vc_column_text][/vc_column][/vc_row][vc_row][vc_column][vc_separator][vc_column_text]
How far do you need to see?
The obvious factor to consider when choosing a map scale is how much of an area you need to be able to see on one map sheet versus how much detail you need.
If you need to be able to see the information for a dozen kilometres or more at a time then you will need a map with a relatively small scale of 1:100,000 or smaller. This will give you a good overview of the large features of an area, but won’t show the minor details. You can distinguish between roads and the major rivers, but won’t be able to see the individual folds of a hillside or where isolated building are.
If you want to have some fine detail, but still have an overview of several kilometres at a time then something like a 1:50,000 scale map will be more appropriate. This will show contours, paths, major crags and some significant buildings but will also allow you to quickly scan across the next few hours of walking route without having to unfold/refold the map.
For finer detail and only looking at a small area at a time then a 1:25,000 scale map is about as detailed as you would want it to be. This will show individual boundary lines, smaller crags and rockfaces and areas of different ground vegetation and even bogs. It will also have A LOT of information and you may need to mentally ‘blank out’ the bits you don’t need to pay attention to so that you can focus on the relevant parts.
In the three photographs below I have placed the same compass on roughly the same line running west-east just north of Fort William. It shows the balance between having enough detail to navigate by and being able to see a larger area in one glance:[/vc_column_text][vc_single_image image=”10330″ img_size=”full” alignment=”center”][/vc_column][/vc_row][vc_row][vc_column][vc_column_text]
Contour Intervals
The ‘contour interval’ is the vertical gap between marked contour lines on the map. If a contour line reads ’90m’ and then the next one up the hill reads ’95m’ then the contour interval is 5m, and so on.
This matters when choosing a map scale as the contour lines shown can both give the navigator a lot of detail to navigate from BUT also provide too much detail and make things confusing. With that said, contour lines only show a broad trend in the shape of a landscape. Objects and lumps on the hillside that are smaller than the contour interval may not be shown. 5m is the height of a bungalow, which would be a significant obstacle to navigate around but it would not appear on a 10m-interval map.
For Ordnance Survey maps the contour interval of 1:50,000 scale is every 10m (vertically), and it can be either 5m OR 10m for 1:25,000 scale maps. For Harvey maps the contour interval is every 15m.
On the 1:25,000 OS maps that variance between it being either 5m or 10m for the vertical contour interval can be a little confusing – the deciding factor seems to be just how ‘lumpy’ the area covered is. If it’s more mountainous then the contour interval is more likely to be 10m, and for flatter, more gently rolling areas then it is more likely to be 5m.
The graphic below has two photos, each of the same ‘grid square’ (just west of Ruthin in Denbighshire). However, one photo (the left one) is from Explorer sheet 265 Clwydian Range and the other (right) is from sheet 264 Vale of Clwyd. Both are the same scale (1:25,000) and they overlap for a few kilometres in the are to the west of Ruthin and Denbigh. However – as you can see – there are two completely different contour intervals for that area, depending on which map sheet you are looking at.[/vc_column_text][vc_single_image image=”10328″ img_size=”full” alignment=”center”][vc_separator][/vc_column][/vc_row][vc_row][vc_column][vc_column_text]
How much detail do you need?
For any mapmaker there is a balance that needs to be struck between presenting information in a clear and relevant way and ensuring that the map is still usable. This isn’t just about scale, but also about choice of colour and symbols used to represent real-world features.
On the graphic below you can see the same area of the eastern flanks of Snowdon, particularly the area between Llyn Lydaw and Glaslyn.
The difference between the OS 1:50,000 and 1:25,000 mapping (left hand) is subtle, as the contour interval is the same and the colours are broadly similar. The most obvious difference is that the crags and rocky outcrop locations are more accurately mapped on the 1:25,000, and it would be possible to navigate from buttress to buttress.
On the right there are two versions of Harvey 1:40,000 scale mapping, the top one produced by the British Mountaineering Council (BMC) and the lower the Harvey standard mapping for the same area. Shading to denote bands of altitude/height really makes the ‘shape’ of the landscape jump out. It’s very clear on the upper (BMC) map, but it’s still quite apparent on the lower one.[/vc_column_text][vc_single_image image=”10332″ img_size=”full” alignment=”center”][vc_separator][/vc_column][/vc_row][vc_row][vc_column width=”1/2″][vc_column_text]
Do fences and boundary lines matter?
One significant difference between OS 1:25,000 and 1:50,000 mapping is the presence or absence of marked fencing and wall locations on the map. As these are static and almost always long-standing features of the landscape they CAN make excellent navigation aids. I have navigated to and from fence junctions numerous times, and they make great features for handrailing along when navigating between waypoints.
The three photos here show the same area of the north-eastern end of Llyn Gwynant and the hillside above. On the 1:50,000 OS map there are some significant feature but no fence or boundary lines marked. On the 1:25,000 Os map and the 1:40,000 Harvey map the fence running uphill from the river are clearly marked – although much more accurately on the 1:25,000 map. If I was navigating using the 1:40,000 map I could say that “there is a fence somewhere around here”, but if I was using the 1:25,000 map I could identify the fence and follow it uphill or downhill with confidence of my position at all times.[/vc_column_text][vc_btn title=”Sign up for our mailing list” color=”warning” align=”center” i_icon_fontawesome=”fa fa-envelope-open-o” button_block=”true” add_icon=”true”][/vc_column][vc_column width=”1/2″][vc_single_image image=”10331″ img_size=”full” alignment=”center”][/vc_column][/vc_row][vc_row][vc_column][vc_separator][vc_column_text]
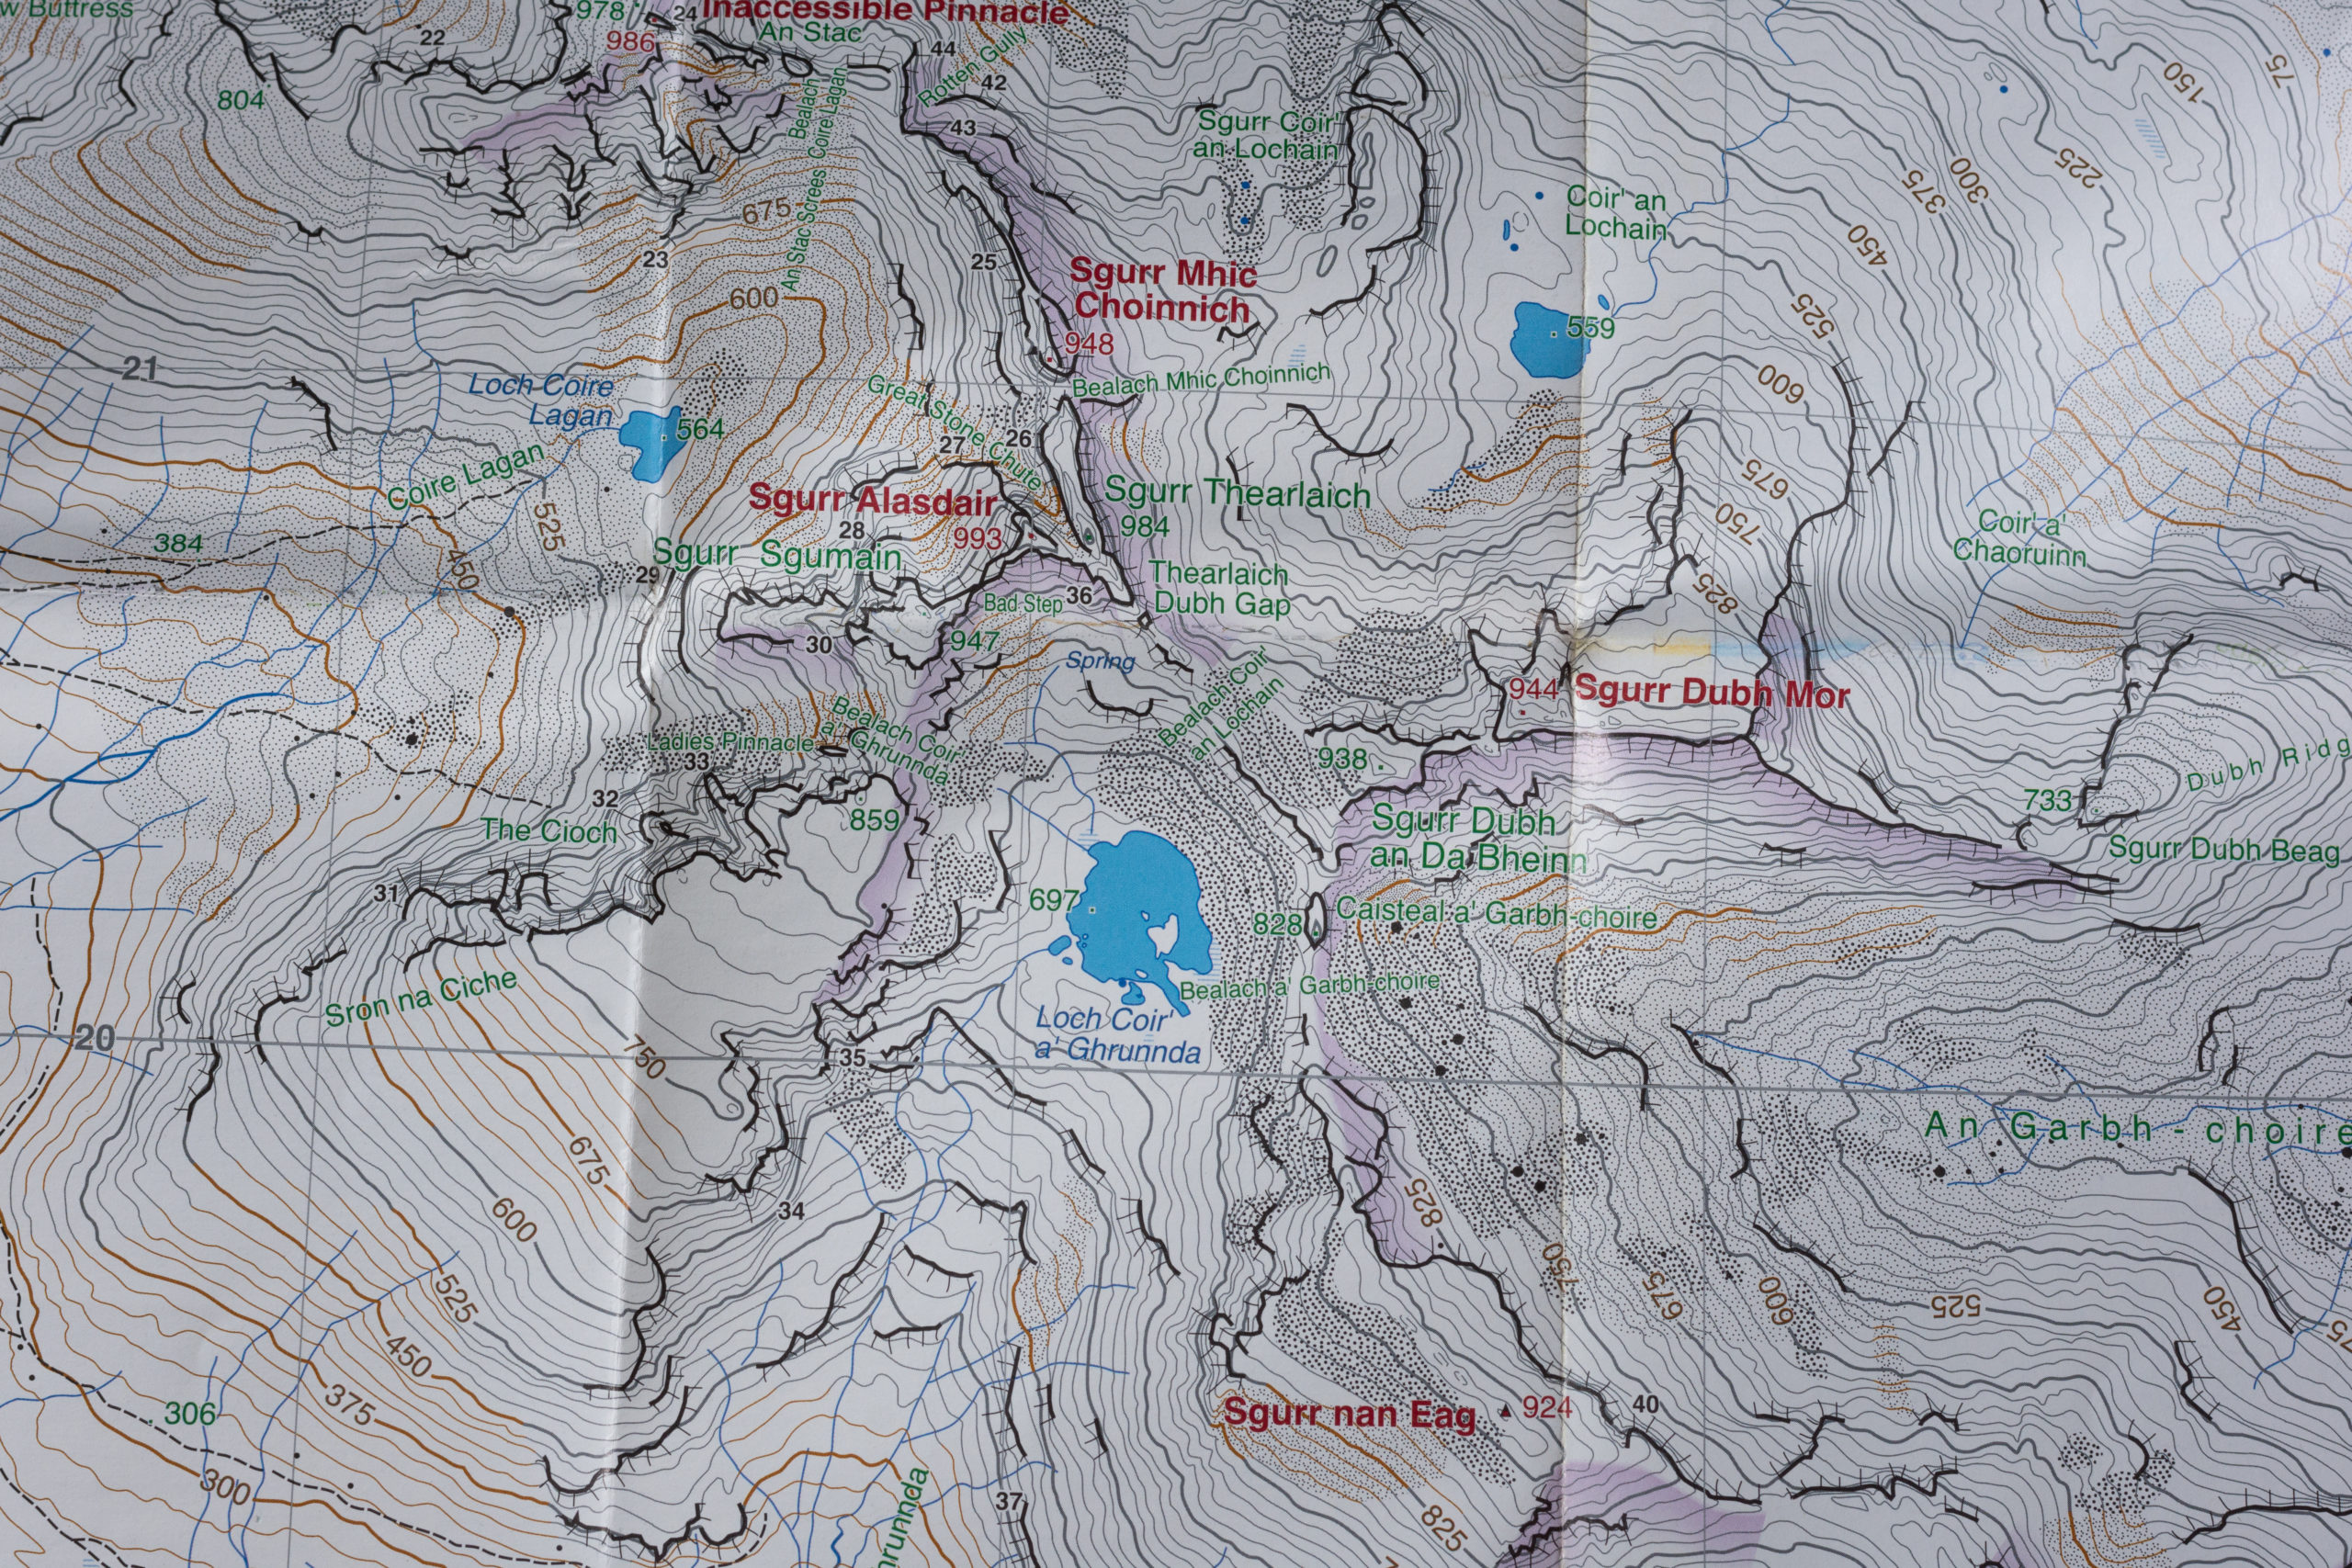
More detail than 1:25,000?
There are other mapping scales on the market, but they are only readily available for certain areas of the UK, or through specialist suppliers. Harvey Maps include ultra-detailed 1:12,500 scale sections of difficult mountain areas on the reverse side of some of their 1:25,000 scale Superwalker series.
Below are three images of maps of the Cuillin range on Skye; the left one being the OS 1:25,000 map, the middle the Harvey Maps 1:25,000 and the right a cropped and zoomed shot of the relevant area of the 1:12,500 section. The three sections show the same terrain, but the 1:12,500 version is much easier to read. This can be critical when trying to navigate in poor visibility in very complex terrain, especially in places where the rocks are mildly magnetic and make compasses unreliable – like Skye!
[/vc_column_text][vc_single_image image=”10329″ img_size=”full” alignment=”center”][vc_separator][vc_single_image image=”10349″ img_size=”full” add_caption=”yes” alignment=”center”][vc_column_text]
So, 1:25,000 is the best because of the detail?
Maaaaaaaybe. I use Ordnance Survey 1:25,000 mapping for about 95% of the work I do in the UK, but there are times when I will use 1:50,000 – and that’s often in the winter.
Having extra detail and lots of features to navigate between is great for micro-navigation, but if half of those features are buried beneath a metre or two of snow then they aren’t much use – in fact, they are more of a hinderance. So when there is a thick blanket of snow on the ground I will often choose a 1:50,000 map as I am able to see the overall shape of the landscape. A blanket of snow will round off the sharp edges of a mountain and smooth out the crevices – all that is left is a broad curve, which is exactly what you see on a 1:50,000 map.[/vc_column_text][vc_column_text]
A matter of personal choice
In the vast majority of cases it won’t matter TOO much if you are carrying a 1;50,000 or a 1:25,000 map for the area – as long as it is up to date, waterproofed somehow and YOU KNOW HOW TO USE IT! 🙂
It matters most that the map shows enough detail for what you are planning to do, and that you know how to read it. If you feel that a 1:50,000 or 1:40,000 scale map has enough detail for the activity you are doing then it will be fine. If however you want to know the exact location of field edges or the a wiggle in a contour line then a 1:25,000 scale map will be more appropriate.
I use a mixture, using 1:25,000 for navigating when out on the ground, 1:50,000 for planning multi-day routes and mountain biking and other scales when necessary. I tend to use OS maps rather than Harvey Maps, but I think that is because I first learned how to read a map with a battered OS map, deep in the countryside and stumbling through muddy fields on Air Cadet camp weekends as a teenager. I know, and work with, quite a few instructors and outdoor professionals who will only use a 1:50,000 map, and it is expected that you be competent navigating off all of the common mapping scales if you undertake your Mountain Leader assessment or similar.
[/vc_column_text][/vc_column][/vc_row][vc_row][vc_column][vc_column_text]
Our UK Outdoor Navigation Courses
[/vc_column_text][product_category per_page=”12″ columns=”4″ orderby=”menu_order title” order=”ASC” category=”navigation-courses”][/vc_column][/vc_row]
- Published in All Blog Posts, Articles, Bushcraft General, EST Framework, Land Navigation, Navigation, Skills
Pacing, timing or ticking off – measuring distance when navigating on foot
Wednesday, 28 November 2018

[vc_row][vc_column][vc_column_text]
Pacing, timing or ticking off – measuring distances when navigating on foot
On our navigation courses we always end up coming around to the subject of distance. Indeed, it’s one of the ‘D’s of navigation and unless you intend to just stand still and survey the surrounding countryside you’ll need to deal with the problem of measuring distance both on the map and on foot at some point or another.
There are three ways that we cover in depth on the EST Framework navigation courses – ‘pacing‘, ‘timing‘ and the enigmatically named ‘ticking off‘. They each have their merits, but also a few drawbacks. Like pretty much every other navigational technique – they are just a tool in the toolkit, and it is up to you to select the right one for the right task.[/vc_column_text][/vc_column][/vc_row][vc_row][vc_column][vc_separator][/vc_column][/vc_row][vc_row][vc_column][vc_single_image image=”9983″ img_size=”full” add_caption=”yes” alignment=”center”][vc_column_text]
Pacing
When we talk about ‘pacing’ with regard to measuring distances when walking we’re actually talking about ‘double-paces’. A double-pace (DP) is just two consecutive walking strides – so if your first step is with your left foot forward then you would count every time your right foot hits the ground for your double-pace count.
When we’re relaxed and walking normally humans are quite good at maintaining a steady rhythm and stride length. This means that we can rely on that regular pacing to measure out distances along paths or across open ground with a reasonable amount of accuracy.
Measuring over 100m segments
If you know how many double-paces (DP) it takes you to walk 100m (mine is 60DP, but I regularly walk with people who could range between 55 and 75DP) then you can use that number to measure either multiples of 100m, or distances shorter than 100m.
So if I measure out a navigation leg as being 120m then it SHOULD take me 72DP to complete that distance (60DP for 100m then 12DP for 25m).
Keeping Count
When measuring out longer navigation legs there always comes a point where the number of double-paces (DP) you are counting out becomes a bit too much to keep track of – especially when you’re also trying to concentrate on a bearing or moving over rough ground. I try to keep pacing navigation legs as short as possible, and then count in ‘sets’ of 100m. So if I need to walk for 300m then I will count to 60DP three times, rather than trying to count to 180DP in one go.
Some people make use of counting aids, such as a row of beads on a length of paracord or even knitting and crochet stitch counters! I either use my fingers (at least 5 on each hand) or pick up the relevant number of rocks and throw one away every time I reach 100m.
Working out your Pacing
You need to find a 100m section of flat, easy terrain where you have clear markers at either end. Wear your normal walking boots, rucksack and clothing and walk as normally as you can from one end of your measured distance to another. Make a note of how many double-paces (DP) it took for you to get there, then turn around and walk back the other way. If all is going well then this number should be the same!
Do this another few times and take an average of the number you get to each time you complete 100m. This is now a number you can start to use to measure distances, but check it against other known distances to see if you have worked it out correctly.
[/vc_column_text][vc_row_inner css=”.vc_custom_1543437739038{background-color: #e5e5e5 !important;}”][vc_column_inner width=”1/2″][vc_column_text]
Good For…
[/vc_column_text][vc_column_text]
- Accurate measuring of distance for shorter navigation legs (less than 500m)
- Walking at variable speeds where stride length is roughly the same
- When accuracy of distance matters more than accuracy of speed
[/vc_column_text][/vc_column_inner][vc_column_inner width=”1/2″][vc_column_text]
Not So Good For…
[/vc_column_text][vc_column_text]
- Longer navigation legs
- Walking and talking at the same time
- Very steep or rocky terrain where regular pacing is impossible or lots of zig-zagging occurs
[/vc_column_text][/vc_column_inner][/vc_row_inner][/vc_column][/vc_row][vc_row][vc_column][vc_separator][/vc_column][/vc_row][vc_row][vc_column][vc_single_image image=”9982″ img_size=”full” add_caption=”yes” alignment=”center”][vc_column_text]
Timing
Timing is another accurate method of measuring distances when walking, but requires a bit more in the way of careful calculation and adjustment for different scenarios. It often works when pacing does not (longer distances, difficult ground) but in some ways it requires more mental energy.
Naismith’s Rule
William Wilson Naismith – Scottish mountaineer and founding member of the Scottish Mountaineering Club – developed a formula for calculating time over distances when walking in the mountains. It essentially says:
one hour for every 3 miles (5 km) forward, plus an additional hour for every 2,000 feet (600 m) of ascent
A slightly easier way of saying this is:
allow 12 minutes per kilometre, then add 1 minute for every 10m of ascent
The problem that may arise here is – what if you walk faster than 12 min/KM? Or slower? My own pace varies substantially either side of 5km/h depending on the terrain I am walking over, the load I am carrying and even how far I have to travel that day or the task I am completing.
Measuring your pace
As with working out your pacing – you need to find a length of easy, flat ground where you can measure against a known distance. Walk that distance (if you can find somewhere that is 1km or 500m long it will help with the maths) with your normal walking clothing and equipment and time it. Turn around and walk it again in the other direction. Do it at least 3 or 4 times and take the average. Work out how long it will have taken you to walk 1KM and make a note of this. Next – try it out against another set distance and see if you can predict how long it will take for you to complete it.
Ascent and Descent
As a general rule you add 1 minute for every 10m you will ascend within the horizontal distance (i.e. the distance you measure on the map). This accounts for both the extra distance of the slope and slowing down as you work harder to walk uphill. In some extreme cases (running etc) you may want to add in less than 1 minute for 10m, but generally speaking it’s best to adjust your horizontal pace and stick to 1min/10m of ascent.
When descending it’s often best to just stick to the horizontal (map-measured) distance and make no adjustments for the change in elevation. However – if the slope you are descending is very rocky, vegetated or steep then you might need to make an adjustment.
Calibrating for the day
Some people are happy to come up with a figure for their average pace and stick with it, but where possible I prefer to measure how quickly I am moving at the beginning of a trip then base my calculations for the rest of the trip on that figure.
So if I have, for example, a 500m section of flat-ish walking at the start of the day I will make a note of how long it takes for me to complete it then use that figure for my min/KM pace. If I walk that 500m in 4 minutes 30 seconds then it’s likely that I will be moving at 9 minutes per KM for the foreseeable future, and so on.
Next I will work out another short leg (less than 1km) and estimate how long it will take for me to complete it at that pace (still adding in 1 minute for every 10 minutes of vertical ascent).
So if I am walking at 9 minutes per kilometre, and in the next 800m on the map I will ascend 250m then my estimated travel time is going to be around 32 minutes and 12 seconds (7 minutes 12 seconds for the horizontal distance, and 25 minutes for the vertical ascent). If that estimated time is substantially wrong then something has gone wrong somewhere – if my calculations are correct then I need to adjust either the times for the horizontal or vertical distances.
Making Adjustments
The problem with using timing and average pace for measuring distance is that it relies on fixed figures in a world where there are a lot of variables. Dense vegetation, rocky ground and bogs/swamps can all substantially slow you down – and a stretch of unexpectedly good path or road can allow you to move much faster than expected. For these reasons you should always be ready to use another navigation technique such as a Catch Feature or Handrailing (see below) to make sure you spot any errors creeping in.[/vc_column_text][vc_row_inner css=”.vc_custom_1543437725664{background-color: #e5e5e5 !important;}”][vc_column_inner width=”1/2″][vc_column_text]
Good For…
[/vc_column_text][vc_column_text]
- Macro navigation or where accuracy matters less
- Walking along well-defined linear features such as paths or along fencelines
- Working out if you have enough time to complete a certain route/navigation leg
- Walking in a group where you want to be able to talk and not worry too much about counting
[/vc_column_text][/vc_column_inner][vc_column_inner width=”1/2″][vc_column_text]
Not So Good For…
[/vc_column_text][vc_column_text]
- Where high-accuracy is crucial
- When you are tired and mathematical calculations are harder
- Where the terrain constantly varies and establishing an average is difficult
[/vc_column_text][/vc_column_inner][/vc_row_inner][/vc_column][/vc_row][vc_row][vc_column][vc_separator][/vc_column][/vc_row][vc_row][vc_column][vc_single_image image=”9984″ img_size=”full” add_caption=”yes” alignment=”center”][vc_column_text]
Ticking Off
This isn’t often mentioned as a way of measuring distance, but if you think about it it’s possibly the technique you will use most often.
‘Ticking Off’ is the navigational term for the process of mentally noting features as you pass them on the ground. You can look at a map and say to yourself:
“OK, I’m going to walk along the edge of this field, cross over a boundary of some kind and then walk on the southern side of a small stream for about 300m. After that I will cross over another stream to the side, climb up a slope with 30m of ascent and then come out onto a plateau.”
That short story adequately describes the route ahead using map features that SHOULD be there on the ground, and you can use it to roughly measure distance. If you have crossed over the boundary of the field and are walking alongside the stream BUT haven’t yet come to the side-stream or the slope then you can at least narrow your position down to a 300m-long stretch of riverbank. And I am willing to bet that you would know if you were closer to the boundary or the stream crossing – so you can maybe narrow your position down to the nearest 150-100m.
Ticking Off is a very broad tool for measuring distance, but if you use it properly it will allow you to narrow things down to a rough area and create a ‘bracket’ of “I have passed this feature but haven’t passed this feature yet, so I must be somewhere between the two“.
Of course, this only works if the features you are looking for actually exist on the ground – fences move, streams dry up and sometimes there are just map errors.[/vc_column_text][vc_row_inner css=”.vc_custom_1543437706887{background-color: #e5e5e5 !important;}”][vc_column_inner width=”1/2″][vc_column_text]
Good For…
[/vc_column_text][vc_column_text]
- Terrain where there are lots of easily-identified features
- Linear routes along paths, rivers or fencelines where progress can be checked
- In good weather where position is important but high-accuracy isn’t
[/vc_column_text][/vc_column_inner][vc_column_inner width=”1/2″][vc_column_text]
Not So Good For…
[/vc_column_text][vc_column_text]
- Times where high-accuracy is important
- Where it could be easy to confuse similar features
- Where there are few definable features on the ground
[/vc_column_text][/vc_column_inner][/vc_row_inner][/vc_column][/vc_row][vc_row][vc_column][vc_separator][/vc_column][/vc_row][vc_row][vc_column][vc_column_text]
Catch Features
No matter which of the three techniques you use to measure distance – it’s wise to have a backup plan. The easiest way to implement this is to identify a ‘Catch Feature’ – something big and obvious that is just beyond the edge of your navigation leg that will immediately alert you if you have gone too far. It could be a fenceline, a river, an obvious change in slope angle (either uphill or downhill) or even a change in vegetation – the edge of a forest maybe.
This is something that you will need to identify on the map before you begin that navigation leg, and maybe even allow for when planning that section of the route. If getting your navigation planning wrong is going to put you in a dangerous situation it’s probably better to take a slightly longer route where any errors can be picked up and fixed straight away than to take the direct route and have errors go unnoticed.[/vc_column_text][/vc_column][/vc_row][vc_row][vc_column][vc_separator][/vc_column][/vc_row][vc_row][vc_column][vc_column_text]
So which is the best?
Pacing, timing and ticking off are all tools in your toolkit. Pacing has the highest accuracy in most cases, but only works well over shorter distances. Timing CAN be very accurate, but you need to put in a lot of work to get there and it’s easy for error to creep in. Ticking Off can work very well, but unless you are stood at the junction of two linear features it’s difficult to be very accurate with it.
Both Pacing and Timing seem to have about 90% accuracy – i.e. you are going to have an error of about 10% each time you use it, even if you are doing it well. 10m of error on 100m is fine, but 50m over 500m can be significant and make the difference between finding the safe descent route or walking off a cliff. No matter which technique you use it’s wise to use i tin conjunction with another navigation tactic – aiming off, a catch feature or even just feature recognition.
Over the course of a navigation-intensive mountain day I will probably use Ticking Off for 80% of the route, Timing for 18% and Pacing for maybe 2% – but that 2% might be the most critical part of the day, such as finding my way from the summit to the correct edge of the plateau for the path I want.
[/vc_column_text][/vc_column][/vc_row][vc_row][vc_column][vc_column_text]
Our Navigation Courses
[/vc_column_text][product_category per_page=”12″ columns=”4″ orderby=”rand” order=”ASC” category=”navigation-courses”][/vc_column][/vc_row]
- Published in All Blog Posts, Articles, Bushcraft General, EST Framework, Land Navigation, Mountain General, Navigation, Skills, Survival
UK Wild Camping Laws Explained
Thursday, 22 November 2018

[vc_row][vc_column][vc_column_text]
UK Wild Camping Laws Explained
The laws and rules about where you ‘can’ and where you ‘cannot’ camp in the hills, mountains, forests and countryside of the United Kingdom always provokes a little debate when discussed. It’s something we talk about on our wild camping course and other campcraft courses, and if you have been following our blog for the last few years you might remember this post where I argued AGAINST the signing of a petition that wanted to legalise wild camping in England and Wales. In that post I wanted to point out that although wild camping is legally difficult, it is possible.
This post explains the laws and rules around wild camping in England, Scotland, Wales and Northern Ireland as to the best of my understanding as an outdoor professional. I’ve also tried to include some other legal issues that may be worth considering when heading out to camp in the mountains and forests.[/vc_column_text][/vc_column][/vc_row][vc_row][vc_column width=”2/3″][vc_column_text]
Can I Wild Camp in the U.K?
Good question. I suppose it depends on what you mean by ‘can’.
If you mean ‘is it physically possible to find somewhere to camp?‘ then of course the answer is ‘yes’. I wild camp somewhere in the UK about once per month and have a decent success rate. I have been camping in the mountains and forests and on the coastline of the UK since I was about 18 – a time that seems to be getting further away at an alarming rate!
If however you mean ‘am I legally entitled to wild camp where I want to in the U.K?‘ then the answer is probably going to involve a sucking of teeth and a ‘well, it depends…’
The problem is that for most of the U.K. we do not have a ‘wild camping law’. The legal rules pertaining to camping on somebody else’s land aren’t clear and are bound up in historic assertions of property and personal rights dating back centuries. Current legislation for most of the U.K. focuses more on the actions of travellers, gypsies and other migratory groups that may park on land with vehicles and caravans – as you can see in this PDF.
The Criminal Justice and Public Order Act 1994 (CJPOA, particularly sections 61-80) conveyed powers onto the Police and created offences relating to various forms of trespass – but again the focus is away from the hiking and camping community and more towards other groups – the examples often cited are ‘hunt saboteurs’ or those participating in a free parties or raves. Quoting the CJPOA in the case of ‘true’ wild camping in the mountains doesn’t really help though, as in the vast majority of cases the trespass on the land would be a civil matter rather than a criminal one.
But that’s about as clear as a mud smoothie, so let’s look at the individual cases for England, Wales, Scotland and Northern Ireland.[/vc_column_text][/vc_column][vc_column width=”1/3″][vc_single_image image=”9958″ img_size=”medium”][vc_single_image image=”9031″ img_size=”medium” alignment=”center”][/vc_column][/vc_row][vc_row][vc_column][vc_column_text]
Wild Camping Laws for England and Wales
Almost all of the land you can walk across in England and Wales is owned by somebody. It may be an individual, a company/commercial organisation (including The Crown Estate), a charity (National Trust etc) or even the government or similar authority. These are almost always referred to as the ‘landowner’ and I will do the same throughout this post.
In England and Wales you do not have the right to pitch a tent, tarp, hammock or bivvy bag on the land belonging to somebody else without the permission of that landowner. To do so without the permission of that landowner means that you are committing trespass – which is a civil offence (i.e. non-arrestable). However, if you do not immediately leave when directed to do so by the landowner or somebody acting on their behalf (such as a gamekeeper or land agent, or security guard) then you may be committing a criminal offence (Aggravated Trespass) – something that a Police officer can arrest you for. There are also a few places where you will be immediately committing criminal trespass as soon as you cross onto that land – such as railway lines, some education establishments and of course sites vital for national defence and security.
This all still applies if you are in the middle of nowhere, stood on top of a mountain in Snowdonia or the Lake District, and cannot see another human or even a road. In the vast majority of cases it still belongs to a landowner, and legally speaking you would still need the permission of the landowner.
The Countryside Rights of Way Act (CROW Act 2000)
This was a landmark piece of legislation that opened up huge swathes of the English and Welsh countryside to the general public, creating what is often referred to as the Right to Roam. This means that within certain, designated areas (often upland and large areas of forest or heathland) the general public can walk over the land, away from Public Rights of Way. This opens up most of the mountainous and remote areas of England and Wales for recreation and exploration on foot and effectively ended disputed access over certain areas, such as Chrome Hill in the Peak District.
One thing that wasn’t included in the Right to Roam was the ‘Right to Camp’ – it did not change the fact that camping on land without permission of the landowner is civil trespass, and in fact says quite clearly that camping is not permitted under the CROW Act:
1. Section 2(1) does not entitle a person to be on any land if, in or on that
land, he:
…
(s) engages in any organised games, or in camping, hang-gliding or paragliding,
That’s pretty clear – the CROW Act changed a lot about where we could walk, but not about where we were legally allowed to camp.
Hang on, what about Dartmoor?
Right Dartmoor. That is a different case.
16th Century English poet John Leland said that “Dartmore is muche a wilde Morish and forest Ground“. He wasn’t wrong, although there is a bit less forest now than there was in his day.
This fairly wild and expanse tract of moor in the South West of England abounds with myths and literary associations (watch out for The Hound of the Baskervilles), and is also home to various Ministry of Defence (MOD) training sites and a few other places of interest. It’s also pretty much the only place where you can legally wild camp in England without first checking with the landowner.
There are local byelaws that permit camping within certain areas of the Dartmoor National Park (see interactive map below) as long as you do so within the following rules:
-
No person shall knowingly use any vehicle, including a caravan or any structure other than a tent for the purpose of camping on the access land or land set out for the use or parking of vehicles except on any area which may be set apart and indicated by notice as a place where such camping is permitted.
-
No person shall knowingly erect a tent on the access land for the purpose of camping:(a) in any area listed in Schedule 2 to these byelaws;(b)within 100 metres of any public road or in any enclosure.
-
No person shall camp in a tent on the same site on the access land for more than two consecutive nights, except on any area which may be set apart and indicated by notice as a place where such camping is permitted.
[/vc_column_text][vc_raw_html]JTNDaWZyYW1lJTIwaWQlM0QlMjJteUlmcmFtZSUyMiUyMHNyYyUzRCUyMmh0dHBzJTNBJTJGJTJGbWFwcy5kYXJ0bW9vci5nb3YudWslMkZjYW1waW5nLmh0bWwlMjIlMjBzdHlsZSUzRCUyMmhlaWdodCUzQSUyMDEwMHZoJTNCJTIyJTIwd2lkdGglM0QlMjI5NSUyNSUyMiUyMGZyYW1lYm9yZGVyJTNEJTIyMSUyMiUzRSUwQSUzQ3AlM0VZb3VyJTIwYnJvd3NlciUyMGRvZXMlMjBub3QlMjBzdXBwb3J0JTIwaWZyYW1lcy4lM0MlMkZwJTNFJTNDJTJGaWZyYW1lJTNF[/vc_raw_html][/vc_column][/vc_row][vc_row][vc_column][vc_column_text]
Wild Camping Laws for Scotland
In Scotland the situation is a lot simpler. The Land Reform Act (Scotland) was enacted by the Scottish Parliament in 2003 and took the idea of the CROW Act and developed it even further. It created, amongst other things, a legal framework for land access in Scotland and included the development of the Scottish Outdoor Access Code.
One of the guiding principles of the Land Reform Act was that everyone has the right of access to the land and inland water of Scotland for recreation so long as they do so responsibly and without impinging on the the rights and freedoms of others. The ways in which responsible access can be exercised is laid out in the Scottish Outdoor Access Code, and quite clearly says that wild camping is permitted under the Scottish Outdoor Access Code and that as long as you:
- are not camping in enclosed areas (i.e. fields with crops or animals) or close to buildings and historic monuments
- are camping away from roads
- leave no trace (including good guidance on campfires)
There are some byelaw restrictions on camping in certain areas, most notably and controversially the restrictions on camping around parts of the Loch Lomond and Trossachs National Park.
[/vc_column_text][/vc_column][/vc_row][vc_row][vc_column][vc_column_text]
Wild Camping Laws for Northern Ireland
In some cases you find that the laws for Northern Ireland are slightly different from those of England, Scotland and Wales for one reason or another. However, in the case of Northern Ireland wild camping rules it is pretty much the same situation that existed in England and Wales prior to the introduction of the CROW Act in England and Wales:
- There are Public Rights of Way but no ‘Right to Roam’ as such
- There is no right to ‘wild camp’, and to do so without the permission of the landowner would be considered trespass, as it is in England and Wales (mostly)
[/vc_column_text][/vc_column][/vc_row][vc_row][vc_column][vc_column_text]
Wild Camping and Campfires
The association between a roaring (or even quietly burning) campfire is about as strong as you can get, but the issue of lighting fires on somebody else’s land is as complex as that of trespass and wild camping.
England, Wales and Northern Ireland
Here you would need the permission of the landowner to light a fire and you do not have the right to do so. This also includes Dartmoor, where wild camping is legal in certain areas (see map and description above).
Anybody lighting a fire on somebody else’s property without their permission needs to consider how it can be construed in a legal sense – trespass is a civil offence and you simply being there without permission and leaving immediately once asked to do so is a civil, not criminal matter. However – would lighting a fire (and presumably, gathering firewood from the immediate area and burning it) be considered criminal damage? There are so many variables to consider that it is impossible to give a clear answer – but it is wrong to assume that you ‘have the right’ to light a fire, just because you saw somebody on YouTube do it… For further reading take a look at the Criminal Damage Act 1971.
Scotland
As outlined above, camp fires are technically permitted under the Land Reform Act, but all (legal) access to land under the Land Reform Act needs to be done whilst adhering to the Scottish Outdoor Access Code. There is a strong recommendation that you use a stove, not an open fire, to cook over – and with good reason. See the tweet below from Ben Dolphin, AKA Countryside Ben:[/vc_column_text][vc_raw_html]JTNDYmxvY2txdW90ZSUyMGNsYXNzJTNEJTIydHdpdHRlci10d2VldCUyMiUyMGRhdGEtbGFuZyUzRCUyMmVuJTIyJTNFJTNDcCUyMGxhbmclM0QlMjJlbiUyMiUyMGRpciUzRCUyMmx0ciUyMiUzRUFub3RoZXIlMjBjYW1wZmlyZSUyMHNjYXIlMjBkdWclMjBvdmVyJTIwYW5kJTIwc3VwZXJmaWNpYWxseSUyMHJlc3RvcmVkJTIwdG9kYXklMkMlMjBmcm9tJTIwYSUyMGZpcmUlMjBvdmVyJTIwdGhlJTIwd2Vla2VuZC4uLi5vbiUyMHRyZWUlMjByb290cyUyMGFuZCUyMHBlYXQlMkMlMjBpbiUyMGElMjB3b29kbGFuZCUyMGR1cmluZyUyMGElMjBoZWF0d2F2ZSUyMGFuZCUyMGRyb3VnaHQuJTIwJTNDYSUyMGhyZWYlM0QlMjJodHRwcyUzQSUyRiUyRnR3aXR0ZXIuY29tJTJGaGFzaHRhZyUyRkNhaXJuZ29ybXMlM0ZzcmMlM0RoYXNoJTI2YW1wJTNCcmVmX3NyYyUzRHR3c3JjJTI1NUV0ZnclMjIlM0UlMjNDYWlybmdvcm1zJTNDJTJGYSUzRSUyMCUzQ2ElMjBocmVmJTNEJTIyaHR0cHMlM0ElMkYlMkZ0LmNvJTJGWU52a3QwYkJlSiUyMiUzRXBpYy50d2l0dGVyLmNvbSUyRllOdmt0MGJCZUolM0MlMkZhJTNFJTNDJTJGcCUzRSUyNm1kYXNoJTNCJTIwQmVuJTIwRG9scGhpbiUyMCUyOCU0MENvdW50cnlzaWRlQmVuJTI5JTIwJTNDYSUyMGhyZWYlM0QlMjJodHRwcyUzQSUyRiUyRnR3aXR0ZXIuY29tJTJGQ291bnRyeXNpZGVCZW4lMkZzdGF0dXMlMkYxMDE0OTYxNTU5OTU1NzM4NjI4JTNGcmVmX3NyYyUzRHR3c3JjJTI1NUV0ZnclMjIlM0VKdWx5JTIwNSUyQyUyMDIwMTglM0MlMkZhJTNFJTNDJTJGYmxvY2txdW90ZSUzRSUwQSUzQ3NjcmlwdCUyMGFzeW5jJTIwc3JjJTNEJTIyaHR0cHMlM0ElMkYlMkZwbGF0Zm9ybS50d2l0dGVyLmNvbSUyRndpZGdldHMuanMlMjIlMjBjaGFyc2V0JTNEJTIydXRmLTglMjIlM0UlM0MlMkZzY3JpcHQlM0UlMEE=[/vc_raw_html][vc_column_text]
Wild Camping with a Knife or an Axe
This is an often overlooked problem, but in the bushcraft, survival and forest wild camping world you will find an endless range of photos and videos of people using axes and other cutting tools to fell trees, make shelters, process firewood and so on. It’s natural for somebody to assume that if they are wild camping then they can bring along a camping tool such as a knife, or a hatchet – right?
Welllllllll……
Consider this – in England, Wales and Northern Ireland you will need the permission of landowner to camp on their land. If you camp and do not have that permission then you are trespassing – a civil offence in most cases. But what if you have a very sharp, well-maintained and lovingly sharpened Gransfors Bruks hatchet or axe strapped to the side of your pack? Or a fixed-blade knife (or locking blade, or folding blade of longer than 3″ etc etc)? Is it still JUST trespass, or is it now armed trespass? Or possession of a bladed article without lawful reason to do so? In UK law the onus is generally on the person carrying the axe/fixed-blade/locking blade knife to justify WHY they are carrying in that place, at that time. If you do not have a lawful excuse for being in that forest (i.e. you are illegally wild camping without landowner permission), then does your reason for carrying a ‘camping tool’ no longer stand?
Again, there are many variables to consider here and I have no clear answers. The Police officers I work with as clients, the ones I have as friends and others working in the legal professions in the UK I have asked about it all have slightly different interpretations of what “they would do in that situation”.
It’s down to the individual to make their own decisions about how they carry a knife or axe when wild camping in the U.K.- and if they actually NEED to do so.[/vc_column_text][/vc_column][/vc_row][vc_row][vc_column][vc_column_text]
Wild Camping in the U.K. – my own experiences
I have wild camped in countless locations around the British Isles. I have yet (fingers crossed) come across a landowner or been asked to leave. There is a generally-accepted tolerance to wild camping in the more mountainous areas of England and Wales – if you arrive late, leave early and camp above the highest fenceline or wall then you are unlikely to come into conflict with a landowner or their representatives.
I try to be careful with where I select a spot to pitch a tent or lay my bivvy bag if wild camping in England and Wales – I go for spots that are set back from the edge of a slope where possible, and far away from roads and houses. I also try and move away from busy footpaths or popular areas – the middle of Cwm Idwal or next to Glaslyn on Snowdon might seem like a perfect place for an ‘epic’ mountain camp but you’re going to cause visual pollution for the tens, if not hundreds, of people who are going to spot you if you are a little bit late in striking camp.
There is also the issue of your ‘impact’ – what trace are you leaving by camping there? Ideally it will be a small patch of temporarily flattened grass and some easily-missed tent peg holes. But what about your toilet arrangements? The excess noodles that welded themselves to the bottom of the pan? The scrap of plastic that escaped from the tent when you unzipped the flap in the morning?
Worrying about being ‘caught’ by a landowner is just a small part of wild camping in the mountains of England, Wales and Northern Ireland – your environmental and ecological impact needs to be considered just as much – if not more.
Did you really need to fell that dead-standing birch and have a fire for 6 hours? Would a gas or meths stove have boiled your water just as well?
[/vc_column_text][/vc_column][/vc_row][vc_row][vc_column][vc_column_text]
A Wild Camping Code of Practice
The below is a code of practice I try to adhere to when wild camping ANYWHERE in the U.K.:
- Arrive late and leave early, and move on every day
- Avoid visual disturbance where possible – don’t be the big, orange shining beacon visible for miles around
- Be considerate of others – be them landowners, fellow campers or other people who seek solace in the wild places of the UK
- Leave No Trace other than footprints wherever possible, and go to great lengths to hide any trace you might have to leave
- You are going to need to poo at some point – do it at least 50m away from paths, water sources and other common features. Further if possible (other rules apply for other countries)
- If you carried it in, you carry it out. Banana skins, orange peel, tissues. The lot.
- Use a stove where possible. Campfires use resources and leave a lot of residual evidence if not managed correctly.
[/vc_column_text][/vc_column][/vc_row][vc_row][vc_column][vc_column_text]
A Wild Camping Video
[/vc_column_text][vc_video link=”https://youtu.be/DZsFUK-8tOI” align=”center”][/vc_column][/vc_row][vc_row][vc_column][vc_column_text]
UK Wild Camping and Campcraft Courses
[/vc_column_text][product_category per_page=”12″ columns=”4″ orderby=”menu_order title” order=”ASC” category=”campcraft-bushcraft-courses-uk”][/vc_column][/vc_row]
- Published in All Blog Posts, Articles, Bushcraft General, Camping, Law and Ethics, Skills
The Six-Bundle Fire Lay
Sunday, 11 November 2018

[vc_row][vc_column][vc_column_text]
The Six-Bundle Fire Lay
A stick-bundle method of lighting a fire
This fire lay requires six bundles of dry, straight dead wood and a good ignition source. It relies on good airflow at the beginning, and the fire lay ‘collapsing’ in on itself in the later stages to ensure a good bed of coals and ash to cook over.
It is also a good option for making a ‘One Match Fire’.
The thickness of the wood in each bundle increases as the fire develops, staring with match stick-sized twigs, moving through pencil-sized ones and finally finger-sized branches.
This is one of the first ways we teach new clients to arrange kindling and fire wood for a simple, reliable camp fire. It works particularly well in the areas we use to run training courses (mature Western Hemlock Spruce woodland) where there is an abundance of dry and easily-accessed materials that works particularly well with a stick-bundle fire lay. It would also work with dry/dead-standing Birch branches and some other straight, small branches.
This video is part of the training materials given to clients participating in training courses under the EST Framework
Learn more at:
OutdoorProfessional.co.uk
[/vc_column_text][/vc_column][/vc_row][vc_row][vc_column][vc_video link=”https://youtu.be/aQLeFTp6x9Y” align=”center”][/vc_column][/vc_row][vc_row][vc_column][vc_column_text]
Some of our North Wales and UK Bushcraft Courses
[/vc_column_text][product_category per_page=”12″ columns=”4″ orderby=”rand” order=”ASC” category=”bushcraft-courses”][/vc_column][/vc_row]
- Published in All Blog Posts, Articles, Bushcraft, Bushcraft General, Camping, Emergency and Safety, EST Framework, Firecraft, Skills, Videos
Extreme Low Tide Foraging – How to find the lowest tides
Thursday, 01 November 2018

[vc_row][vc_column][vc_column_text]
Extreme Low Tide Foraging
How to find the lowest tides on the UK coastline
Extreme Low Tide foraging is becoming popular and one of the increasingly common requests we get for a private coastal foraging course over here in North Wales. It’s easy to understand why – when all of the most interesting and edible parts of the beach are under the water for part of every day then there’s a lot more to see when the water has retreated to its lowest point.
The UK is home to one of the biggest tidal ranges in the world – the Severn Estuary can have a difference of as much as 15m (49ft). The tidal range of one particular spot can be dependent on several factors, ranging from the shape of the bay, inlet or estuary where the range is being measured to the underwater geology and topography, and even the direction it is facing relative to the prevailing winds.
You don’t have to travel far to see a big difference between tidal ranges – the average tidal range in Colwyn Bay is about 8.5-9m whereas the range at Barmouth (only 42 miles away as the crow flies) is more like 4.5-5m. So a small building’s worth of difference in tidal range then![/vc_column_text][/vc_column][/vc_row][vc_row][vc_column][vc_single_image image=”9909″ img_size=”full” alignment=”center”][vc_column_text]A comprehensive and very complicated diagram courtesy of this Wikipedia page.[/vc_column_text][/vc_column][/vc_row][vc_row][vc_column][vc_column_text]
Why Tidal Ranges are important to the coastal forager
When looking for wild edibles on the UK coastline the REALLY good stuff spends at least part of its life under the water – the edible seaweeds, molluscs, bivalves and gastropods and of course the fish and crustaceans. As the tide drops away (the ebb) then some of these species are left stranded on the rocks and the sand of the intertidal zone (the area between the high tide and low tide marks). This makes them easy to gather (as long as you’re doing it safely, legally and responsibly) and identify, and is also safer than wading around in deep rock pools and crashing waves!
For most of the UK the tidal period is around 12 hours and 25 minutes – the period between each high tide. The UK has what is known as a semi-diurnal regime – meaning that there are usually two high tides and two low tides every day. Other regions may only experience one tidal cycle in a 24hr period, such as happens in the Guld of Mexico.
This semidiurnal regime gives the forager on the UK coastline two chances of reaching that intertidal zone on foot, although for a good part of the year only one of those chances is going to be in daylight hours!
Predicting the tides
Understanding the local tidal cycle is very important to anybody working or exploring that intertidal zone, whether it’s on land or in a boat. Fortunately – it has never been easier to access that information. There are multiple reliable websites, smartphone apps and other resources that help give reasonably accurate forecasts for the tidal cycle for any given location along the coast:
- Tide Charts/Books – These are the more traditional way of predicting a tidal cycle, and are usually sold for a 12 month period and are specific to a region of the coast. They give the tidal forecast for one specific, accurately measured location in that region (Liverpool is the spot for the North Wales tidal charts) and then a list of adjustments that you need to make for another location in the region. The ‘High Tide’ does not hit all locations along one stretch of coastline at the same time, and there can be a differenc eof several hours between one location and another.
- Tidal Forecast Websites – There are several websites that not only give reasonably accurate forecasts for a given location (usually based on popular locations like coastal towns or tourist beaches) but also give you a visualisation of that tidal cycle. Most websites only give you a forecast of up to 14 days from the current date, but some offer a premium service where you can get more detailed longe-range forecasts of the tidal cycle.
- Smartphone Apps – These are often associated with tidal forecast websites mentioned above, or at least make use of the same data. Again – they may only give up to 14 days of forecast and might be limited on locations. There are also several that I have found to be very innacurate for some locations – it’s worth checking against other sources of information before you start relying on one app or website
- Local newspapers – Many local papers for coastal regions still publish the local tide times for the coming week
- Local information boards – Many harbours and council-owned beach areas have information boards with the local tide times published somewhere.
The published tide tables I use for North Wales and Anglesey are here (Amazon link) and I often use a combination of these two websites for free online tidal predictions:
TideTimes.org.uk
Tide-Forecast.com
A strategy of using a combination of printed tide tables and online sources is probably wisest – I have the printed set in my truck and use it if I want to quickly plan a spontaneous trip to the shore.[/vc_column_text][vc_column_text]For the UK specifically there is an excellent set of FAQs and diagrams on the National Tidal And Sea Level facility here.[/vc_column_text][/vc_column][/vc_row][vc_row][vc_column][vc_column_text]
How Tides Work – a video explanation
I did consider doing our video on how tides work to help explain this point further – but then I discovered that BrainStuff had already produced on, at least a 1,000 times more interesting and concise than my ramblings would have been.
This video runs through how tides work, has a great visualisation of the ‘bulge’ of water created by the gravitational pull of the moon and a little more on the tidal cycle.[/vc_column_text][vc_video link=”https://youtu.be/5ohDG7RqQ9I” align=”center”][vc_column_text]
How Tides Work – a simple explanation
There are several factors affecting the cycle of tides on our planet, but the simplest way to think of it is to associate the tidal cycle with that of the moon in orbit around us. Imagine a ‘bulge’ of water being pulled out from the surface of the Earth towards the moon. As the earth rotates that ‘bulge’ of water can be seen by the fact that the sea ‘moves’ a little further up the shore. When the bulge disappears (i.e. moves away to another part of the Earth) it seems like the water level drops.
There are actually TWO ‘bulges’ of water, one directly under the moon and another on the opposite side of the Earth. This is where the rotational force of the moon and the Earth comes into play – the common centre of mass between the Earth and the moon isn’t in the centre of the Earth, but at a point a little clsoer to the moon.
This rotational force also has an effect on the ‘bulge’ of water, creating a second one on the opposite side from the one ‘under’ the moon.
As these two imaginary (but helpful for visualisation) ‘bulges’ pass by your area of coast then you will experience a cycle of the water rising, then receding as they come and go.
Hang on, do I need to know all of this???
Yes, I know this isn’t particularly clear AND an oversimplification, but you reach a point with trying to understand tidal cycles where your knowledge of orbital physics and rotational geometry becomes more important than your knowledge of edible coastal species.
So for the coastal forager and hunter there are a few key things you need to understand and be aware of:
- Tides are predictable and run in cycles, but gradually change from day to today, and can be very different in locations that aren’t THAT far away from each other
- There are several sources of information that will give you the tide times and ranges, but you need to be able to read them AND make sure that you are looking at the right date and location as it can make a big difference
- The tidal range changes throughout a month, and there are other factors that can affect how high or low a tide will be. Local knowledge is incredibly useful, and it is worth learning about the variables in your local area.
[/vc_column_text][vc_single_image image=”9911″ img_size=”full” alignment=”center”][vc_column_text]
The Extreme Low Tides – AKA the Spring Tides
This is the term that has started to become popular for the point in the tidal cycle where the low tide is as far down the beach as it is likely to be. More properly it is known as a ‘Spring Tide’, and occurs twice per month.
Despite the name, Spring Tides have nothing to do with the season between Winter and Summer, but probably have something to do with the way the water seems to ‘leap up’ at high tide.
Maybe.
They do occur on regular cycle, usually a day or two after a full moon OR new moon.
Why do Spring Tides happen?
If we go back to the simplified-but-helpful idea of there being two ‘bulges’ of water moving around the earth (‘under’ the moon and on the opposite side of the earth) then we can start to work out why Spring Tides occur.
The sun also has an effect on the mass of water on the surface of the earth, but much less than that of the moon. However – when the sun and the moon ‘line up’ relative to the earth then the effect of both of these bodies creates a bigger ‘pull’ than normally experienced. This happens twice per lunar month (which is approximately 29.5 days), and the noticeable effect on the Earth is that the ‘bulge’ of water is bigger/higher than at other times in that cycle. As the mass of water on the surface is largely unchanged then as more water is ‘pulled’ towards the Moon/Sun then the low tide in between the high tide will be as low as it can get – the water has gone away into the ‘bulge’ as it moved elsewhere.
This occurs a day or so AFTER a full moon or new moon, as it takes some time for the mass of water to ‘catch up’ with the gravitational forces.
Basically – when the sun and moon align there’s a bigger pull on the sea than normal, raising it slightly higher and further up the beach. Halfway between the ‘High Tides’ we get a the ‘Low Tide’, and during a Spring Tide the lowest point of the tidal range is as about as low as it can get – this, of course, is the really interesting part for the forager.[/vc_column_text][vc_column_text]
Predicting the Extreme Low Tides
As there is a regular, predictable tidal cycle it is easy enough to predict when that extreme low tide event will occur. It will be roughly 6 hours BEFORE or AFTER the highest point of a Spring Tide, and local factors (shape of the coastline and underwater features) will affect which one of these two low tides will be the lowest.
You can see it on tidal forecasting websites that show the next period of tidal cycles as a ‘wave’ diagram. You will see that the height difference between the ‘peaks’ of the wave and the ‘trough’ or ‘dip’ between those peaks changes from day to day. When the difference is greatest you are probably looking at the Spring Tide, and when the difference is at its least then you have the Neap Tide.
In printed tidal charts you can look to see the relative height of the high tide – normall listed in metres. When it is at its highest number then you are again probably looking at a Spring Tide. Some tidal charts will have a symbol or letter next to that Spring Tide, or have other information that help you calculate it for your area.
[/vc_column_text][vc_column_text]
What About Neap Tides?
Neap Tides are simply the points halfway between the Spring Tides, when those lunar and solar forces cancel each other out. During a neap tide the high tide won’t be very high, but the low tide won’t be very low either. The tidal range for any location is at its lowest during a neap tide.
[/vc_column_text][vc_column_text]
The Neap/Spring Tidal Cycle
Within a lunar month (29.5 days-ish) you will usually find two Spring Tides and two Neap Tides. The cycle might look something like this:
Spring Tide > 7 Days > Neap Tide > 7 days > Spring Tide > 7 Days > Neap Tide > 7 Days > Spring Tide
So if you have just experienced a Spring Tide, with the extreme low tide that a forager is looking for, then you will have to wait roughly 14 days until the next one. This is of course dependant on several local factors AND the fact that the tidal cycle doesn’t exactly line up with a set of 24hr periods.
[/vc_column_text][vc_separator][vc_single_image image=”9914″ img_size=”full” add_caption=”yes” alignment=”center”][vc_column_text]The above diagram shows the tidal cycle for roughly one month. Each ‘wave’ peak or trough on the chart represents one tide, with the ones under the line being low tide, and the ones above being the high tides. You can clearly see the two Spring Tides either side of a Neap Tide.[/vc_column_text][vc_separator][vc_column_text]
The Other Factors that affect Tide Height
I keep mentioning ‘other factors’ that would affect how high (or low) any given tide might be, and it’s probably worth exploring that a little further.
The Wind
A strong wind blowing onto the shore can prevent the water from being able to move away as the tide recedes, and in narrow estuaries or coves this effect can be magnified. There is a term sometimes used – “wind over tide” – which refers to times when the wind and the tide are moving in opposite directions. This is particularly dangerous for anybody trying to broach the surf or head out to sea as the wavelength (gap between waves) is much shorter than normal and they can ‘stack up’ on each other. For the forager it can mean that the carefully-planned excursion to the beach to take advantage of the low water of a Spring Tide is scuppered by a strong onshore wind pushing the water further up the beach than expected.
Coastline Shape
Coves, narrow inlets and estuaries can trap water and hold it for longer than the area of coast either side if there is a narrowing or other restriction stopping the water from draining out as the tide recedes. This can be worsened by fresh water draining into a bay or estuary, ‘filling up’ the bay as the sea tries to drain away on a falling tide. Heavy rain somewhere inland combined with a Neap Tide can actually make for an almost negligible tidal range in some places along the North Wales coast – the water from the river fills up the estuary nearly as quickly as it drains away.
[/vc_column_text][vc_column_text]
So what if I can’t wait for the Spring Tide?
If for some reason you are incredibly impatient (or, more likely, you’re only on the coast for a short period and it doesn’t align with the Spring Tides) then there are a number of options open to you. However I must stress that buggering around in even very shallow water can kill you, or at least cause serious injury. Rocks are slippery below the high water mark, they can have hidden holes or openings that can trap legs (or cause you to slip and break something) and the mud of estuaries and shallow bays can entrap you or leave you stranded on a rapidly shrinking sandbar. It’s worth taking care and planning any in-water foraging very carefully.
It SOUNDS like I am being over cautious – but if you want to hear more have a word with your local RNLI or HM Coastguard teams and see if they thing the waters edge is a perfectly safe place to be…
- Snorkeling – I have happily foraged for very fresh and healthy seaweed and had my pick of the edible molluscs,bivalves and gastropods just below the low water mark by snorkeling along with a netted bag in one hand, carefully selecting as I go. This only works in calm and clear-ish waters, but if your wetsuit is up to it and you can handle the cold you can forage on the UK coast year-round. This works best on rocky beaches or areas where there is a sudden change in water depth at the low water mark (otherwise you end up beaching yourself on the bottom most of the time).
- Waders – these are cheaper than ever and there are plenty to choose from. I like these neoprene ones from Bison, but they aren’t the toughest and have a few patches and repair marks. There is a perpetual myth that if you fall into water wearing waders they will ‘drag you to the bottom’. This isn’t quite true, and I have succesfully swam in waders with a ‘swim belt’ several times – but if they do fill with water then it makes it almost impossible to clamber back onto a rocky ledge or a ladder due to the extra weight. They’re only suitable for use up to about knee depth if you want to stay safe – and they can still get snagged or trapped on underwater hazards.
- Bare legs and wading – this is essentially the same as wading in with waders, except without the waders. The water temperature can be tolerable for most of the year, but the real hazards come from your unprotected legs (and maybe feet if barefoot or in sandals) either being injured by sharp rocks (or fishing tackle, or broken glass) or from interacting with something stingy or sharp that dwells in the water – probably jellyfish or the lovely Weever fish.
If you want to make the very most out of any coastal foraging excursion then I strongly recommend just arriving during a falling (ebb) tide, at least 2-3hrs before low tide, and following the water as it receds. This way you find things that have only just been stranded by the receding water and more likely to be healthy and better for collecting.[/vc_column_text][/vc_column][/vc_row][vc_row][vc_column][product_category per_page=”12″ columns=”4″ orderby=”menu_order title” order=”ASC” category=”foraging-courses-uk”][/vc_column][/vc_row]
Survival Tips for Travellers
Tuesday, 30 October 2018

[vc_row][vc_column][vc_column_text]
Survival Tips For Travellers
Quick tips that SHOULD work for anybody travelling to anywhere
Earlier this week I was asked by a writer for an upcoming Lonely Planet book called Travel Goals. The request was for some simple tips on ‘wilderness survival’ and…, well I’ll let you read for yourself:[/vc_column_text][vc_column_text]
I am getting in touch as I am currently looking to include an ‘expert voice’ in a feature I am writing for a new Lonely Planet book called Travel Goals.
The feature is on survival in the wilderness, including around five/six expert tips. I’m afraid, though, that there is a fairly tight turnaround and I would need your input by tomorrow, if possible – so sorry for the short notice!
These are the points I’d love to cover and have your opinion on:
– What would be your top tips for surviving in the wilderness? Please feel free to go into step-by step detail on everything from foraging (and what to watch out for) to lighting a fire without matches, building a shelter, using medicinal plants, using a map and compass, mountain navigation, river crossings, etc. Our aim is to present you as the expert here and hopefully give you (and Wales!) some great exposure.
I look forward to hearing from you.
[/vc_column_text][vc_column_text]As you have probably guessed – what Lonely Planet wanted was somebody to write some unique content for them (for free) and then for them to make money from selling that content as one of the ‘expert voices’ in the book. Apparently they “never pay interviewees (they benefit in terms of exposure)“. Well, quite. Exposure can be a dangerous thing – too much of it and it can kill you. That’s why our survival courses always include some training in awareness and prevention of hypothermia.
However, it prompted me to write this post – are there any generic survival tips I can give for people travelling the globe? Something quick and easy to read and as applicable to someone travelling to Mongolia as it would be to Mali? Tips that would work in Belgium or Belize?
It turns out I can. So here are some of those top travelling survival tips – given away to you for free – but I like you, so it’s OK.[/vc_column_text][/vc_column][/vc_row][vc_row][vc_column][vc_separator][/vc_column][/vc_row][vc_row][vc_column width=”1/4″][vc_single_image image=”7761″ img_size=”medium” alignment=”center”][/vc_column][vc_column width=”3/4″][vc_column_text]
Knowledge weighs nothing
It’s easy to get distracted by shiny equipment and expensive outdoor toys, but the really important survival skills rely on good decision making and improvisation. Basic first aid training is easy to access and the lifesaving basics of being able to clear an airway, stop a major bleed and perform CPR requires only a few hours of training and either very basic or improvised equipment. When I teach people about survival in different environments there is always a lot more time spent on learning how to make good decisions and plan well rather than relying on gear and equipment.
[/vc_column_text][/vc_column][/vc_row][vc_row][vc_column][vc_separator][/vc_column][/vc_row][vc_row][vc_column width=”1/4″][vc_single_image image=”9425″ img_size=”medium” alignment=”center”][/vc_column][vc_column width=”3/4″][vc_column_text]
Pay attention to maps
Unless you’re going out do something like climb a mountain or travel along a certain route it’s unlikely that you will be carrying a detailed map of the area with you. Smartphones and online map sources are great but rely on access to the internet, or at the very least a functioning device with a charged battery. You can at least retain a good idea of what is around you by paying attention to any tourist or information maps you pass – probably found at ‘hub’ sites like fuel stops, railway and bus stations and some tourist sites. You don’t have to memorise each one, but it’s worth checking where important places are relative to your current position – which direction is the nearest town where you are likely to find medical care? Is that waterfall more than, or less than, halfway along the next section of trail? Does this road head more to the north, or more to the east? It may seem trivial at the time but being able to quickly orientate yourself in the direction of the nearest help will remove a lot of confusion and uncertainty from an emergency situation.[/vc_column_text][/vc_column][/vc_row][vc_row][vc_column][vc_separator][/vc_column][/vc_row][vc_row][vc_column width=”1/4″][vc_single_image image=”7157″ img_size=”medium” alignment=”center”][/vc_column][vc_column width=”3/4″][vc_column_text]
Carry the fire with you
If you are travelling to somewhere where there is an outside chance that if you are stranded you may need to light a fire to save your life then carry some form of firelighting with you. This could just be a box of matches, but it would be better to carry something that’s easy to use, is reliable and doesn’t weigh very much. It’s also worth taking something to help get that fire going – dry firewood can always be gathered without cutting tools, but finding dry tinder can be very hard in some environments. When I travel to places like that I take several cigarette lighters (the type with a spark wheel) and scatter them throughout my kit along with some strips of bicycle innertube. They’re cheap, light and small and you can put one in your first aid kit, one in your rucksack lid and one in something you ALWAYS have with you – like the bag you carry your camera in perhaps?[/vc_column_text][/vc_column][/vc_row][vc_row][vc_column][vc_separator][/vc_column][/vc_row][vc_row][vc_column width=”1/4″][vc_single_image image=”9043″ img_size=”medium” alignment=”center”][/vc_column][vc_column width=”3/4″][vc_column_text]
File a ‘flight plan’
When travelling in remote places away from other humans and access to reliable communications the best chance of someone getting help to you when you need is from somebody reporting you missing or overdue. If you are planning on returning to a hostel or other accommodation after completing a hike or other excursion see if there is a facility for you to leave notes of your intended route, your details and when you expect to be home. That way if you don’t return then there is at least SOMEBODY who will send help to the right area. You MUST make sure that you check in with that person when you get back from your trip – plenty of SAR missions have been sent out in search of somebody who had just forgotten to tell their accommodation that they were back safely![/vc_column_text][/vc_column][/vc_row][vc_row][vc_column][vc_separator][/vc_column][/vc_row][vc_row][vc_column width=”1/4″][vc_single_image image=”8976″ img_size=”medium” alignment=”center”][/vc_column][vc_column width=”3/4″][vc_column_text]
You don’t have to go far to get into trouble
When most people start to think about ‘survival situations’ they tend to picture themselves as a castaway on some strangely uninhabited island or shivering atop a remote mountain. The reality is more likely to come from doing something fairly ‘safe’, like hiking along a trail not too far from a busy tourist area or exploring an area away from where you left your kit. A broken ankle or just misplaced footwear can incapacitate you very quickly in a place where you thought was ‘just a short walk’. Don’t assume the survival situation will be a big, dramatic moment – it’s going to arrive dressed up as something fairly boring and ordinary. Consider the ‘penalty of failure’ for what you’re about to do – although considering and working within that risk are an important part of any adventure.[/vc_column_text][/vc_column][/vc_row][vc_row][vc_column][vc_separator][/vc_column][/vc_row][vc_row][vc_column][vc_column_text]
Make Good Decisions at the Right Times
Survival training is fun. It often involves knives and fire and learning weird and fun skills in the woods or halfway up a mountain. But that’s not the lesson that we hope our course participants take away with them – what we want is for them to take away one VERY important lesson:
MAKE
GOOD
DECISIONS
Good decisions before you go out. Good decisions whilst you are there. Good decisions when you are back at home and planning the next trip. That’s all it is really – and the single best survival tip I can give any traveller is to learn how to make good decisions. That might mean learning about the potential environmental risks of the country you are travelling to – or how to do some basic first aid so you can make good decisions about whcih way round D,R,A,B, and C go.
I can outline every potential survival situation here, but you can take a good look at where you’re going to, what you’re planning to do when you get there and then decide if you are equipped to make those decisions yet.
[/vc_column_text][/vc_column][/vc_row][vc_row][vc_column][vc_column_text]
Some of our public survival courses
[/vc_column_text][product_category per_page=”12″ columns=”4″ orderby=”rand” order=”ASC” category=”survival-courses”][/vc_column][/vc_row]
- Published in All Blog Posts, Articles, Bushcraft General, Emergency and Safety, EST Framework, Mountain General, Personal, Skills, Survival
Sharpening Bushcraft Knives and Axes – a 2018 update
Friday, 10 August 2018

[vc_row][vc_column][vc_column_text]
A guide to sharpening axes and knives for bushcraft and the outdoors
The equipment and techniques we use to sharpen our equipment at home and at camp
[/vc_column_text][/vc_column][/vc_row][vc_row][vc_column width=”2/3″][vc_column_text]This isn’t the first article on the blog about the equipment we use for sharpening knives and axes. The last one was quite short and was mostly just a list of the equipment – but I have been meaning to write out a more in-depth guide. We cover knife and axe sharpening at different levels on our bushcraft and campcraft courses, and it’s one of those subjects where the course participants ‘lean in’ to the topic – most of those who attend the course have tried to sharpen their own equipment and had, shall we say, a variety of results? Sometimes at the end of that lecture or presentation I have been handed a knife or axe that could be a lot sharper than it currently is and have been asked for advice on how to improve it, and if we have time I will show that person how to regain the shape and edge they want. As one of the instructor team said during our most recent Woodcrafter course – “what the hell did you do that guy’s axe? Last time I saw it you could have used it as a spoon and now it’s shaving the hairs off a nettle!“
I need to state a few things from the outset – first, I’m not a ‘knife guy’. I don’t collect knives, and I don’t buy knives to put in a display case. That is not to denigrate or to criticise those who do – it’s just that I have enough hobbies and collections to fill my time (and home) and knives, axes and similar items have been, quite literally, the tools of my trade. I use my cutting tools weekly, both on courses and for tasks at home – my morning exercise today was snedding, crosscutting and splitting several dozen kgs of firewood for the logburner in the office, using a chainsaw, forest axe and maul that have all been sharpened or fettled by myself recently. I use knives and axes, and teach others how to use them within an ‘outdoors’ context – but I know many other people who care much more about the subject than I do and will have strong opinions on everything that follows.
I also need to acknowledge that there are many different ways to achieve the same thing when it comes to tool sharpening, and a quick Google search would bring up dozens of techniques and variations – each written by somebody who swears that their way is the ‘true’ method.
This is, as with many things on the internet, complete cobblers.
When it comes to teaching a complex skill like sharpening any good instructor should acknowledge that there are often multiple ways of achieving the same thing. Generally speaking, if someone says that “THIS is the only way to do this…” then it’s likely that:
- They don’t know another way of doing it, because they have a limited range of experience
- They have an external pressure on them teaching ‘that way’ of doing things – i.e. they need to keep to a strict syllabus or lesson plan, often seen in military training
- They are selling you ‘that way’ of doing things, usually to go along with the equipment they are selling
In short – there are several techniques and methods that can achieve the same thing. Some are certainly easier for novice users, or work more efficiently with certain blade shapes – but if you find one method works best for you and your tools, you can repeat that process time and again and recognise when you have achieved what you wanted then that’s absolutely fine.[/vc_column_text][/vc_column][vc_column width=”1/3″][vc_single_image image=”9255″ img_size=”medium” add_caption=”yes” alignment=”center”][vc_single_image image=”9261″ img_size=”medium” add_caption=”yes” alignment=”center”][vc_single_image image=”9260″ img_size=”medium” add_caption=”yes” alignment=”center”][vc_single_image image=”9262″ img_size=”medium” add_caption=”yes” alignment=”center”][/vc_column][/vc_row][vc_row][vc_column][vc_column_text]
Stage 1 – Shaping the Blade
In most cases you will only need to perform this stage if the knife or axe is VERY blunt, needs to be reshaped or has a dent/ding in the edge of the blade that needs to be removed (well, the material either side needs to be removed to match it). It is often performed with a file, either one dedicated for use with outdoor cutting tools or a general machinist/metalworking file.
This is the most aggressive stage in the sharpening process and care needs to be taken. All sharpening processes involve removing material from the blade, but when you are using a file or very coarse stone you can quickly grind away more material than you wanted to. Each stroke needs to be deliberate and assessed and done to a plan.
Remember also to only use hand tools unless you have access to dedicated grinding and honing machines for this stage – power tools like grinders will unevenly heat the blade, changing the chemistry of the steel and ruining the ‘temper’ of the steel. Cutting tools like knives or axes are made from steel or alloys that have been carefully heated and shaped to maintain a balance between hardness and shapeability – something that can be sharpened to a fine edge but is resilient enough to not chip or dent the moment it is used to cut something.
Knives
It’s rare that you will need to reshape or repair a knife blade with a file but it can be useful if you need to change a knife ‘grind’ from a convex to a bevel shape – it’s still unlikely that a general user will reprofile a knife in this way. I have repaired knife blades with a file though, removing material from across the length of the blade until it has dropped to the same level of the ding. It can also be useful for reinstating a point on the knife, and area that can be tricky to sharpen and easily dulled by repeated ‘stabbing’ of material or game/fish preparation.
A file can also be useful for ensuring the ‘spine’ of a knife has a 90° edge, vital for use with a ferro rod.
Axes
This is where you are more likely to use a file, as the force used to swing an axe can easily put a significant dent into an edge if it comes across a hard spot in the wood, or misses and hits a stone in the ground. I once managed to ding an axe when I hit a bolt that was buried in a small tree – at some point someone had bolted/screwed a sign to the tree and the tree had regrown around it.
Using a File on an Axe or Knife
I favour longer, flat files, such as those used for sharpening chainsaws (for dropping the height of the cutter guides, not the round ones used on the cutters themselves). I hold the knife or axe on a stump or other flat surface where I can hold it steady and push the file over the edge from behind – i.e. my hand stays behind the cutting edge and I DO NOT file towards the edge. It can be done that way but it does have a significant risk of slipping with the file and plunging your fingers into the blade.
Work carefully and steadily and be wary of removing too much material or making a gouge in the blade. Maintain the original angle of the cutting edge and replicate the effort on the other side of the blade – it is very easy to end up with an asymmetric blade when using a file.
I wear leather gloves when possible, and work in good light. A head torch can help, but there is no substitute for moving out from under the trees to a clearing where you can carefully examine what you are doing.
Cleaning a blade
If your knife or axe has seen some heavy use, particularly with woods or materials that can ‘stain’ the blade or leave deposits on the surface, then it’s probably a good idea to clean them from the blade before beginning to sharpen it. Depending on what it is you’re trying to remove it could prevent the blade from properly contacting with the sharpening stone, it could prevent the blade from cutting through material effectively or just carry on corroding into the steel.
There are several ways you can clean the blade, but my favourite is to use either an abrasive block (the Garryflex blocks are great) or an abrasive paper. Just be careful to not be too enthusiastic with your actions as you could end up dulling the edge of the blade or cutting yourself through a bit of careless finger placement. [/vc_column_text][vc_row_inner][vc_column_inner width=”1/2″][vc_single_image image=”9291″ img_size=”medium” add_caption=”yes” alignment=”center”][/vc_column_inner][vc_column_inner width=”1/2″][vc_single_image image=”9286″ img_size=”medium” add_caption=”yes” alignment=”center”][/vc_column_inner][/vc_row_inner][/vc_column][/vc_row][vc_row][vc_column][vc_column_text]
Stage 2 – Sharpening Stones
This is the stage in the sharpening process where most people begin, and with good reason – if you knife/axe is the right ‘shape’ but just blunt then you do not need to go through the heavy work with a file to regrind the blade.
As mentioned above – any sharpening of a blade involves removing material until you achieved the desired angle. The way you remove that material matters when it comes to cutting effectiveness, and there are a number of ways to achieve the desired level of sharpness.
All ‘sharpening stones’ (including stones plucked from a riverbed or shore) are an abrasive, and harder than the steel/metal of the knife or axe. By moving the blade across the stone you grind away material from the blade – although you may also remove material from the stone as well. Some stones require the use of a fluid or lubricant, normally water or some kind of oil, to aid the process. Some stones (increasingly difficult/expensive to obtain) are made from naturally-occurring material, others from a composite of materials, some artificial and some naturally-sourced.
Most stones are graded by ‘grit’, with a number denoting the grit. The smaller the number the more coarse the stone (and the more aggressively it will remove the material from the blade) – usually starting at about 250 for knife sharpening and moving on up to around 3-5000 or even higher.
The aim is to move from a coarse grit (small number) to a fine grit (large number) with several steps between. As you progress through the steps you remove some of the scratches/scoring made by the step before and create a uniform cutting edge.
[/vc_column_text][vc_column_text css=”.vc_custom_1533896498483{padding-top: 5px !important;padding-right: 5px !important;padding-bottom: 5px !important;padding-left: 5px !important;background-color: #eaeaea !important;}”]
Sharpening Stone Types
There are several commonly available sharpening stones, and hundreds of commercial products making use of these types of stone within their designs.
Whetstones (Oil Stones) – can be made from natural stone (usually Novaculite, AKA Arkansasa Oilstone) or synthetically using an abrasive such as silicon carbide or aluminium oxide. The synthetic variety are often sold as double sided, with a finer grit on one side and a coarser grit on the other. They are relatively cheap and robust, although heavy. They do not necessarily NEED the use of a lubricant (I use 3-in-1 oil) but this does help with the movement of the blade across the stone and remove swarf (material removed from the blade that may prevent the blade touching the stone evenly or even blocking the ‘pores’ of the stone that have the abrasive effect).
Japanese Water Stones – these are mostly made as synthetic product using naturally-occurring stone and are seen by many as being the ‘ultimate’ way of sharpening a blade – but I’ve personally had as good a result with an oilstone. There is certainly a strong cultural association with these Japanese stones, and there is a whole world of nagura, Shapton, Debado and Ao Toishithat you could dive into if you so wished. The grit sizes range from around 400 up to 12000 which takes you well into ‘polishing’ territory. These stones tend to be quite heavy but robust, and most require immersion in water prior to use (using water as a lubricant – never use oil on a water stone).
Diamond Stones – diamond has been used industrially for sharpening and cutting applications for a long time now, making use of the hardness of diamond and the relatively low cost of it in granule form. It is usually a coating on top of a steel plate, often with a plastic or resin surround – they often look a little like a cheese grater. These ‘stones’ can be used to sharpen a blade directly or even used to ‘true’ a sharpening stone – i.e. make it back into a flat surface, removing the depression often formed by repeated grinding and sharpening. They do not require the use of lubricant and have a long service life.
Abrasive Paper – high-quality abrasive and polishing papers, often bonded onto glass or flat wood. This is the method associated with the term ‘scary sharp‘ and is inexpensive and simple to master. It works best with blades that have a ‘flat’ bevel and where the whole blade can be run across the surface. It works very well with woodworking tools (chisels etc) but can be modified for use with an axe or knife.
Sharpening Tools – these sharpening kits and items are often one of the above types of stone set into a jig or pre-defined shape. The best types are ones that can accommodate various angles and knife shapes and use good materials – but there are several terrible sharpening kits on the market – beware and read several independent reviews before purchasing if you can.[/vc_column_text][vc_row_inner][vc_column_inner width=”1/3″][vc_single_image image=”9284″ img_size=”medium” add_caption=”yes” alignment=”center”][/vc_column_inner][vc_column_inner width=”1/3″][vc_single_image image=”9296″ img_size=”medium” add_caption=”yes” alignment=”center”][/vc_column_inner][vc_column_inner width=”1/3″][vc_single_image image=”9297″ img_size=”medium” add_caption=”yes” alignment=”center”][/vc_column_inner][/vc_row_inner][vc_column_text]
Sharpening Stone Technique (Knife)
Fortunately, despite the slightly confusing array of sharpening stones available on the market, the technique for actually sharpening a knife on a stone is fairly simple and common to most types of stone. The key points are:
- Ensure that whatever you do to one side you do to the other – ideally in alternating strokes
- Be consistent with your angles, pressure and movements to avoid imbalanced blade shapes
- Be conscious of where the cutting edge of the blade is relative to your hands and body etc
Sharpening Strokes
- Position yourself so you can stay comfortably in that position for a while, and place the stone on a flat, stable surface. When in the woods/field it can be tricky to find such a surface – tree stumps, logs, rocks, equipment cases and even the bonnet of a Land Rover have all been used by me in the past. The key is stability, flatness and a comfortable working height.
- Start with the ‘coarse’ grit of whatever stone system you are using and place the blade edge on the surface of the stone so that the very edge is touching the stone. You will need to know what kind of blade ‘grind’ you knife has in order to decide where that final flat surface you need to lay on the stone actually is. A simple test is to see if there is a shadow or ‘gap’ between the metal of the blade and the surface of the stone – if there’s a gap you need to tile the blade a little further. The angle is key, as too shallow an angle will remove material in the wrong place, and too steep an angle will actually make the knife blunter.
- Move the blade across the stone as if you are trying to take a slice off the top of the stone itself. Start at one end of the stone, aiming to finish at the other end of the stone having moved the entire length of the blade over the stone in a single pass. This will require care and practice to ensure you maintain the angle of the blade throughout the stroke length – most outdoor-oriented knives have a curve at one end of the blade, requiring the user to lift the handle of the knife to maintain the angle.
- After completing the stroke you can repeat, or turn the knife and perform the same action on the other side of the blade. When sharpening a knife on a stone all actions have to be repeated for the opposing side. Most people end up with a sharpening ‘pattern’ – mine is outlined below.
Push or Pull?
There are several schools of thought about whether a knife should be pushed across a stone with the cutting edge as the ‘leading’ edge of the blade, or whether it should be dragged, i.e. the cutting edge ‘trails’ over the stone. There is also a debate about whether you should ‘push’ the knife in the same direction (normally away from you, swapping the knife from hand to hand to maintain direction and angle) or if you should ‘push’ it away from you on one stroke, then turn the knife and ‘push’ it back towards you to sharpen the other side. The consensus seems to be for ‘push’ over ‘pull/drag’, but with a split over which way to perform that ‘push’ action.
Knife grind/shape certainly comes into it, with scandi and convex grinds easier maybe to sharpen with a ‘push’ and other grinds with a drag. Personal preference and a host of other factors come into play – so if you find a technique that you replicate time and again, it works for your equipment and you understand WHY it works then I wouldn’t worry too much about it.[/vc_column_text][vc_row_inner][vc_column_inner width=”1/3″][vc_single_image image=”9281″ img_size=”medium” add_caption=”yes” alignment=”center”][/vc_column_inner][vc_column_inner width=”1/3″][vc_single_image image=”9282″ img_size=”medium” add_caption=”yes” alignment=”center”][/vc_column_inner][vc_column_inner width=”1/3″][vc_single_image image=”9283″ img_size=”medium” add_caption=”yes” alignment=”center”][/vc_column_inner][/vc_row_inner][vc_column_text]
Sharpening Stone Technique (Axe)
Most axes you are going to come across in a bushcraft, campcraft and outdoor context will have a convex grind, and also be a bit too cumbersome to bring to a bench sharpening stone. There are several versions of the ‘hockey puck’ axe sharpening stones on the market – I use the Gransfors Bruks Yxsten/Axestone but others are available.
The technique with these stones is to sharpen the length of the blade in a circular motion, being careful to keep fingers out of the way. Again – all actions performed on one side of the blade should be repeated on the other, and a progression from coarse to fine grit sizes will ensure a sharp edge free from scratches and abrasion marks can be achieved.[/vc_column_text][/vc_column][/vc_row][vc_row][vc_column][vc_column_text]
Stage 3 – Polishing and Stropping
Once you have progressed through the sharpening stones you have you SHOULD already have a sharp blade – but it could be sharper, especially for fine work with wood or for skinning animals and game preparation.
The point where sharpening stops and polishing begins with regards to cutting tools is a little… fuzzy. As you progress through to around 3000 and higher you should start to see a ‘shiny’ surface on the area you have been sharpening. Scratches left behind by the earlier sharpening steps have begun to disappear and the surface will be a lot smoother.
There may also be a burr that develops at the very edge of the blade – a strip of metal that is the result of the grinding process of sharpening. Stropping removes this without further grinding of the edge.
The next stage normally involves the use of a ‘strop’ – usually a piece of leather, often in conjunction with a polishing compound like Autosol or similar.
A strop can be free-hanging (i.e. not attached to any surface, or just anchored at the ends) or bonded to a surface, usually a wooden board. The leather needs to be thick enough to ‘hold’ the polishing compound and some people look for a thicker leather as it can ‘wrap’ around the edge of the blade. An additional layer of foam between the leather and a the board can help with this effect –
Technique for stropping knives and axes
As with using a sharpening stone, the technique for stropping involves putting equal work into both sides. It’s best to ‘drag’ the blade as this helps remove the burr. It’s also very difficult to do it any other way as the blade would cut into the leather.
You’ll get better results with more strokes, and 50-100 strokes across the strop is what I aim for. If your strop is mounted to a wooden board you can keep the blade still and move the strop across it – but be careful to maintain the angle and not ‘roll’ over the edge of the blade. It’s very easy to undo all of the hard work you’ve put in already!
[/vc_column_text][vc_row_inner][vc_column_inner width=”1/3″][vc_single_image image=”9298″ img_size=”medium” add_caption=”yes” alignment=”center”][/vc_column_inner][vc_column_inner width=”1/3″][vc_single_image image=”9287″ img_size=”medium” add_caption=”yes” alignment=”center”][/vc_column_inner][vc_column_inner width=”1/3″][vc_single_image image=”9285″ img_size=”medium” add_caption=”yes” alignment=”center”][/vc_column_inner][/vc_row_inner][/vc_column][/vc_row][vc_row][vc_column width=”2/3″][vc_column_text]
Aftercare and Oiling
If you have performed the above steps correctly you SHOULD have a sharp blade with a smooth and consistent edge. It’s good practice to finish the day with a sharp cutting tool, and often my work days end with a sharpening session. Starting a long day with a set of sharp and well-maintained tools is always a morale boost, and doubly so if you weren’t the last person to use that tool.
Corrosion Prevention
If you have a carbon steel axe or knife (i.e. something that can rust) then you will need to perform some kind of post-sharpening oiling or corrosion prevention before putting it away. There are a number of things you can use to prevent corrosion on a knife or axe blade:
- Oil – something that can be applied safely to the blade that won’t evaporate or solidify (or turn rancid). I use either 3-in-1 oil or a silicone gun oil on my blades, but you may want to consider using a food-grade mineral oil for blades that will be used for food.
- Wax – either ordinary candle wax, beeswax or a dedicated corrosion-prevention product like Renaissance Wax (used in museums etc).
The key thing is to ensure that you treat the whole blade, but not excessively. A small amount of oil on a rag or piece of kitchen towel is normally sufficient. If your knife has a leather sheath (or leather mask on an axe) then the leather will probably begin to be impregnated by the oil and help prevent corrosion when stored for a longer period.
I tend to use mineral oil on my knives that live in leather sheaths, gun oil (that creates a thicker, corrosion-resistant layer on an uncovered steel surface) on knives and axes that are uncovered or in plastic sheaths (like Moras, Hultafors etc) and wax on other carbon steel surface (saws etc).[/vc_column_text][/vc_column][vc_column width=”1/3″][vc_single_image image=”9293″ img_size=”medium” add_caption=”yes” alignment=”center”][/vc_column][/vc_row][vc_row][vc_column width=”1/3″][vc_single_image image=”9275″ img_size=”medium” add_caption=”yes” alignment=”center”][/vc_column][vc_column width=”1/3″][vc_single_image image=”9276″ img_size=”medium” add_caption=”yes” alignment=”center”][/vc_column][vc_column width=”1/3″][vc_single_image image=”9277″ img_size=”medium” add_caption=”yes” alignment=”center”][/vc_column][/vc_row][vc_row css=”.vc_custom_1533897160026{padding: 5px !important;background-color: #eaeaea !important;}”][vc_column][vc_column_text]
My Sharpening Methods
The above is intended as a general guide to the separate stages of the sharpening process for most user types, and (hopefully) answers to some of the frequently asked sharpening questions. Below are my current methods for sharpening axes and knives for bushcraft and other outdoor activities at home and in the field.
Knife (at home/workshop)
The below steps are performed at a workbench with good lighting:
- Visually inspect edge for damage (looking for reflective spots along the edge, possibly with a loupe/jeweller’s lens if one is available). If no damage then proceed to Step 3.
- If damaged then begin to file back the blade to a level where the ding/dent is no longer visible
- 800 grit water stone – 10 strokes in one direction then 10 in other, then 10 alternating strokes. Repeat at least once.
- 1200 grit water stone – 10 strokes in one direction, one stroke in other, then another 10. Repeat for other side, then 20 alternating strokes.
- 5000 grit water stone – 10 strokes in one direction, one stroke in other, then another 10. Repeat for other side, then 20 alternating strokes.
- Strop the knife over a leather strop using Tormek paste. The strop is bonded to a thin layer of foam on a flat oak board.
Knife (in camp)
The below steps are performed on a tree stump or equipment case if possible, but the flattest, most stable surface I can find. If no flat surface is available then I will try and do it carefully by hand, but accept that it will be harder to get the same quality of sharpness. If I know that I will be performing a lot of carving and woodworking tasks at the camp then I will carry a more comprehensive sharpening kit, but I usually carry as a bare minimum a ‘pocket’ diamond or oil stone. there is always a balance to be struck between the amount of equipment you are willing to carry vs what you can realistically achieve with minimal equipment:
- Visually inspect edge for damage (looking for reflective spots along the edge, possibly with a loupe/jeweller’s lens if one is available). If no damage then proceed to Step 3.
- If damaged then begin to file back the blade to a level where the ding/dent is no longer visible
- 300 grit diamond stone (DMT folding type) – 10 strokes in one direction then 10 in other, then 10 alternating strokes. Repeat at least once.
- 650 grit diamond stone – 10 strokes in one direction, one stroke in other, then another 10. Repeat for other side, then 20 alternating strokes.
- 1200 grit abrasive paper on a board (if carried) – 10 strokes in one direction, 10 in other then 10 alternating. Must be ‘dragged’ or paper will catch and tear.
- Strop the knife over a leather strop (using Tormek paste if carried). The strop is either a dedicated strip of leather or even a leather belt.
Axe (at home or in camp)
The process for sharpening my axes is very similar in camp or at home – either way I normally take the sharpening stone to the axe rather than laying the stone down and moving the axe across it. The only difference may be that I use a (soft) vise or clamp to hold the axe securely if filing the edge at home:
- Visually inspect edge for damage (looking for reflective spots along the edge, possibly with a loupe/jeweller’s lens if one is available). If no damage then proceed to Step 3.
- If damaged then begin to file back the blade to a level where the ding/dent is no longer visible
- 180 grit axestone – careful rotational strokes along one edge, trying to replicate on both sides and maintain a balance in the shape.
- 600 grit axestone – as above, with extra care due to increasingly sharp edge
- 1200 grit abrasive paper on a board – use eye to estimate how much work you have done on one side, but use colour change in metal/reflection to estimate how much has been done in order to match on other side.
- 2500 grit abrasive paper on a board – as above
- Strop the knife using a leather bonded to an oak board using Tormek paste.
Essentially the stage are the same – progressive movement through from a coarse abrasive to a finer one and finishing with a ‘polishing’ stage using a leather strop. Consideration is given to how much equipment can be carried and, realistically how sharp you can get your tools when working from a camp. I can usually achieve a ‘shaving sharp’ edge using a diamond stone or axestone on a well-maintained blade with access to leather for stropping, but I am realistic about my expectations when it comes to working far from the trappings of civilisation (and my workshop…)[/vc_column_text][/vc_column][/vc_row][vc_row][vc_column width=”2/3″][vc_column_text]
How sharp does it need to be?
Depends on what you’re doing with it…
The point to where a blade is ‘sharp enough’ is subjective and varies from tool to tool, and is often dependent on the task you are going to perform with it. My wood carving knives are orders of magnitude sharper than my splitting maul, but my felling and woodworking axes are usually sharp enough to shave with (although I don’t recommend it). If my splitting maul was much sharper then I would likely dent the edge whenever I hit a knot in the wood (or miss and hit the ground), but my carving knives need to be that sharp so that I can remove fine layers of wood without much force and do so delicately and carefully.
As a very general rule I go and sharpen the blade of a cutting tool as soon as I find that I have to put in more effort than I expected to perform that task. A good number of the minor cuts and scars on my hands have come from using more force than was necessary with a slightly blunt tool. It’s a hard-won lesson, but it makes you appreciate the importance of a sharp tool.
For some tools that need a lot of force to use effectively (splitting mauls and larger axes normally, plus some machetes/parangs) there can be a point where the tool is too sharp. By this I mean that the edge could be slightly blunter and still perform the required task, but the consequences of a mistimed strike or swing could be at best a damaged tool – and at worse a damaged limb. I will leave it to the reader to decide how sharp their cutting tool should be, but does EVERY item in your kit need to be sharp enough to shave a gooseberry, or are you creating a potential safety issue by making everything that narrow/sharp?
[/vc_column_text][/vc_column][vc_column width=”1/3″][vc_single_image image=”9295″ img_size=”medium” add_caption=”yes” alignment=”center”][/vc_column][/vc_row][vc_row][vc_column][vc_column_text]
Testing the sharpness of a cutting edge
There are a couple of tests I use, although I will steer the novice user towards some rather than others. Any time you bring a sharp cutting tool into close proximity with your skin and flesh you are increasing the risk of an injury. Unless you are 100% confident in your abilities then stick with one of the methods that doesn’t involve testing the edge by shaving your arm or your fingernail!
We don’t have many disclaimers or warnings on this blog – but if you are swinging cutting tools around you need to be aware of the potential risks of things going wrong, and position yourself, your knife/axe and anybody watching accordingly.
- The Paper Test – take a piece of A4 printer paper (I use 80gsm stuff, straight from the printer in the office) and hold one corner, with the paper in landscape orientation. Holding the knife in your dominant hand (i.e. the had you write with normally) try and take a swipe at the corner of the paper. If you can take the tip of the corner off in one swipe without the paper bunching up or tearing then your knife or axe is sharp enough for most tasks, including carving. If you can take several (careful) swipes and remove stripe after stripe of the paper then you can be confident that your blade is sharp – although you may need to quickly perform the stropping stage again as paper is great for blunting a knife!
- The Onion Test – this one takes a little practice but is a good test if you are sharpening a knife for food prep, and it also works on ripe tomatoes and starchy potatoes. If the knife can ‘fall’ through the onion with little effort, cutting through the individual layers without crushing them together and no ‘notchy’ resistance then it’s pretty sharp. A slightly mad variation on this test is to put the knife blade-upwards on a chopping board and drop a cherry tomato onto it from about 30cm above. If the cherry tomato lands on the blade and cuts through, partially or wholly, then the knife is at the ‘scary’ end of the sharpness spectrum.
- The Wood Test – AKA the Featherstick Test. This is a good one when in the field and a quick test of a blade edge is required. Take a quartered log (i.e. something that has been split in two, then that half has been split again) and try to make a fine, curling shaving from the corner. If you can do this two or three times then it is sharp enough for most tasks.
- The Shaving Test – this works best on hairy forearms, and stay away from anywhere else on the body! If you can shave the fine hairs from the outside of a forearm with minimal effort then that blade is, of course, shaving-sharp. The potential risks with this method include cutting into the flesh (with possible infection as a result) and even the risk of hitting something VERY important, like a major blood vessel or a tendon.
- The Fingerprint Test – once again, a risky strategy. Turn the blade upwards and LIGHTLY place a fingertip on the blade. If you can feel the individual ridges of your fingertip ACROSS the blade edge then you are certainly holding a sharp tool – but DO NOT run your finger along the edge. I heard a story from a client about them watching an experienced ‘woodsman’ and outdoor gear reviewer at a trade show take a new knife from a vendor and go to perform this test – but instead absent-mindedly ran their finger ALONG the blade instead. The bloodstains apparently remained on that patch of carpet for the rest of the trade show.
- The Fingernail Test – as with the above, one of the outcomes of getting this wrong involves blood and missing/damaged flesh. Stick out your index finger and lay the knife on it perpendicular to the surface. If the blade leaves a mark without any effort required from the user then it is, again, at the ‘scary’ end of the sharpness spectrum. DO NOT slide the knife blade around or put any pressure on it – fingernails aren’t that thick and they are easily cut through.
With any of the tests above there is the potential risk of injury – but that risk is much lower when the material you are testing is not part of your body. The Paper Test and the Wood Test are probably the safest and most easily performed in a camp/outdoor environment.[/vc_column_text][/vc_column][/vc_row][vc_row][vc_column][vc_column_text]
Another Method
This is a video we shot with green woodworker Doug Don of Heartwood Treen a couple of years ago. In it he takes a factory-fresh Hultafors axe and brings the edge up to a razor-sharpness with a mirrored edge – all using cheap materials.[/vc_column_text][vc_video link=”https://youtu.be/39zvVKnFFao” align=”center”][/vc_column][/vc_row][vc_row][vc_column][vc_column_text]
Some of our related courses
[/vc_column_text][product_category per_page=”12″ columns=”4″ orderby=”rand” order=”ASC” category=”bushcraft-courses”][/vc_column][/vc_row][vc_row][vc_column width=”1/4″][vc_raw_html]JTNDaWZyYW1lJTIwc3R5bGUlM0QlMjJ3aWR0aCUzQTEyMHB4JTNCaGVpZ2h0JTNBMjQwcHglM0IlMjIlMjBtYXJnaW53aWR0aCUzRCUyMjAlMjIlMjBtYXJnaW5oZWlnaHQlM0QlMjIwJTIyJTIwc2Nyb2xsaW5nJTNEJTIybm8lMjIlMjBmcmFtZWJvcmRlciUzRCUyMjAlMjIlMjBzcmMlM0QlMjIlMkYlMkZ3cy1ldS5hbWF6b24tYWRzeXN0ZW0uY29tJTJGd2lkZ2V0cyUyRnElM0ZTZXJ2aWNlVmVyc2lvbiUzRDIwMDcwODIyJTI2T25lSlMlM0QxJTI2T3BlcmF0aW9uJTNER2V0QWRIdG1sJTI2TWFya2V0UGxhY2UlM0RHQiUyNnNvdXJjZSUzRHNzJTI2cmVmJTNEYXNfc3NfbGlfdGlsJTI2YWRfdHlwZSUzRHByb2R1Y3RfbGluayUyNnRyYWNraW5nX2lkJTNEb3JpZ2lvdXRkbzA1LTIxJTI2bGFuZ3VhZ2UlM0Rlbl9HQiUyNm1hcmtldHBsYWNlJTNEYW1hem9uJTI2cmVnaW9uJTNER0IlMjZwbGFjZW1lbnQlM0RCMDAwMDRXRlRXJTI2YXNpbnMlM0RCMDAwMDRXRlRXJTI2bGlua0lkJTNEZWFmMGQ5NTAyMzAzYjI2MGI3NTQxZWI2MGZlZDdlMTYlMjZzaG93X2JvcmRlciUzRHRydWUlMjZsaW5rX29wZW5zX2luX25ld193aW5kb3clM0R0cnVlJTIyJTNFJTNDJTJGaWZyYW1lJTNF[/vc_raw_html][/vc_column][vc_column width=”1/4″][vc_raw_html]JTNDaWZyYW1lJTIwc3R5bGUlM0QlMjJ3aWR0aCUzQTEyMHB4JTNCaGVpZ2h0JTNBMjQwcHglM0IlMjIlMjBtYXJnaW53aWR0aCUzRCUyMjAlMjIlMjBtYXJnaW5oZWlnaHQlM0QlMjIwJTIyJTIwc2Nyb2xsaW5nJTNEJTIybm8lMjIlMjBmcmFtZWJvcmRlciUzRCUyMjAlMjIlMjBzcmMlM0QlMjIlMkYlMkZ3cy1ldS5hbWF6b24tYWRzeXN0ZW0uY29tJTJGd2lkZ2V0cyUyRnElM0ZTZXJ2aWNlVmVyc2lvbiUzRDIwMDcwODIyJTI2T25lSlMlM0QxJTI2T3BlcmF0aW9uJTNER2V0QWRIdG1sJTI2TWFya2V0UGxhY2UlM0RHQiUyNnNvdXJjZSUzRHNzJTI2cmVmJTNEYXNfc3NfbGlfdGlsJTI2YWRfdHlwZSUzRHByb2R1Y3RfbGluayUyNnRyYWNraW5nX2lkJTNEb3JpZ2lvdXRkbzA1LTIxJTI2bGFuZ3VhZ2UlM0Rlbl9HQiUyNm1hcmtldHBsYWNlJTNEYW1hem9uJTI2cmVnaW9uJTNER0IlMjZwbGFjZW1lbnQlM0RCMDc1WVZOSFpYJTI2YXNpbnMlM0RCMDc1WVZOSFpYJTI2bGlua0lkJTNEZGIyNDRlYTA5MThjNzJjMDhkODRiN2RkYjg2YzcyMDAlMjZzaG93X2JvcmRlciUzRHRydWUlMjZsaW5rX29wZW5zX2luX25ld193aW5kb3clM0R0cnVlJTIyJTNFJTNDJTJGaWZyYW1lJTNF[/vc_raw_html][/vc_column][vc_column width=”1/4″][vc_raw_html]JTNDaWZyYW1lJTIwc3R5bGUlM0QlMjJ3aWR0aCUzQTEyMHB4JTNCaGVpZ2h0JTNBMjQwcHglM0IlMjIlMjBtYXJnaW53aWR0aCUzRCUyMjAlMjIlMjBtYXJnaW5oZWlnaHQlM0QlMjIwJTIyJTIwc2Nyb2xsaW5nJTNEJTIybm8lMjIlMjBmcmFtZWJvcmRlciUzRCUyMjAlMjIlMjBzcmMlM0QlMjIlMkYlMkZ3cy1ldS5hbWF6b24tYWRzeXN0ZW0uY29tJTJGd2lkZ2V0cyUyRnElM0ZTZXJ2aWNlVmVyc2lvbiUzRDIwMDcwODIyJTI2T25lSlMlM0QxJTI2T3BlcmF0aW9uJTNER2V0QWRIdG1sJTI2TWFya2V0UGxhY2UlM0RHQiUyNnNvdXJjZSUzRHNzJTI2cmVmJTNEYXNfc3NfbGlfdGlsJTI2YWRfdHlwZSUzRHByb2R1Y3RfbGluayUyNnRyYWNraW5nX2lkJTNEb3JpZ2lvdXRkbzA1LTIxJTI2bGFuZ3VhZ2UlM0Rlbl9HQiUyNm1hcmtldHBsYWNlJTNEYW1hem9uJTI2cmVnaW9uJTNER0IlMjZwbGFjZW1lbnQlM0RCMDA0NzMyQlNBJTI2YXNpbnMlM0RCMDA0NzMyQlNBJTI2bGlua0lkJTNEMWNiNTMwMGU2NjU1NDZiMDY1OWU1NzkzN2Q3Mzg2NTclMjZzaG93X2JvcmRlciUzRHRydWUlMjZsaW5rX29wZW5zX2luX25ld193aW5kb3clM0R0cnVlJTIyJTNFJTNDJTJGaWZyYW1lJTNF[/vc_raw_html][/vc_column][vc_column width=”1/4″][vc_raw_html]JTNDaWZyYW1lJTIwc3R5bGUlM0QlMjJ3aWR0aCUzQTEyMHB4JTNCaGVpZ2h0JTNBMjQwcHglM0IlMjIlMjBtYXJnaW53aWR0aCUzRCUyMjAlMjIlMjBtYXJnaW5oZWlnaHQlM0QlMjIwJTIyJTIwc2Nyb2xsaW5nJTNEJTIybm8lMjIlMjBmcmFtZWJvcmRlciUzRCUyMjAlMjIlMjBzcmMlM0QlMjIlMkYlMkZ3cy1ldS5hbWF6b24tYWRzeXN0ZW0uY29tJTJGd2lkZ2V0cyUyRnElM0ZTZXJ2aWNlVmVyc2lvbiUzRDIwMDcwODIyJTI2T25lSlMlM0QxJTI2T3BlcmF0aW9uJTNER2V0QWRIdG1sJTI2TWFya2V0UGxhY2UlM0RHQiUyNnNvdXJjZSUzRHNzJTI2cmVmJTNEYXNfc3NfbGlfdGlsJTI2YWRfdHlwZSUzRHByb2R1Y3RfbGluayUyNnRyYWNraW5nX2lkJTNEb3JpZ2lvdXRkbzA1LTIxJTI2bGFuZ3VhZ2UlM0Rlbl9HQiUyNm1hcmtldHBsYWNlJTNEYW1hem9uJTI2cmVnaW9uJTNER0IlMjZwbGFjZW1lbnQlM0RCMDAwMUs5Wk1TJTI2YXNpbnMlM0RCMDAwMUs5Wk1TJTI2bGlua0lkJTNEY2YwZjllMWU4YjFlNjc4YzA3N2RjMGI5MWM0OGM4Y2ElMjZzaG93X2JvcmRlciUzRHRydWUlMjZsaW5rX29wZW5zX2luX25ld193aW5kb3clM0R0cnVlJTIyJTNFJTNDJTJGaWZyYW1lJTNF[/vc_raw_html][/vc_column][/vc_row][vc_row][vc_column width=”1/4″][vc_raw_html]JTNDaWZyYW1lJTIwc3R5bGUlM0QlMjJ3aWR0aCUzQTEyMHB4JTNCaGVpZ2h0JTNBMjQwcHglM0IlMjIlMjBtYXJnaW53aWR0aCUzRCUyMjAlMjIlMjBtYXJnaW5oZWlnaHQlM0QlMjIwJTIyJTIwc2Nyb2xsaW5nJTNEJTIybm8lMjIlMjBmcmFtZWJvcmRlciUzRCUyMjAlMjIlMjBzcmMlM0QlMjIlMkYlMkZ3cy1ldS5hbWF6b24tYWRzeXN0ZW0uY29tJTJGd2lkZ2V0cyUyRnElM0ZTZXJ2aWNlVmVyc2lvbiUzRDIwMDcwODIyJTI2T25lSlMlM0QxJTI2T3BlcmF0aW9uJTNER2V0QWRIdG1sJTI2TWFya2V0UGxhY2UlM0RHQiUyNnNvdXJjZSUzRHNzJTI2cmVmJTNEYXNfc3NfbGlfdGlsJTI2YWRfdHlwZSUzRHByb2R1Y3RfbGluayUyNnRyYWNraW5nX2lkJTNEb3JpZ2lvdXRkbzA1LTIxJTI2bGFuZ3VhZ2UlM0Rlbl9HQiUyNm1hcmtldHBsYWNlJTNEYW1hem9uJTI2cmVnaW9uJTNER0IlMjZwbGFjZW1lbnQlM0RCMDAzQlVWMjI2JTI2YXNpbnMlM0RCMDAzQlVWMjI2JTI2bGlua0lkJTNEYTAyNmI4NGIxYzM2N2M4Y2I3YWEzMzc4NTMzNTZlMDYlMjZzaG93X2JvcmRlciUzRHRydWUlMjZsaW5rX29wZW5zX2luX25ld193aW5kb3clM0R0cnVlJTIyJTNFJTNDJTJGaWZyYW1lJTNF[/vc_raw_html][/vc_column][vc_column width=”1/4″][vc_raw_html]JTNDaWZyYW1lJTIwc3R5bGUlM0QlMjJ3aWR0aCUzQTEyMHB4JTNCaGVpZ2h0JTNBMjQwcHglM0IlMjIlMjBtYXJnaW53aWR0aCUzRCUyMjAlMjIlMjBtYXJnaW5oZWlnaHQlM0QlMjIwJTIyJTIwc2Nyb2xsaW5nJTNEJTIybm8lMjIlMjBmcmFtZWJvcmRlciUzRCUyMjAlMjIlMjBzcmMlM0QlMjIlMkYlMkZ3cy1ldS5hbWF6b24tYWRzeXN0ZW0uY29tJTJGd2lkZ2V0cyUyRnElM0ZTZXJ2aWNlVmVyc2lvbiUzRDIwMDcwODIyJTI2T25lSlMlM0QxJTI2T3BlcmF0aW9uJTNER2V0QWRIdG1sJTI2TWFya2V0UGxhY2UlM0RHQiUyNnNvdXJjZSUzRHNzJTI2cmVmJTNEYXNfc3NfbGlfdGlsJTI2YWRfdHlwZSUzRHByb2R1Y3RfbGluayUyNnRyYWNraW5nX2lkJTNEb3JpZ2lvdXRkbzA1LTIxJTI2bGFuZ3VhZ2UlM0Rlbl9HQiUyNm1hcmtldHBsYWNlJTNEYW1hem9uJTI2cmVnaW9uJTNER0IlMjZwbGFjZW1lbnQlM0RCMDA1MDRJNkxHJTI2YXNpbnMlM0RCMDA1MDRJNkxHJTI2bGlua0lkJTNEMTk2YmUxY2YwNTE4NDgwZjRmOWVhNzYxMWY4MGZmNzklMjZzaG93X2JvcmRlciUzRHRydWUlMjZsaW5rX29wZW5zX2luX25ld193aW5kb3clM0R0cnVlJTIyJTNFJTNDJTJGaWZyYW1lJTNF[/vc_raw_html][/vc_column][vc_column width=”1/4″][vc_raw_html]JTNDaWZyYW1lJTIwc3R5bGUlM0QlMjJ3aWR0aCUzQTEyMHB4JTNCaGVpZ2h0JTNBMjQwcHglM0IlMjIlMjBtYXJnaW53aWR0aCUzRCUyMjAlMjIlMjBtYXJnaW5oZWlnaHQlM0QlMjIwJTIyJTIwc2Nyb2xsaW5nJTNEJTIybm8lMjIlMjBmcmFtZWJvcmRlciUzRCUyMjAlMjIlMjBzcmMlM0QlMjIlMkYlMkZ3cy1ldS5hbWF6b24tYWRzeXN0ZW0uY29tJTJGd2lkZ2V0cyUyRnElM0ZTZXJ2aWNlVmVyc2lvbiUzRDIwMDcwODIyJTI2T25lSlMlM0QxJTI2T3BlcmF0aW9uJTNER2V0QWRIdG1sJTI2TWFya2V0UGxhY2UlM0RHQiUyNnNvdXJjZSUzRHNzJTI2cmVmJTNEYXNfc3NfbGlfdGlsJTI2YWRfdHlwZSUzRHByb2R1Y3RfbGluayUyNnRyYWNraW5nX2lkJTNEb3JpZ2lvdXRkbzA1LTIxJTI2bGFuZ3VhZ2UlM0Rlbl9HQiUyNm1hcmtldHBsYWNlJTNEYW1hem9uJTI2cmVnaW9uJTNER0IlMjZwbGFjZW1lbnQlM0RCMDc4WEI2QldYJTI2YXNpbnMlM0RCMDc4WEI2QldYJTI2bGlua0lkJTNEMzY4MmU3YzM0NmMyMTRlMjIxZjk0Nzg3ZjMxOTJiZDMlMjZzaG93X2JvcmRlciUzRHRydWUlMjZsaW5rX29wZW5zX2luX25ld193aW5kb3clM0R0cnVlJTIyJTNFJTNDJTJGaWZyYW1lJTNF[/vc_raw_html][/vc_column][vc_column width=”1/4″][vc_raw_html]JTNDaWZyYW1lJTIwc3R5bGUlM0QlMjJ3aWR0aCUzQTEyMHB4JTNCaGVpZ2h0JTNBMjQwcHglM0IlMjIlMjBtYXJnaW53aWR0aCUzRCUyMjAlMjIlMjBtYXJnaW5oZWlnaHQlM0QlMjIwJTIyJTIwc2Nyb2xsaW5nJTNEJTIybm8lMjIlMjBmcmFtZWJvcmRlciUzRCUyMjAlMjIlMjBzcmMlM0QlMjIlMkYlMkZ3cy1ldS5hbWF6b24tYWRzeXN0ZW0uY29tJTJGd2lkZ2V0cyUyRnElM0ZTZXJ2aWNlVmVyc2lvbiUzRDIwMDcwODIyJTI2T25lSlMlM0QxJTI2T3BlcmF0aW9uJTNER2V0QWRIdG1sJTI2TWFya2V0UGxhY2UlM0RHQiUyNnNvdXJjZSUzRHNzJTI2cmVmJTNEYXNfc3NfbGlfdGlsJTI2YWRfdHlwZSUzRHByb2R1Y3RfbGluayUyNnRyYWNraW5nX2lkJTNEb3JpZ2lvdXRkbzA1LTIxJTI2bGFuZ3VhZ2UlM0Rlbl9HQiUyNm1hcmtldHBsYWNlJTNEYW1hem9uJTI2cmVnaW9uJTNER0IlMjZwbGFjZW1lbnQlM0RCMDAzWEoxT0RNJTI2YXNpbnMlM0RCMDAzWEoxT0RNJTI2bGlua0lkJTNENGQ4MzYzN2Y5OTRlNDYwNWI1MzljMWFlZTI0ZGU2ZGElMjZzaG93X2JvcmRlciUzRHRydWUlMjZsaW5rX29wZW5zX2luX25ld193aW5kb3clM0R0cnVlJTIyJTNFJTNDJTJGaWZyYW1lJTNF[/vc_raw_html][/vc_column][/vc_row][vc_row][vc_column width=”1/4″][vc_raw_html]JTNDaWZyYW1lJTIwc3R5bGUlM0QlMjJ3aWR0aCUzQTEyMHB4JTNCaGVpZ2h0JTNBMjQwcHglM0IlMjIlMjBtYXJnaW53aWR0aCUzRCUyMjAlMjIlMjBtYXJnaW5oZWlnaHQlM0QlMjIwJTIyJTIwc2Nyb2xsaW5nJTNEJTIybm8lMjIlMjBmcmFtZWJvcmRlciUzRCUyMjAlMjIlMjBzcmMlM0QlMjIlMkYlMkZ3cy1ldS5hbWF6b24tYWRzeXN0ZW0uY29tJTJGd2lkZ2V0cyUyRnElM0ZTZXJ2aWNlVmVyc2lvbiUzRDIwMDcwODIyJTI2T25lSlMlM0QxJTI2T3BlcmF0aW9uJTNER2V0QWRIdG1sJTI2TWFya2V0UGxhY2UlM0RHQiUyNnNvdXJjZSUzRHNzJTI2cmVmJTNEYXNfc3NfbGlfdGlsJTI2YWRfdHlwZSUzRHByb2R1Y3RfbGluayUyNnRyYWNraW5nX2lkJTNEb3JpZ2lvdXRkbzA1LTIxJTI2bGFuZ3VhZ2UlM0Rlbl9HQiUyNm1hcmtldHBsYWNlJTNEYW1hem9uJTI2cmVnaW9uJTNER0IlMjZwbGFjZW1lbnQlM0RCMDFBR0MwNlZZJTI2YXNpbnMlM0RCMDFBR0MwNlZZJTI2bGlua0lkJTNEMTI2MWE3ZGI3ZGFkYmU4YTdlZmM1OTU2NDg0NmI5Y2IlMjZzaG93X2JvcmRlciUzRHRydWUlMjZsaW5rX29wZW5zX2luX25ld193aW5kb3clM0R0cnVlJTIyJTNFJTNDJTJGaWZyYW1lJTNF[/vc_raw_html][/vc_column][vc_column width=”1/4″][vc_raw_html]JTNDaWZyYW1lJTIwc3R5bGUlM0QlMjJ3aWR0aCUzQTEyMHB4JTNCaGVpZ2h0JTNBMjQwcHglM0IlMjIlMjBtYXJnaW53aWR0aCUzRCUyMjAlMjIlMjBtYXJnaW5oZWlnaHQlM0QlMjIwJTIyJTIwc2Nyb2xsaW5nJTNEJTIybm8lMjIlMjBmcmFtZWJvcmRlciUzRCUyMjAlMjIlMjBzcmMlM0QlMjIlMkYlMkZ3cy1ldS5hbWF6b24tYWRzeXN0ZW0uY29tJTJGd2lkZ2V0cyUyRnElM0ZTZXJ2aWNlVmVyc2lvbiUzRDIwMDcwODIyJTI2T25lSlMlM0QxJTI2T3BlcmF0aW9uJTNER2V0QWRIdG1sJTI2TWFya2V0UGxhY2UlM0RHQiUyNnNvdXJjZSUzRHNzJTI2cmVmJTNEYXNfc3NfbGlfdGlsJTI2YWRfdHlwZSUzRHByb2R1Y3RfbGluayUyNnRyYWNraW5nX2lkJTNEb3JpZ2lvdXRkbzA1LTIxJTI2bGFuZ3VhZ2UlM0Rlbl9HQiUyNm1hcmtldHBsYWNlJTNEYW1hem9uJTI2cmVnaW9uJTNER0IlMjZwbGFjZW1lbnQlM0RCMDAxNDlESUJFJTI2YXNpbnMlM0RCMDAxNDlESUJFJTI2bGlua0lkJTNEMGRmMmRmNTdlOGZkM2QyNzYyYzMyNWE4OTJiNWU4NmIlMjZzaG93X2JvcmRlciUzRHRydWUlMjZsaW5rX29wZW5zX2luX25ld193aW5kb3clM0R0cnVlJTIyJTNFJTNDJTJGaWZyYW1lJTNF[/vc_raw_html][/vc_column][vc_column width=”1/4″][vc_raw_html]JTNDaWZyYW1lJTIwc3R5bGUlM0QlMjJ3aWR0aCUzQTEyMHB4JTNCaGVpZ2h0JTNBMjQwcHglM0IlMjIlMjBtYXJnaW53aWR0aCUzRCUyMjAlMjIlMjBtYXJnaW5oZWlnaHQlM0QlMjIwJTIyJTIwc2Nyb2xsaW5nJTNEJTIybm8lMjIlMjBmcmFtZWJvcmRlciUzRCUyMjAlMjIlMjBzcmMlM0QlMjIlMkYlMkZ3cy1ldS5hbWF6b24tYWRzeXN0ZW0uY29tJTJGd2lkZ2V0cyUyRnElM0ZTZXJ2aWNlVmVyc2lvbiUzRDIwMDcwODIyJTI2T25lSlMlM0QxJTI2T3BlcmF0aW9uJTNER2V0QWRIdG1sJTI2TWFya2V0UGxhY2UlM0RHQiUyNnNvdXJjZSUzRHNzJTI2cmVmJTNEYXNfc3NfbGlfdGlsJTI2YWRfdHlwZSUzRHByb2R1Y3RfbGluayUyNnRyYWNraW5nX2lkJTNEb3JpZ2lvdXRkbzA1LTIxJTI2bGFuZ3VhZ2UlM0Rlbl9HQiUyNm1hcmtldHBsYWNlJTNEYW1hem9uJTI2cmVnaW9uJTNER0IlMjZwbGFjZW1lbnQlM0RCMDA3TkhSM0JDJTI2YXNpbnMlM0RCMDA3TkhSM0JDJTI2bGlua0lkJTNEOWQ3OTFkZTIwYTc5YWQxYzlhY2YyNWM3Y2I4ZGE5NDElMjZzaG93X2JvcmRlciUzRHRydWUlMjZsaW5rX29wZW5zX2luX25ld193aW5kb3clM0R0cnVlJTIyJTNFJTNDJTJGaWZyYW1lJTNF[/vc_raw_html][/vc_column][vc_column width=”1/4″][vc_raw_html]JTNDaWZyYW1lJTIwc3R5bGUlM0QlMjJ3aWR0aCUzQTEyMHB4JTNCaGVpZ2h0JTNBMjQwcHglM0IlMjIlMjBtYXJnaW53aWR0aCUzRCUyMjAlMjIlMjBtYXJnaW5oZWlnaHQlM0QlMjIwJTIyJTIwc2Nyb2xsaW5nJTNEJTIybm8lMjIlMjBmcmFtZWJvcmRlciUzRCUyMjAlMjIlMjBzcmMlM0QlMjIlMkYlMkZ3cy1ldS5hbWF6b24tYWRzeXN0ZW0uY29tJTJGd2lkZ2V0cyUyRnElM0ZTZXJ2aWNlVmVyc2lvbiUzRDIwMDcwODIyJTI2T25lSlMlM0QxJTI2T3BlcmF0aW9uJTNER2V0QWRIdG1sJTI2TWFya2V0UGxhY2UlM0RHQiUyNnNvdXJjZSUzRHNzJTI2cmVmJTNEYXNfc3NfbGlfdGlsJTI2YWRfdHlwZSUzRHByb2R1Y3RfbGluayUyNnRyYWNraW5nX2lkJTNEb3JpZ2lvdXRkbzA1LTIxJTI2bGFuZ3VhZ2UlM0Rlbl9HQiUyNm1hcmtldHBsYWNlJTNEYW1hem9uJTI2cmVnaW9uJTNER0IlMjZwbGFjZW1lbnQlM0RCMDA3SVMyS1hNJTI2YXNpbnMlM0RCMDA3SVMyS1hNJTI2bGlua0lkJTNENjcyYmQ1OTgxYWU5NmJjN2RlZTcwZDkzYmRkNmIxM2ElMjZzaG93X2JvcmRlciUzRHRydWUlMjZsaW5rX29wZW5zX2luX25ld193aW5kb3clM0R0cnVlJTIyJTNFJTNDJTJGaWZyYW1lJTNF[/vc_raw_html][/vc_column][/vc_row]
- Published in All Blog Posts, Articles, Bushcraft, Bushcraft General, Mountain General, Personal, Skills, Tools and Equipment
COURSE REPORT: Woodcrafter Course July 2018
Wednesday, 01 August 2018

[vc_row][vc_column][vc_column_text]
COURSE REPORT: Woodcrafter Course July 2018
The Woodcrafter – our original and long-established 2-day bushcraft and campcraft course – remains one of our most popular courses. The July 2018 course was a mixture of rain, sun and smoke – but everyone seemed to survive and have a great time!
The other course photos and report from the July Woodcrafter course can be found over on our new partner site – outdoorprofessional.co.uk.[/vc_column_text][/vc_column][/vc_row][vc_row][vc_column width=”1/4″][vc_single_image image=”9207″ img_size=”medium” alignment=”center”][/vc_column][vc_column width=”1/4″][vc_single_image image=”9211″ img_size=”medium” alignment=”center”][/vc_column][vc_column width=”1/4″][vc_single_image image=”9213″ img_size=”medium” alignment=”center”][/vc_column][vc_column width=”1/4″][vc_single_image image=”9210″ img_size=”medium” alignment=”center”][/vc_column][/vc_row][vc_row][vc_column width=”1/4″][vc_btn title=”Learn more at OutdoorProfessional.co.uk” color=”warning” align=”center” button_block=”true” link=”url:https%3A%2F%2Foutdoorprofessional.co.uk%2Fcampcraft-bushcraft%2Fcourse-report-woodcrafter-l1-campcraft-july-2018%2F||target:%20_blank|”][/vc_column][vc_column width=”3/4″][vc_column_text]
Upcoming Woodcrafter Course Dates
[/vc_column_text][product id=”7338″][/vc_column][/vc_row]
- Published in All Blog Posts, Behind The Scenes, Bushcraft General, Course Reports, EST Framework, Skills
Why tracking doesn’t work for misper SAR in the UK
Wednesday, 13 June 2018

[vc_row][vc_column][vc_single_image image=”8775″ img_size=”large” alignment=”center”][vc_column_text]
Why tracking doesn’t work for Misper SAR in the UK
(And why every SAR team member needs to learn basic tracking skills)
Here we go… this post will attract a minimum of two types of response:
1. “you don’t know what you’re talking about, if your skills were as good as mine you could follow a flea across a glacier”
2. “tracking is too slow/doesn’t work/is overrated”
Well, quite.
Both views have some validity, and that’s the point of this post.
Tracking, within the context of SAR/non-combat scenarios, is often represented by evangelists who want to present tracking as a panacea to locating any human OR by those who have sworn off it having tried the techniques (sold to them on a course) on a live operation and found that it just slows everything down and eats up resources. Each side will defend their own hilltop to the last man – neither attitude being actually that helpful to achieving the end goal.
[/vc_column_text][/vc_column][/vc_row][vc_row][vc_column][vc_column_text]
Looking for Jim
Let’s consider Jim. Jim wasn’t actually called Jim, wasn’t necessarily a him and didn’t necessarily have this motivation – but Jim is roughly based on a real person and a real job.
******
Jim knows this forest well and runs here regularly. He likes to drive into the forest, park at one of the secluded public car parks and head off into the woods for a 5-10km run along the paths and forest roads.
It’s 06:44 and he has just locked the car and has set off on the trail leading to the lake. It’s a last-minute decision but it’s a trail he knows well.
At 08:44 Jim’s wife is wondering what time he will be back. At 11:30 she is really starting to get worried and at 12:37 she tentatively rings 999 and asks for the Police.
By 14:00 a police officer has contacted her to see if Jim has made contact yet. By 15:00 a PolSA (Police Search Advisor) has started to co-ordinate the early response to this incident, and by 17:00 a police officer in a vehicle has discovered Jim’s car in the secluded car park. It’s sat safely amongst the slamming of car doors and shouts of dog walkers, families with kids on bikes and mountain bikers returning or leaving their vehicles at the beginning or end of their forest adventures.
At 17:32 a message is sent through SARCALL to the local volunteer search and rescue team and the incident moves to the next level of response.
******
It’s a fairly standard missing person callout – someone without any previous indications of despondency, medical distress or other factor goes out into a relatively remote area for a short activity and just doesn’t return to their vehicle, and a steady but measured response unfurls from the emergency services – allowing for various scenarios but also not assuming immediately that Jim is dying in a ditch, and it’s most likely to be a miscommunication between Jim and his wife, and Jim is happily doing something blissfully unaware of the multi-agency search developing in the forest.
The volunteer Search and Rescue (volSAR) team will follow their own protocol for calling the team members together, establishing a search control/staging area and gathering other assets – dogs, helicopters, even drones. A Search Manager will speak with the PolSA, Jim‘s wife and possibly anyone else involved in the response thus far. This will lead the Search Manager to come up with a variety of scenarios in the following categories:
- Jim is in the area, but stationary and possibly in medical distress (or worse)
- Jim is in the area but mobile (either in a good cognitive state or otherwise)
- Jim is somewhere completely different (Rest of World)
Search Managers may be good but they are not omniscient so they must focus on the first two categories – Jim is somewhere out there in an area they can search with the resources they have now, and the resources they are likely to have in the future.
So they work out a search area, based on a combination of barriers to travel, previous search incident data for profiles similar to Jim, his own patterns of behaviour and fitness and what can be accomplished in the next few hours and days. They have a Last Known Point (LKP) – Jim‘s car, as he HAD to be there in order to park it and run off somewhere. He did this unseen by anyone else (as far as the Search Manager can know) but it gives them an Initial Planning Point (IPP) to set a radius around and begin the process of planning search areas, calculating probability and the other wizardry and dark arts of Search Theory.
The next steps are a combination of good personal skills exercised by both SAR team members on the ground and their party leaders and data gathering/handling. Search parties are deployed to an area or areas with a brief of what Search Control expects them to do – it might be a ‘hasty’ (fast search along trails and tracks to ensure that the misper isn’t lying in plain sight) or an area search of a section of woodland or open ground marked out on the map. They perform their search brief, return to control and pass on the information they gathered. This feeds back into the search plan and a new tasking might be generated.
Rinse, and repeat. Until either Jim is found or a decision is made to stop searching for Jim.[/vc_column_text][/vc_column][/vc_row][vc_row][vc_column width=”1/3″][vc_single_image image=”8781″ img_size=”300×300″ alignment=”center”][/vc_column][vc_column width=”1/3″][vc_single_image image=”8973″ img_size=”300×300″ add_caption=”yes” alignment=”center”][/vc_column][vc_column width=”1/3″][vc_single_image image=”8972″ img_size=”300×300″ add_caption=”yes” alignment=”center”][/vc_column][/vc_row][vc_row][vc_column][vc_column_text]
Deploying the trackers
The above is probably familiar to anyone involved in misper SAR around the world. A person leaves their car in a busy parking area, heads off into increasingly ‘wild’ terrain and doesn’t return. They had to leave SOME sign of their passage surely, so couldn’t trained trackers be deployed to go out, find those signs of passage and link them together into SOME kind of narrative?
When it comes to looking for humans and the physical signs they leave behind on the ground (training humans to search by scent has been largely unsuccessful and unpleasant for all involved) there are two things a tracker will hope to find:
- Prints (foot or occasionally hand, often referred to as a subject-print) – including partial prints, vague smears on muddy banks and impressions left in soft surfaces
- Physical sign – everything from vegetation bent at unnatural angles and broken off in unusual ways, foliage turned over the wrong way by a trailing foot or hand and even broken cobwebs and a thousand other clues
Finding signs of some human passage through an area isn’t that hard – in a few hours you can train somebody to look for the obvious signs of a track in most terrain. It’s the noise-to-signal ratio that matters – which of these dozen prints or physical signs belong to your misper and which are just the dogwalkers and hikers?
In the above scenario any SAR tracker deployed as part of the search would either hope to find a print or series of prints that they could, with good certainty, assign to Jim and use for tracking further down the trail.
In an ideal world they would be able to find out exactly what brand, model and size of running shoe Jim wore that day, if they had any unique wear patterns and even what clothing he was wearing, which snacks/gels he carried and anything else he might discard by the trailside. They might even be able to get a calibrated photograph of a print from somewhere at Jim‘s home.
It isn’t an ideal world though – and Jim‘s wife doesn’t know what shoes he wore other than “the blue ones”. He’s a size 11, but sometimes 10. He probably took a water bottle but maybe not. She can’t find his expensive GPS watch she bought for him last Christmas though… And so it goes. Information dribbles in over time and analysis is made as to how accurate or useful it is.
On the ground
The gravel area around the car has been heavily trod since Jim was declared missing. Several members of the public parked close by and walked either side of the car, the police poked around the vehicle when they first found it and again when they forced entry to see if there was any clue inside to Jim‘s whereabouts. The volSAR team members had a good poke around too. Any hope of discovering a sterile print is probably lost – but what about further out?
As the laid surface of the car park ends it turns back to mud and soil and there is a chance of finding a print at the start of the various trails that radius out from the parking area. There are plenty of partial prints – from the public, police and volSAR. They are layered down into the damp soil and the most recent start to obscure the previous ones. There is a bottleneck at the start of most trails and the prints cluster together. It takes time and careful examination to find a few candidates that match the vague criteria for a Jim-print: running shoe, roughly UK size 10-11 and laid roughly twelve hours previously. With several possible trails and a limited number of trackers they must make a decision about where to move to next.
Meanwhile the search parties move along the trails, sweep through open areas at a regular spacing and gradually reduce the Probability of Area (POA, the likelihood that Jim is in that bit of woodland or open ground) for their tasked areas. They trample and crush, make new trails through vegetation and turn untouched wilderness into a footpath – but move far ahead and faster than the tracker teams.[/vc_column_text][/vc_column][/vc_row][vc_row][vc_column][vc_single_image image=”8974″ img_size=”large” add_caption=”yes” alignment=”center”][/vc_column][/vc_row][vc_row][vc_column][vc_column_text]
Limited Resources
The enemy for Search Managers is not nature herself or the elements – it’s depletion of limited resources:
Time and Daylight
Jim could be lying somewhere in a poor medical condition and getting worse by the second. Eventually he will reach a point where his recovery is unlikely and then expire. All searches run the possibility of becoming a recovery rather than a rescue if too much time passes before the search subject is located. A slow and methodical search would probably find that misper EVENTUALLY, but the whole point of SAR is to try and locate that person and help them.
The sun is also setting over in the west and it’s not unusual for volSAR to not be called on until the end of the day – to allow enough time for the misper to be located by the initial response, or just wander home under their own steam. As soon as darkness falls the whole job has become harder – reducing the effectiveness of the searchers and potentially compromising their safety.
Personnel Availability
Voluntary SAR teams all suffer the issue of availability of their team members. You don’t join unless you are able to help and attend callouts, but the 24/7 nature of volSAR means that not everybody will be able to attend every callout. Work, family, health and even finances can keep a team member away for part or all of a search and a volSAR team that boasts 50 members might be only able to field 15-25 at one time. Those team members on the ground also have a limited time they can search for – whether due to fatigue/operational effectiveness or just the demands of their ‘real’ lives. Eventually every volSAR team member will need to return home and a Search Manager cannot guarantee how long they will have that team member for. A good Search Manager will start to stack up potential reinforcement and replacements from neighbouring teams as soon as it looks like a search will run for that long.
Skills
Specialist search teams are a boon for any Search Manager, but use of them can pull resources away from other parts of the operation. The moment the search moves to near-water (T6 or T7 terrain) then a decision needs to be made about whether that area is left unsearched or to redploy part of the search teams for water search – something that cannot be done without several team members plus specialist equipment and PPE.
Dogs are another exhaustable resource – they can only work for so long, and although they can cover a large acreage quickly they can still only ‘search’ part of the area at once.
So with the above resources dwindling, does a dedicated tracking cell within a volSAR team actually work? Where and when would they deploy – prior to the hasty teams and when the minimal amount of damage had been done to what trail remains? Are trackers a specialist search asset to be deployed from the SAR toolkit like Swiftwater Rescue Technicians and dogs?
You’re burning daylight and with a limited number of searchers available for the next few hours is it appropriate to separate out a few tracking-trained team members to faff around on the fringes with elastic bands and sticks?[/vc_column_text][/vc_column][/vc_row][vc_row][vc_column width=”1/2″][vc_single_image image=”8975″ img_size=”medium” add_caption=”yes” alignment=”center”][/vc_column][vc_column width=”1/2″][vc_single_image image=”8976″ img_size=”medium” add_caption=”yes” alignment=”center”][/vc_column][/vc_row][vc_row][vc_column][vc_column_text]
The cohesive approach
Although we teach tracking as a distinct skill from search techniques as part of the EST Framework courses I do not think the two can be completely separated. By the very nature of the skills required a good searcher can be a good tracker, and vice versa. The skills of Land-SAR search (searching the cube, staying in formation, personal safety) are all essential skills for a SAR-tracker, but an understanding of the importance of certain patterns (or indeed, breaks in those patterns) can highlight certain things to a tracking-trained searcher.
When a tracker is either looking for a specific print or any relevant sign of passage then she or he can pick them out from the background scenery and analyse them – if they are also searching then they can do that in-context and feedback information to their Party Leader of Search Control.
Basic tracking skills and an understanding of both the benefits and limitations of those skills within a SAR context should be seen as an essential skill for any volSAR ground team member (and indeed, understood by Search Managers and Search Coordinators).
Any sign of Jim?
What if every team member on the ground in this search had been given some basic training in tracking (e.g. how to extrapolate an entire print from several partial prints, or to spot the signs of passage by an adult human through dense vegetation etc) and had been deployed by a Search Manager who also understood this?
What if those initial hasty parties had been on the lookout not only for an adult male runner somewhere within their search radius, but also slowing down to check likely track-traps such as the edges of puddles or choke points between trees? Or if they had performed their first search around the edges of the car park, looking for candidates for a Jim-print?
This is how it SHOULD be done, but rarely is. Tracking is often seen as a separate skill or occasionally an afterthought when previous efforts are proving fruitless – but it should be part of the mindset of any volSAR deployment where the misper could possibly leave sign of their passage. Too much emphasis is often put on looking for the body of the misper, not a 20% partial print that could become the next LKP and shift the whole search in a positive direction.
How to deploy tracking in a SAR operation
This is part of the guidance that we give to candidates on the Level 3 Search Operations Management Course but is relevant for anyone involved in planning search operations and deployment of SAR assets for missing person search:
- Tracking awareness should be seen as a vital skill for all trained searchers deployed on the ground and training should reflect this, challenging team members and preventing skill-fade whilst promoting personal skill development.
- Search teams should be equipped and prepared for tracking re-deployment in the field.
- Acquiring information for tracking-trained search teams should be a vital part of witness and family interview techniques and efforts made to isolate footwear type and shape – social media photos, prints at home and so on.
- Tasking of search parties should reflect the potential usefulness of tracking, and time allowed for an initial search around the IPP for potential print candidates.
- Be ready to re-deploy search teams to another area/track if they discover a potential trail on the ground – this highlights the need for Search Managers to have a good awareness of the limitations of tracking and the relative importance of the information being fed back in to Search Control.
For most applications tracking should be seen as a vital SAR skill, not a specialism and subset of strange folk with feathers sticking out of their gear and castration rings on a trekking pole. Of course training contact time is limited for volSAR teams, but once those skills have been gained they can be maintained fairly easily.
SAR Tracking isn’t THAT hard
Unlike some of my clients, nobody is going to be shooting at you whilst you are tracking within a SAR context. Your search subject is unlikely to be actively trying obscure their tracks or slow pursuers down with traps and IEDs, and they aren’t a small and fast mammal scurrying across a forest floor without even turning over a dead leaf.
Humans (well, ones not trying to avoid capture) are pretty lazy and bumbling. We step into soft mud, scrape our feet across mossy logs and boulders and trample over leaves and twigs crushing them into the floor under our bulk. We wade through long grass and vegetation turning the leaves and blades of grass over to flag our passage and even discard plastic and paper objects from our pockets as we walk.
It’s why our Level 1 Tracking Technician course is run over only 3 days, and that also includes crossover with navigation skills and interoperability with other organisations and a final exercise – tracking shouldn’t be seen as a mysterious and ethereal skill, but nor should it be dismissed out of hand because your deployment plan doesn’t allow for it.[/vc_column_text][/vc_column][/vc_row][vc_row][vc_column][vc_column_text]
TL;DR
Tracking is good and useful within a misper SAR context in the UK, but is often misrepresented by poor deployment and inflexibility of existing deployment procedures. There is also a lack of understanding by Search Managers who see it as an ineffective delay in the search operation and don’t ask pertinent questions when speaking to informants and witnesses. Tracking-awareness should be a vital part of any SAR search party members and be an intrinsic part of the training programme.
Tracking also has many limitations, and more so in the densely-populated UK where volSAR teams have to try and identify a potential subject-print early on in the search rather than hoping to the find the ‘sign of passage’ in the wilderness and following the resultant trail.
It’s also not that hard, and with a bit of training most competent SAR party members can become effective trackers.[/vc_column_text][/vc_column][/vc_row]
- Published in All Blog Posts, Articles, Bushcraft General, Emergency and Safety, EST Framework, Mountain, SAR, Skills, Tracking
2018 UK Knife Law Changes
Tuesday, 01 May 2018

[vc_row][vc_column][vc_column_text]
2018 UK Knife Law Changes
Changes to UK Knife Law and what it means for the outdoor enthusiast
In the past weeks the news has featured several stories on UK knife crimes, knife law and the perception of knives as weapons as well as tools. This was followed by the announcement of a new Offensive Weapons Bill which will begin the process of changing of what is considered a legal knife, where they can be used/carried by the general public and how they can be acquired.
Last year a consultation on offensive and dangerous weapons was published, which caused a lot of discussion online from knife makers, owners and collectors from all sectors.
Whilst this is currently a bill (not yet an Act of Parliament, see the differences here) it is likely that some significant changes are coming for those who collect knives or purchase them for outdoor use.[/vc_column_text][vc_separator][vc_row_inner][vc_column_inner][vc_column_text]
Knives Purchased Online
The big changes are mostly about the types of knives and ‘weapons’ that can be owned in private and where they can be carried, but one change that is likely to have an impact on an outdoor user is a ban on knives being bought online being shipped to a residential address. Exactly how this will work and what workarounds can be created (shipping to a work address, pickup from a nominated place and so on) remains to be seen, but it will add a layer of complexity for those buying knives online.
Flick Knives and One-Handed Opening
Something mentioned in the original consultation document was an update to the definition of what constitutes an (already banned in the U.K.) flick knife:
England, Wales and Scotland
The current definition of flick knives in the Restriction of Offensive Weapons Act 1959 is
outdated and refers to the mechanism that activates the blade being in the handle. We will
delete the reference to the switch blade mechanism being in the handle, as manufacturers
now place the mechanism in a part of the knife that can be argued is part of the blade.
This means the prohibition on the sale, manufacture and importing of flick knives cannot
be circumvented through changes in their design.
Will this include knives with a thumbstud that can be opened with one hand? If so this will include knives that are very useful as rescue tools for climbing, mountaineering and canoeing/kayaking where one-handed operation could be crucial for a lifesaving cutaway from a rope entrapment.
UK Knife Law and EDC
This isn’t the first post we’ve put together on UK knife laws for the outdoor user, but it’s important in a country with strict knife-carry laws to be aware of any changes made and, potentially, how your useful outdoor tool is perceived by someone else.[/vc_column_text][/vc_column_inner][/vc_row_inner][/vc_column][/vc_row][vc_row][vc_column][vc_column_text]
UK Knife Law video on the Original Outdoors Youtube Channel
[/vc_column_text][vc_video link=”https://youtu.be/01yHH7iZuvU” align=”center” css_animation=”none”][/vc_column][/vc_row]
- Published in All Blog Posts, Articles, Bushcraft, Bushcraft General, Foraging, Law and Ethics, Mountain General, Personal, Skills, Tools and Equipment, Videos
GPS, Smartphones and Operational Security – is Strava the only problem?
Wednesday, 07 February 2018

[vc_row][vc_column][vc_single_image image=”8035″ img_size=”full” alignment=”center”][/vc_column][/vc_row][vc_row][vc_column][vc_column_text]
GPS, Smartphones and Operational Security – is Strava the only problem?
[/vc_column_text][/vc_column][/vc_row][vc_row][vc_column][vc_column_text]
The recent hullabaloo over the Strava heatmap reminded me of a strange case from a few years ago…
If you have any kind of interest in GPS, fitness apps, unusual maps or just technology news then you were probably at least vaguely aware of a story about the fitness app Strava and some analysis of the heatmap they published last month. This publicly-viewable heatmap of anonymised user data isn’t new – but the last update was from 2015 data. The 2017 data release included over 1 billion activities and 10 terabytes of raw data. The total distance clocked up was 27 billion KM – 180 times the distance from the Earth to the sun. It’s an impressive piece of user-generated information and it’s quite good fun to see which are the most popular routes to the summit of Snowdon, or the tracks made by people swimming, kayaking or SUP’ing in Llyn Padarn.
There’s also potentially a bit of a security risk – but that’s something I’ve got prior experience of, and it’s still a potential problem for those who work in ‘sensitive’ areas of the world.
The security issues raised over the Strava heatmap started off with Nathan Ruser, an analyst with the Institute for United Conflict Analysts:
Strava is arguably the most popular fitness app in the world, and members of the armed forces are no strangers to running, cycling and swimming to keep fit for their roles at work. It’s no surprise that many of them around the world (both on deployment and at home bases) use the app in the same way every other user does (me included). It’s almost certain that nobody in those roles is using Strava on operations, but running around the perimeter track of the base you’re deployed to is probably OK, right?
Well… although the data in the Strava heatmap is anonymised it does show the outline of that perimeter track. And all of the other tracks, and the access paths between accommodation blocks and admin areas. On bases that sometimes aren’t meant to exist, at least not officially. It’s something that the military forces of the world have probably been vaguely aware of, but it looks like it hasn’t been raised as a specific operational security (opsec) issue until now. I would put good money on there having been some rapid editing of operational procedures with regards to apps, smartphones and how those working and training in operationally-sensitive areas handle their own data. Knowing that the running app on your phone is going to share your movements with the enemy is something of a sobering thought. Strava have released a statement about the issue, and some advice for military personnel.
It’s not just fitness apps – a lot of people are surprised when I show them this link – if you have a Google account (all Android phone users and most of the western world probably do) then there is a good chance your daily position is being logged and uploaded to the Google servers. They even let you see your own personal location timeline – HERE.[/vc_column_text][/vc_column][/vc_row][vc_row][vc_column][vc_separator][/vc_column][/vc_row][vc_row][vc_column width=”1/3″][vc_column_text]
Strava released their global heatmap. 13 trillion GPS points from their users (turning off data sharing is an option). https://t.co/hA6jcxfBQI … It looks very pretty, but not amazing for Op-Sec. US Bases are clearly identifiable and mappable pic.twitter.com/rBgGnOzasq
— Nathan Ruser (@Nrg8000) January 27, 2018
[/vc_column_text][/vc_column][vc_column width=”1/3″][vc_column_text]
If soldiers use the app like normal people do, by turning it on tracking when they go to do exercise, it could be especially dangerous. This particular track looks like it logs a regular jogging route. I shouldn’t be able to establish any Pattern of life info from this far away pic.twitter.com/Rf5mpAKme2
— Nathan Ruser (@Nrg8000) January 27, 2018
[/vc_column_text][/vc_column][vc_column width=”1/3″][vc_column_text]
#stravaheatmap even helps to deanonymize map data: Military site in Germany pic.twitter.com/lpqLEJgS11
— DocMalloc (@DocMalloc) January 30, 2018
[/vc_column_text][/vc_column][/vc_row][vc_row][vc_column][vc_separator][/vc_column][/vc_row][vc_row][vc_column][vc_column_text]
But it’s not just smartphones and Strava – there’s another problem
This whole story reminded me of something that happened with a client of ours a few years ago. It has been long enough, and the story anonymous enough, for me to share it here – especially as it is probably still an overlooked opsec issue.
The advertised public courses on the Original Outdoors site probably only make up 40% of what we actually do. The rest is private training, consultancy and working with individuals and organisations to do something specific. A lot of that work doesn’t make it to the blog or our social media pages because we work under confidentiality agreements and our respect for the privacy, commercial sensitivity and sometimes opsec of those clients. We have worked with private military and security contractors on various things over the years and more than once doing work with GPS devices and navigation training.
There was one training session where I worked with a small group, all seasoned contractors with military backgrounds and who had been deployed to combat areas several times with their previous and current employers. I was about to deliver a session on GPS use and particularly the difference between routes, tracks, POIs and waypoints. One of the contractors handed me his GPS device – a Garmin model with no external connectivity – just an SD card and a port for attaching a data cable. Whilst scrolling through the menu screens and showing the rest of the group we discussed the relative merits of a standalone GPS versus a smartphone with a GPS/mapping app. The opinion of the group was that ‘dumb’ devices that didn’t transmit data to the wider world were more secure and ‘safer’ than smartphones.
Then I opened up the track history of that particular device.
There were several recorded tracks from the country the contractor had recently worked in, including from their base of operations out to various work sites on oil pipelines. Plus a long one that led from their compound to an airport, then another airport, then back to the UK.
Then along several motorways until it arrived at the contractor’s house. Where it squiggled around a bit whilst the GPS hunted for a signal until the battery died – presumably in their kitbag, forgotten until they next went to work.
This wasn’t from their most recent deployment either – they had more recent tracks, both ‘in-country’ and at home in the U.K.[/vc_column_text][/vc_column][/vc_row][vc_row][vc_column][vc_column_text]
Leaving your home address on the battlefield
Can you imagine what was going through that person’s head, realising that they had been carrying a map to their home (and family) around in a device strapped loosely to their belt or their chest rig?
They probably went through a ritual every time they left the gate of the compound to make sure they were as anonymous as they could be, and to separate their work life from their home life as much as they possibly could. They were very careful in how they used social media, and followed strict guidelines from their employer and colleagues about maintaining operational security – all whilst carrying around a map leading directly to everything they held dear in life.
As you would expect, this led to a discussion about deleting tracklogs from GPS devices and a greater understanding of exactly what information their GPS was gathering. I know that particular company has changed their procedures following that training session, and I make it part of the regular briefings when working with similar clients. I now have to mention Strava and fitness apps too I suppose…
It’s very similar to the Strava heatmap issue – a device of convenience being a little too convenient, and the data it gathers giving away more than you would like it to. Just like the Strava problem it can be avoided by understanding the technology used, and diving into the settings of the device to make sure it is only recording your position when you need it to, and that if it is sharing your location with the wider world you turn it off.[/vc_column_text][/vc_column][/vc_row][vc_row][vc_column][vc_column_text]
The Simple Advice
If you’ve read through this blog post and are wondering if it’s something that might affect you then here is the simple advice I give to clients when the subject comes up:
- If it’s a device that doesn’t transmit anything (most GPS devices without wifi or a sim-card slot) then make sure that you start and stop any track logs, don’t just let them run continuously
- If the device transmits information (smartphones, newer GPS devices, smartwatches etc) then pay careful attention to all of the settings of the app/device you are using. Most have the facility to turn off location sharing, or opt-out of sharing anonymised location data
- Be aware of apps running in the background that could be sharing your location – like Google Maps (see your location timeline here)
Being careful with potentially sensitive information is nothing new to those working in the military and security fields – but as technology and the way we use it continues to evolve we need to be more vigilant about what we share – and also what is being shared by those who work with us.[/vc_column_text][/vc_column][/vc_row][vc_row][vc_column width=”1/2″][vc_facebook][/vc_column][vc_column width=”1/2″][vc_tweetmeme share_via=”originaloutdoor” share_recommend=”originaloutdoor” share_hashtag=”stravaheatmap”][/vc_column][/vc_row][vc_row][vc_column width=”1/3″][product id=”7294″][/vc_column][vc_column width=”1/3″][product id=”7253″][/vc_column][vc_column width=”1/3″][product id=”7241″][/vc_column][/vc_row]
- Published in All Blog Posts, Articles, Land Navigation, Personal, Skills
The mystery of the Cwm Tryfan ice axe
Monday, 15 January 2018

The Mystery of the Cwm Tryfan Ice Axe
We found something long-forgotten on the slopes of Tryfan…
So, New Year’s Day 2018… chasing the last of that patch of snowy weather we decided to welcome in the new year with a gentle scramble to the summit of Tryfan (917m) via the Heather Terrace and then the South Ridge. This is a familiar route and we started late, quickly gaining height and feeling the force of the first storm of January.
Rather than Three Men in a Boat we were three men and an ecologist (who is also a girl called Rhian). We didn’t have a dog called Montmorency but we did make do with a cocker spaniel called Darcy.

Darcy and The Doctor
The trip to the summit and back was uneventful (apart from my stirring rendition of Auld Lang Syne on the South summit), but as we descended the path out of Cwm Tryfan alongside the stream leading to Gwern Gof Uchaf something strange occurred…
[divider]
The Discovery
The exact moment of discovery wasn’t quite captured on camera (although it was faithfully recreated for the GoPro in the video below), but it went something like this:
Tom, also known as Dr. Tom (mostly because he claims to be a doctor, but we rarely see evidence of it) ventured a short distance from the well-worn path to relieve himself in the heather. As the rest of the group reached his general location he finished and strode back up to the track. About a metre before reaching the track he spotted something sticking out of the heather and bilberry:

It turned out to be a Grivel ice axe, showing some considerable signs of weathering. It was buried, shaft downwards, in the vegetation and there is nothing to suggest that it had been placed there recently.
So, had Tom just discovered a vintage axe in the vegetation right next to a fairly busy Snowdonia footpath?
After a bit of examination on site Tom shoved it in his pack and we continued our descent – hastened onwards by the promise of hot chocolate at the Siabod Cafe.

Later that evening we examined the axe (aided by beer). It is definitely a Grivel axe, and the wooden shaft showed some significant aging and was consistent with a few decades in the elements (albeit protected by a screen of mountain vegetation). Some very gentle research (aka asking Alex Roddie) suggests that it’s a 1960s model but modified for a slightly dropped pick to suit the changing style of winter climbing in the last half of the 20th century. The surface corrosion wasn’t total so I don’t THINK it can have been left out there longer than a couple of decades, but my knowledge of the corrosion rate of mountaineering gear alloys is sadly lacking.
Tom is claiming stewardship of the axe – as he found it, and he is now armed with a vintage ice axe so probably shouldn’t be argued with…
So if you’re reading this and have any information on either this particular axe (which hundreds of thousands of mountaineers have walked within inches of and not noticed) or just the model or anything else we will happily pass it on to Tom. Please get in touch through the comments below or via email.
[divider]
Location
I was too distracted by the thought of warm sugar and milk served by a grumpy landscape photographer to remember to grab an accurate grid reference, but it was approximately SH 669 595 (although I am happy to be corrected on that).
This is the general area – not far above the fenceline that is crossed near Tryfan Bach:
[divider]
Dramatic re-enactment of the discovery of the axe
[divider]
Gallery


- Published in All Blog Posts, Articles, Behind The Scenes, Personal, Skills
Outdoor Fashion Shoots in Snowdonia
Wednesday, 13 December 2017

[vc_row][vc_column][vc_column_text]
Outdoor Fashion Shoot in Snowdonia
Location Scouting and Location Safety in the mountains of North Wales
[/vc_column_text][/vc_column][/vc_row][vc_row][vc_column][vc_column_text]It seems like 2017 was the summer of location work for Original Outdoors. We have been putting our experience of working in the world of outdoor adventure in North Wales to use as consultants and location scouts for several years, but this was a busy summer for us.
We were contacted by Claudia from German production company Natural Born Explorers for a project they were working on for a European outdoor clothing and equipment retailer. They had already chosen Snowdonia as a general area for their shoot but wanted some help finding locations, gaining permissions and just the logistics of shooting in a different country. After several Skype conversations and emails we narrowed it down to some key areas in the mountains and forests of Northern Snowdonia.
Then it was down to the usual pre-shoot planning – working with landowners to gain permissions for commercial photography on their land, timelines to make sure we had enough time on location to get what the client needed and be in the right place for the ‘golden hour’ at sunset. We also needed to keep an eye on the weather and make sure that the entire crew were equipped for several days in the mountains.[/vc_column_text][/vc_column][/vc_row][vc_row][vc_column width=”1/3″][vc_single_image image=”7885″ img_size=”medium” alignment=”center”][/vc_column][vc_column width=”1/3″][vc_single_image image=”7900″ img_size=”medium” alignment=”center”][/vc_column][vc_column width=”1/3″][vc_single_image image=”7890″ img_size=”medium” alignment=”center”][/vc_column][/vc_row][vc_row][vc_column][vc_column_text]Any plan that relies on the weather behaving itself or natural light falling in a certain way cannot be too rigid, especially in the mountains. In a few hours we can go from 5 metre visibility, to blue skies then back to heavy cloud and rain. If you only have a few days to get the shots required then you need to be flexible and respond to the challenges thrown up. So that’s what we did – we bounced back and forth between locations, chasing the best of the light and hiding from the weather when it came in and making the most of the sun when it showed itself.
The photographer, Lars Schneider, and the rest of the Natural Born Explorers team all showed that they were not only comfortable in the mountains but they were competent outdoorspeople. The locations chosen were not just footpaths and flat ground easily accessible from the roadside, they included rocky scrambles and ridges requiring a walk-in of 2hrs or more.
The Original Outdoors team was also there as a safety backup in case anything went wrong (or to spot the calamity before it occurred) but the only medical or rescue assistance we had to give was to a member of the public who had suffered a lower-leg injury after a rockfall nearby. They literally hobbled down to the middle of our group, where I offered and delivered some first aid and called in mountain rescue to meet them. Other than that the safety kit stayed in the bags and we spent the days eating biscuits and occasionally looking out for incoming clouds![/vc_column_text][/vc_column][/vc_row][vc_row][vc_column width=”1/3″][vc_single_image image=”7908″ img_size=”medium” alignment=”center”][/vc_column][vc_column width=”1/3″][vc_single_image image=”7911″ img_size=”medium” alignment=”center”][/vc_column][vc_column width=”1/3″][vc_single_image image=”7902″ img_size=”medium” alignment=”center”][/vc_column][/vc_row][vc_row][vc_column][vc_column_text]Snowdonia and North Wales as a whole is a smart choice for outdoor adventure brands looking for locations to promote their clothing and equipment. 30 minutes drive from a central point like Betws y Coed could take you to a raging river, rocky mountain top or deep and mossy forest. The diversity of locations, good access and landscapes that look a lot wilder than they might actually be works well for international brands too. If you frame a shot just right, or make sure the background is neutral then that rocky ledge or forest trail could be in Oregon, Patagonia or New Zealand. We have a few days doing similar work lined up for 2018 already, and I suspect that we will be seeing more in the next few months.[/vc_column_text][/vc_column][/vc_row][vc_row][vc_column width=”1/3″][vc_single_image image=”7887″ img_size=”medium” alignment=”center”][/vc_column][vc_column width=”1/3″][vc_single_image image=”7907″ img_size=”medium” alignment=”center”][/vc_column][vc_column width=”1/3″][vc_single_image image=”7910″ img_size=”medium” alignment=”center”][/vc_column][/vc_row][vc_row][vc_column][vc_separator][/vc_column][/vc_row][vc_row][vc_column][vc_media_grid element_width=”3″ grid_id=”vc_gid:1513168937192-fc2cda18-8608-8″ include=”7911,7910,7909,7908,7906,7905,7904,7903,7902,7901,7900,7899,7897,7896,7895,7894,7893,7892,7891,7890,7888,7885,7884,7886″][/vc_column][/vc_row]
- Published in All Blog Posts, Behind The Scenes, Company News, Mountain, Mountain General, Skills
Location Work – 4WDs and Photoshoots in Snowdonia
Sunday, 29 October 2017

[vc_row][vc_column][vc_column_text]
Location Work – 4WDs and Photoshoots in Snowdonia
Behind the scenes on a commercial automotive photoshoot in North Wales
At the beginning of the summer we were contacted by renowned automotive photographer Nigel Harniman for a client project of theirs. The brief was simple – help find some locations in North Wales that matched their client brief, and then help with the unique logistical challenges of shooting commercial photography in the middle of nowhere!
After a couple of days of driving around North Wales and Snowdonia looking at dozens of potential locations they settled on two key sites – one below the Carneddau massif and one across the valley from Snowdon. After negotiation with landowners and relevant stakeholders we formulated a plan – and returned a few weeks later for the shoot itself.[/vc_column_text][vc_separator][vc_row_inner][vc_column_inner width=”1/3″][vc_single_image image=”7731″ img_size=”medium” add_caption=”yes” alignment=”center”][/vc_column_inner][vc_column_inner width=”1/3″][vc_single_image image=”7734″ img_size=”medium” add_caption=”yes” alignment=”center”][/vc_column_inner][vc_column_inner width=”1/3″][vc_single_image image=”7737″ img_size=”medium” add_caption=”yes” alignment=”center”][/vc_column_inner][/vc_row_inner][vc_separator][vc_column_text]This is not the first location shoot we have been involved with – but it is the first involving cars and access by vehicle, not on foot. It adds a veneer of problems that I hadn’t considered before… the first being access. Obviously permission was gained from the landowners – but we still had to get the cars up there! Lots of careful planning and route-finding was needed to make sure that the ‘star’ cars and the logistics vehicles (including our very battered but rugged Trooper) could get to the locations.
The next issue was ecological. These were brand-new factory-fresh vehicles so it’s unlikely that there would be any leaks from cars themselves, but still precautions had to be taken to make sure the vehicles were as clean as possible before heading off the track. I also spent a long time wandering about making sure that we wouldn’t damage any plants or head into terrain where we would leave ruts or damage the ground.
Then there are the problems of weather and lighting. The coastal location of Snowdonia makes for lots of cloud and dramatic skies – but not for stable weather conditions! The first couple of days saw us basking in bright sunshine, but by the end of the week we were dodging thunderstorms and at one point fleeing back down to the valley after an epic downpour.[/vc_column_text][vc_separator][vc_row_inner][vc_column_inner width=”1/3″][vc_single_image image=”7728″ img_size=”medium” add_caption=”yes” alignment=”center”][/vc_column_inner][vc_column_inner width=”1/3″][vc_single_image image=”7729″ img_size=”medium” add_caption=”yes” alignment=”center”][/vc_column_inner][vc_column_inner width=”1/3″][vc_single_image image=”7732″ img_size=”medium” add_caption=”yes” alignment=”center”][/vc_column_inner][/vc_row_inner][vc_separator][vc_column_text]As anyone who has been involved with any kind of TV, film or big media production knows – it isn’t necessarily the most glamorous of events off-camera, and there is a lot of hanging about. However it’s always fascinating to see how things are put together. The sheer amount of preparation and creativity that Nigel and his team puts into the shots is staggering, and as you can see from the Instagram posts below the end-result is worth it.
It’s also a little odd to see the end results in print in magazines ‘in the wild’ with the usual small print and banner titles overlaid on top. There is normally a professional understanding that we won’t really talk about the commercial TV and media projects we’re involved with until the finished product is broadcast or shared with the public. This is usually several months after the work itself, so occasionally they do take us by surprise when we find them in magazines or online in ads.
This wasn’t the only media project we helped out with in North Wales this summer – keep an eye out for more blog posts in the coming weeks as we get the all-clear to publish the behind-the-scenes shots.[/vc_column_text][vc_separator][vc_row_inner][vc_column_inner width=”1/2″][vc_column_text css_animation=”fadeIn”]
[/vc_column_text][/vc_column_inner][vc_column_inner width=”1/2″][vc_column_text css_animation=”fadeIn”]
A post shared by Nigel Harniman (@harnimanphoto) on
[/vc_column_text][/vc_column_inner][/vc_row_inner][/vc_column][/vc_row][vc_row][vc_column][vc_text_separator title=”Behind the scenes”][vc_media_grid element_width=”3″ grid_id=”vc_gid:1510246867696-468cfbb4-07fb-7″ include=”7739,7738,7737,7736,7735,7734,7733,7732,7731,7730,7729,7728,7727,7726,7725,7724″][/vc_column][/vc_row]
- Published in All Blog Posts, Behind The Scenes, Company News, Skills
Do I need to bother with bow drill?
Thursday, 07 September 2017

Bow Drill Skills: Are they worth learning?
One of the skills most associated with the world of ‘bushcraft’ is that of making fire by friction. The image that normally accompanies that description is somebody crouching over a contraption that looks like a fiddle crossed with a rolling pin, furiously sawing back and forth with (ideally) smoke billowing from the base of the device.
This is the ‘bow-drill’ (Bow Drill, Bowdrill, Firedrill, Fire Fiddle etc etc) method and has become inextricably linked with the popular image of bushcraft and survival skills.
We teach this method on our bushcraft courses, and it is often something that clients look forward to and specifically request when we have a free moment in the itinerary and ask them “what next?”.
So we break out some pre-prepared bow drill sets and get down to making some embers…
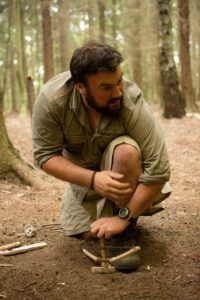
Richard Prideaux demonstrating bow drill technique
I’ve found over the years that the course participants normally pick up three very important things from seeing the demonstrations then having a go for themselves:
– It’s a lot harder than it looks to get a consistent rotation of the drill without something going awry
– It’s physically demanding and needs patience
– Success is not guaranteed
With skill, patience and the right materials an experienced user can normally get an ember with less than a minute of actual ‘drilling’ action but it is dependent on several variables all lining up correctly to achieve that.
Why do people want to learn how to do it?
Here are 3 direct quotes about fire by friction/bow-drill from instructors that I have heard over the years:
“This is the most important outdoor skill you can learn”
“If you lose all of your equipment this will save your life”
“If you can’t do this then you are not a real outdoorsman”
A quick trawl through the various bushcraft/wilderness skills Facebook groups, forums, YouTube channels and magazines will come up with statements and comments that might not be as succinct as those above but are along the same lines. Then there are the hundreds of articles, blog posts and videos offering tips and techniques that will improve your chances of success. “Bow Drill” is now one of the keywords of bushcraft, along with “knife”, “axe” and “Ray Mears”. You can even purchase knives with divots in the handle so that you can use it as a bearing block (the top of the ‘drill’) in a dire survival situation.
There is undoubtedly some merit to the bow drill firelighting technique:
– It mostly makes use of materials from the environment, not items carried
– Components can be replaced as they wear out or are damaged
– Does not require electricity, flammable liquids/gas or metal components to use
It is also a truly ‘primitive skill’ and would have been understood by our paleolithic ancestors (or indeed indigenous people around the world today). In a world before lighters, ferrocerium rods or even steel then fire by friction would have been a skill passed down throughout a community and as important as making a blade or finding edible plants.
For the modern outdoorsperson and enthusiast it is touted as being an “essential bushcraft skill” (see instructor quotes above) and it is both expected by bushcraft course participants and a requisite for all good bushcraft and wilderness skills course providers.
Are Bow Drill skills that useful?
Yes.
No.
Maybe.
It depends.
Deciding if something is actually useful is of course dependent on the intended use. In a world where we do have lighters, matches, ferrocerium rods, chemical firelighting, electronic firelighting (you can have a lot of flammable fun with wire wool and a battery) and dozens of ways of keeping them dry the Bowdrill set becomes a little redundant.
But what if you lose all of your other gear?
There is another quote from an eminent instructor that I think answers this quite eloquently:
“If you are stupid enough to lose your lighter and firestriker and get all of your matches wet then you are probably too stupid to learn how to bow drill”
A real survival situation is something you try to avoid by making good decisions and with careful preparation. If you lose your lighter your fallback shouldn’t be to rip the laces out of your boots and start whittling a drill – it should be to call yourself an idiot and then go get the other lighter from your pack. Or the firesteel on your belt or clipped to your pocket. Because you brought multiple firelighting methods, right?
If you are travelling somewhere that it is quite possible that you will find yourself in a situation where lighting a fire will make a big difference to your immediate health or safety then you need to carry a way of making fire.
If you are travelling somewhere that you will have to light a fire to cook on, purify water or perform other basic tasks then you will need to carry MULTIPLE methods of making fire.
Accidents happen. Kit is lost on river crossings or can fall overboard. You might be separated from your pack or kit due to unforeseen circumstances. Things break or get lost due to carelessness. We’re human and things happen. But in the modern age we have so many cheap, lightweight and reliable firelighting methods that there aren’t many reasons not to carry more than one way of making a spark, a flame or an ember.
If I am hiking, canoeing or otherwise moving or working in an environment where fire is either required or desireable I will have on my person or in my kit:
1. Ferrocerium rod and striker (clipped to trouser pocket loop or belt)
2. Disposable lighter with ferro (‘flint’) striker (normally in pouch on belt or in pocket of PFD if canoeing)
3. Lifeboat/windproof matches (2 or 3 packs in various places in rucksack)
I also normally carry some prepared tinder or similar either in waterproof plastic bags or in a waterproof form (such as strips of bicycle innertube).
So if I lose my firesteel or it breaks in two then I can use my lighter. If I lose that too then I can still light a fire using the matches and warm myself whilst simultaneously deciding if I need to re-examine the decision-making process that led to me losing all of my other kit…
But what if it’s unplanned?
There are of course situations where you can find yourself thrust unexpectedly into a genuine survival situation. However, outside of contrived and survival TV shows like Naked and Afraid or Alone the number of possible scenarios where you will need to make a fire and you have arrived there with no other equipment whatsoever are pretty slim:
The Plane Crash
If you were a passenger on the plane then chances are that you hit the ground somewhere close to, if not actually inside, the aircraft itself. A big pile of jagged metal, flammable liquids and materials and batteries, electrical components and probably SOME survival equipment like flares etc. You have plenty of options to explore before you need to start trying fire by friction.
The Stranded Vehicle
In this scenario it is a broken or stuck car or truck somewhere far from external help. It might be deep in winter or high summer in the desert, but as with the downed aircraft scenario you are basically sat in a big shelter/survival kit. It is powered by flammable liquid and needs a battery to keep the engine and ancillary components running. Also – if you are for some reason travelling through such a remote area why haven’t you thrown in a few emergency items for just this scenario?
The River/The Sea
It’s not beyond the realms of possibility for even an experienced kayaker or canoeist to find themselves washed on a beach or riverbank watching their very expensive canoe or kayak, stuffed with their camping and safety kit, drifting away downstream or on a current. Dressed only in a drysuit (at best), some kind of footwear and a PFD (Personal Flotation Device) what are they going to do? Well, if you have decided that yes, a fire is the thing that you need then you should just grab the small firelighting kit from the pocket of your PFD or belt and get cracking on looking for some dry kindling. You didn’t think of this possibility and have found yourself far from help, paddling alone with no provision for possibly falling out of the canoe? Well, natural selection is still in effect, and your corpse might provide food for another creature at least.
The scenarios could continue, but they all come down to either:
1. You will rarely travel without there being SOME other way of making fire around you
2. If you are travelling in a way that you won’t have other items around you – carry fire WITH you.
The root of all of this is that fire by friction and making a bow drill set should be a long way down your list of solutions when the need for a fire arises. It is fiddly and time consuming to make (especially if you need to make natural cordage), requires a lot of skill to use and success is NOT GUARANTEED. It is also quite wasteful of calories and can be very demoralising if not successful. It can be hard enough to get right when well-fed in ideal conditions under a parachute shelter in some pleasant woodland. There are normally aggravating factors in a survival situation, such as injury, lack of food/water and (if fire is required) the risk of hypothermia. Would you be better off building a simple shelter and getting out of the wind, off the cold ground and conserving body heat and energy?
What if I just want to learn how to do it?
That’s fine. It is very rewarding the first time you get an ember, and I admit that I really enjoy watching someone battle through the multiple failures to get to their first glowing coal in the notch of the hearth board. The point of this post is to highlight the difference between an IMPORTANT SKILL and one that is fun to learn and achieve, not to put you off learning how to do it for yourself.
It is also good to learn a skill that connects us with our ancestors and to start off with a pile of wood and maybe some cord and end with a roaring fire. The first time you see it it looks like a magic trick, and I suspect that is part of the reason that so many are interested in learning how to do it for themselves. The first time I saw it I immediately wanted to try for myself – a very similar thing happened the first time I saw someone turn a bowl on a lathe, shoot a bow or play Tomb Raider (a good indicator of my age/generation!).
So, should I bother to learn how to make and use a bow drill set?
This is normally where the demonstration of the bow drill comes to on our courses. After watching several people fail, succeed, get frustrated and learn patience with the technique the mood of the group can be a little less enthusiastic than it was. At this point I go through the points above – where are you going to use this technique? Is it as easy as you thought it would be? Are other methods easier/more reliable? What is your motivation for learning this skill?
The final decision is of course down to the individual user and it is up to you to form your opinions. I’ll leave you with a few things to consider:
- Are your fireskills good enough to reliably make a fire from a bow-drill ember every time?
- If you’re travelling somewhere you will need to light a fire are you carrying enough backup methods?
- If you lose your kit will you still have a firelighting method on your person?
- What’s your motivation for learning this technique?
- Do you need to improve your skills elsewhere too?
[divider]


- Published in All Blog Posts, Articles, Bushcraft, Bushcraft General, Personal, Skills
Private Expedition Training in North Wales
Tuesday, 05 September 2017

Private Expedition Training with Mike and Wayne
In the winter of 2016 I was contacted by a gentleman (Mike) who was enquiring about the possibility of some bespoke private training. Funnily enough, Mike had found us through the review of the Katadyn Gravity Camp Water Filter we wrote last year. You never know how things will work out…
After a brief conversation Mike explained that he and one or two others were interested in the idea of a week of navigation and expedition skills training with Original Outdoors, with a mix of woodland and mountain environments.
We discussed a few different ideas over the winter months and settled on a syllabus that included:
– map/compass navigation
– natural navigation
– route planning
– resource and logistics for expeditions
– campcraft in different environments
– emergency techniques
The venues for the course would be our basecamp in North Wales on the edge of the Vale of Clwyd and the Carneddau mountains in Northern Snowdonia.
Bespoke training courses are sometimes tricky to pull together. The client/s normally have a general sense of what they want to learn, but I always need to drill down into what the client’s vision is. Are they heading off on a trip to a specific place or environment? Do they need to perform certain tasks when they get there? Will they be able to resupply en-route or does everything need to be packed in? What about medical evacuation and calling for help?
The thing is – planning an expedition or trip for 3 days or 3 months is a similar process. It’s all a matter of scale and understanding the task. For courses like this I can only teach so many practical skills, the rest is all about decision making and having a strategy for dealing with the problems one is likely to encounter. So any bespoke expedition training has to cover as much about planning and contingency as it does about compass work and choosing a tent over a hammock and tarp.
A lot is down to personal preference too – and that cannot be taught, only experienced. The huge range of outdoor gear available these days means that there are nearly millions of combinations of gear one can choose from. Gas stove or meths? Stove or fire? Tarp and bivvy or tarp and hammock? Boots or trail shoes? I know experienced outdoors-people that would argue for hours over those combinations, and each one certain that they had the right idea.
So the week went along roughly as planned, with a minor change of plan to avoid some poor weather. I’ve pulled together some photos of the trip with Mike and Wayne, plus a short video showing what we got up to.
If you have your own idea for some private training or a trip then please do not hesitate to get in touch with us.
[divider]
[divider]


- Published in All Blog Posts, Bushcraft, Bushcraft General, Camping, Course Reports, Mountain, Mountain General, Personal, Skills, Videos
- 1
- 2